Work with Your Document
OCR features several tools to help you work with medical records.
Organize Your Document
The OCR Organize feature lets you take a large, consolidated document and divide it into the logical sections you need for your work. Like all OCR operations, you can always return to the original source document if needed.
OCR Organize uses the same concepts that you use in dealing with long paper faxes, such as a patient history. If you were receiving a fax with a lot of pages, you could spread them out on a table and organize them into stacks and sections labeled with Post-it Notes.
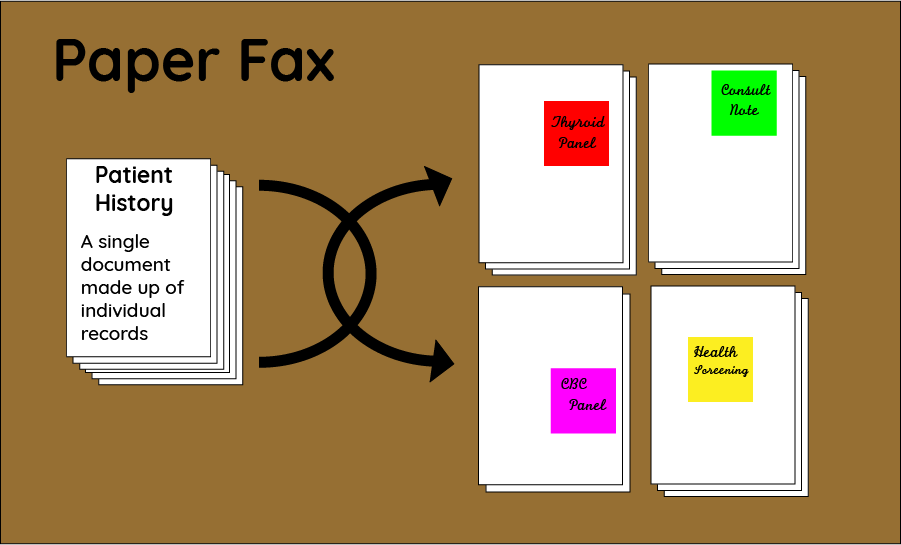
With OCR, you receive the patient history as a large file and organize the file into stacks and sections labeled with classifications.
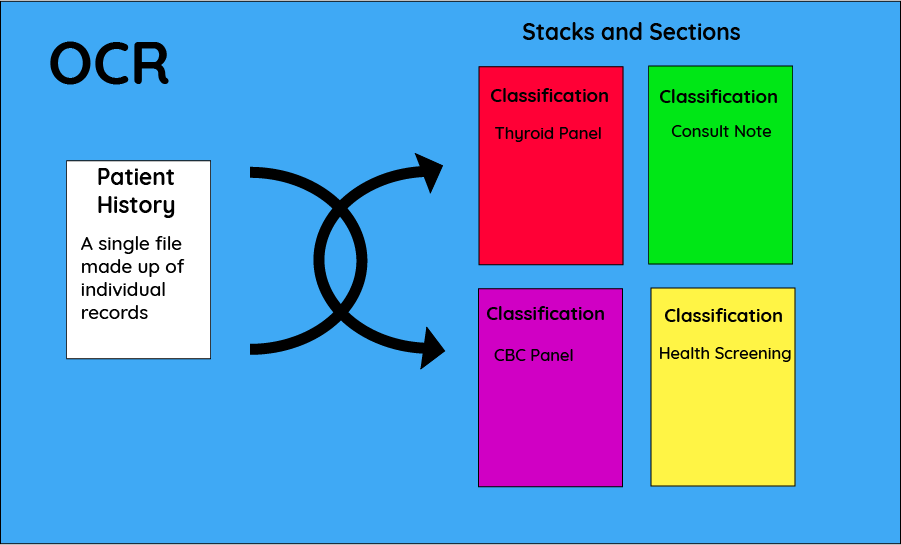
Organize Stacks, Sections and Classifications
-
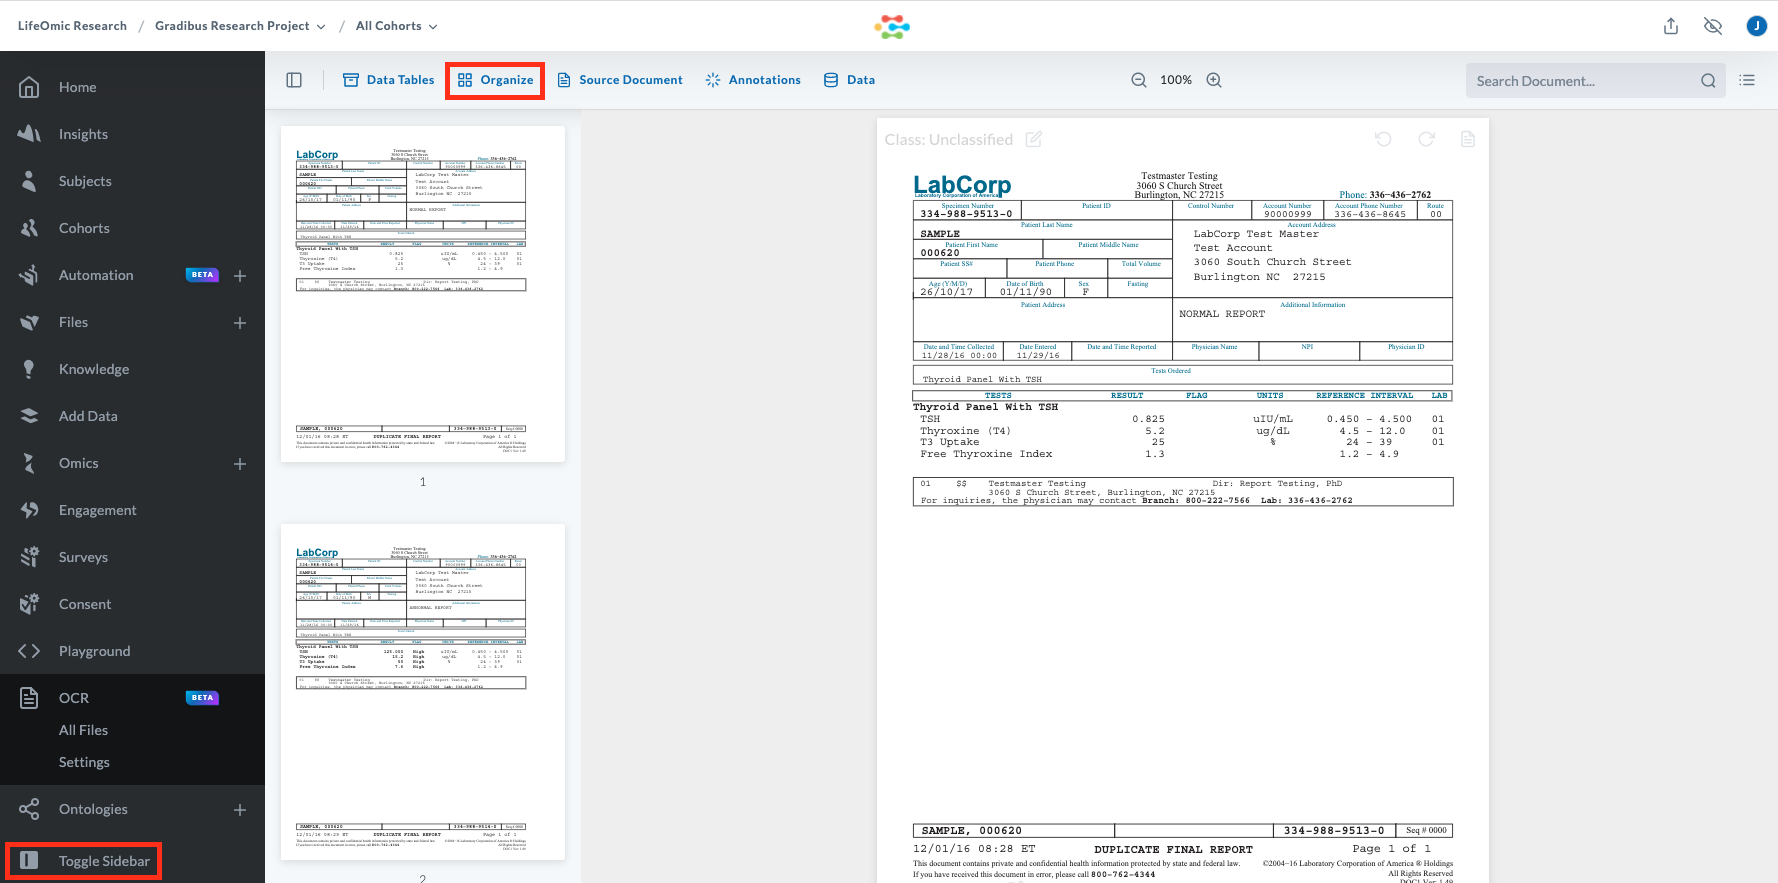
At the bottom of the left-side menu, click the Toggle Sidebar to get more screen space to work with documents.
-
On an open document, at the top of the screen, click the Organize icon .
-
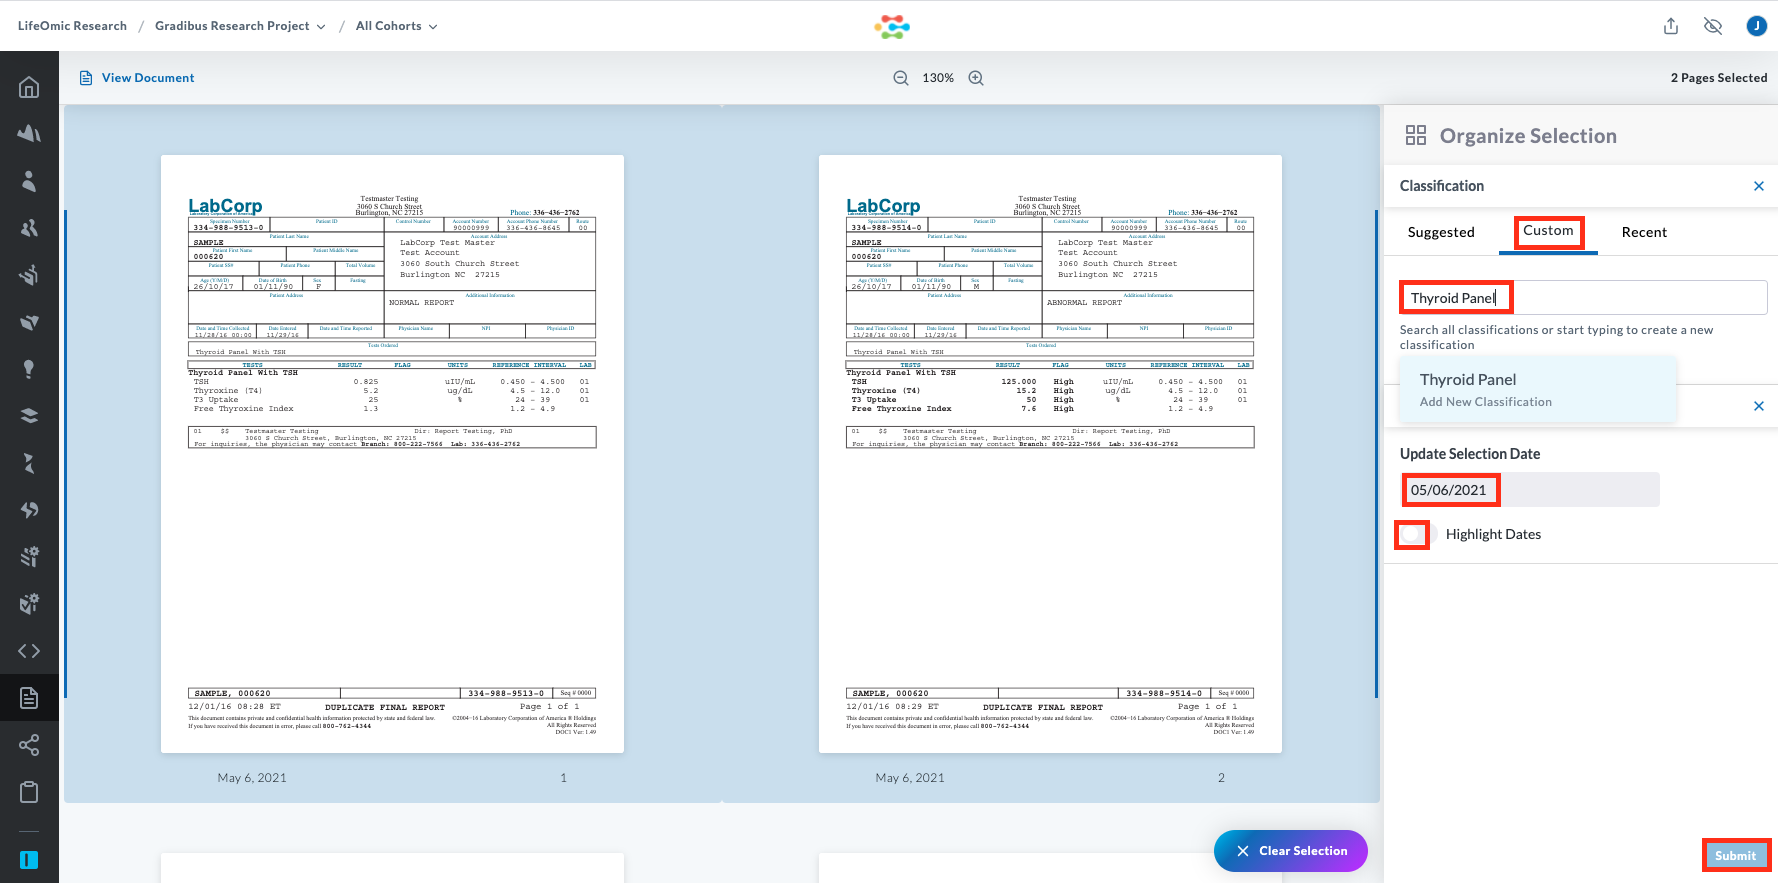
Click on pages that belong to the same classification to add them to the selection.
-
In the Organize Selection panel, click the Custom tab.
-
In the Search... field, select an existing classification or enter a new classification and press enter.
-
To identify the dates in the selection, click the Highlight Dates toggle.
-
Under Update Selection Date, enter a date for the section if desired.
-
Click Submit.
-
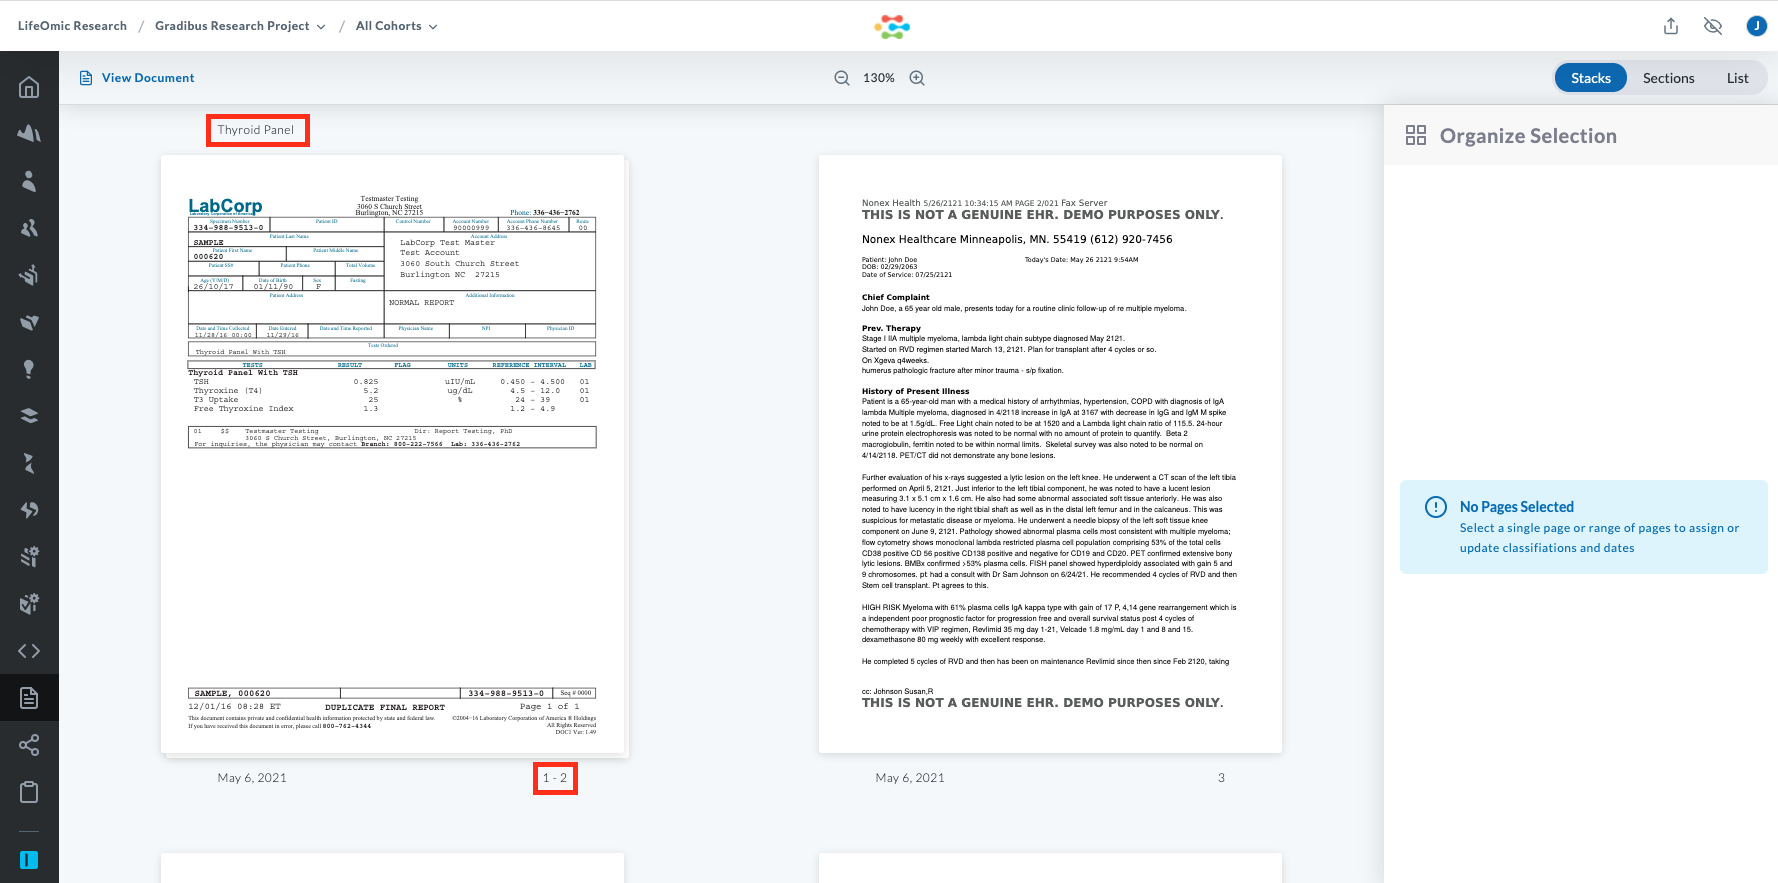
Confirm that the classification you created appears with your selected pages.
-
Repeat this classification process for any other relevant sections.
Download a Split File
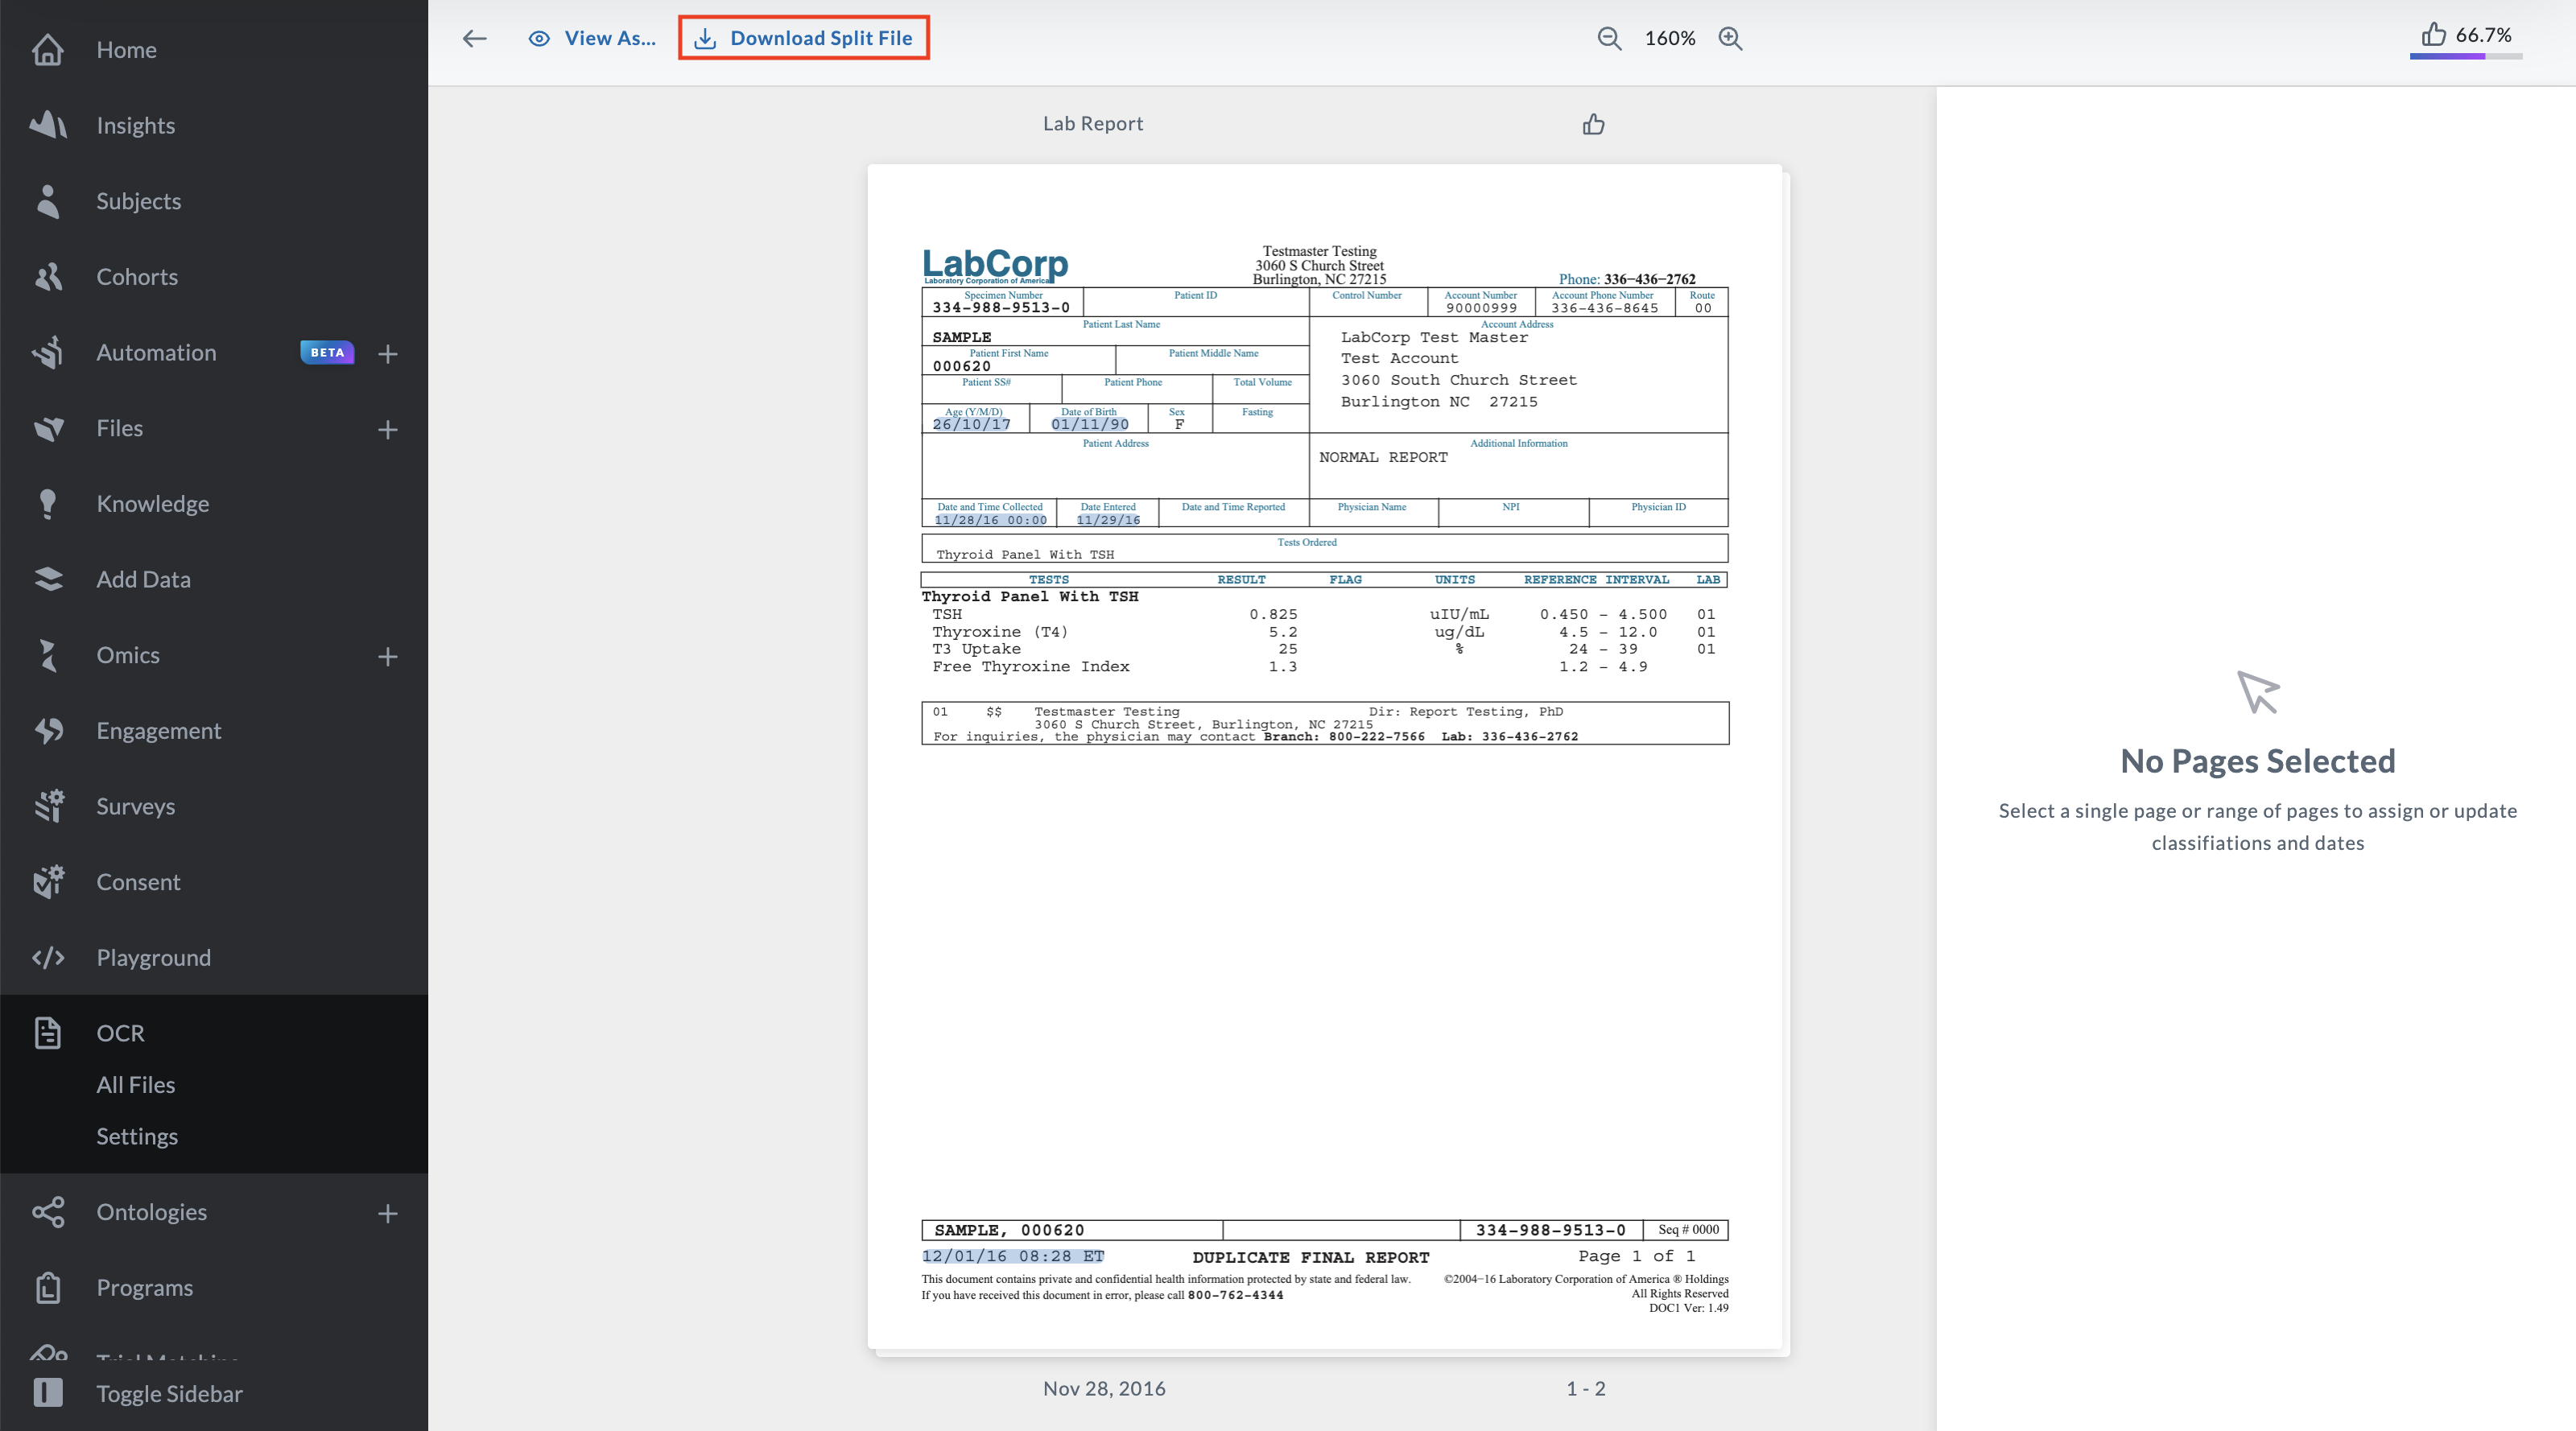
Once you organize a document into classifications, you can download a zip file containing a collection of files made up of a separate PDF file for each classification you created.
Note: If an icon appears in your browser's address bar after you click download, you may need to configure your browser to allow pop-ups from the LifeOmic Platform. Click the icon that appears in the address bar to allow this or search the help information for your browser.
-
On an open document, at the top of the screen, click the Organize icon .
-
Click Download Split File.
-
Open the Downloads folder on your PC or search for a zip file with a title similar to
ocr_split_zip_859d174e-a250-4ae2-9c2c-f2e3e7a573e9.zip. -
Click the zip file to open it and reveal the individual PDFs.
Find and Set Document Dates
The LifeOmic Platform offers two ways to add dates to your document. You can use the OCR organize feature and Suggest Dates to have a date applied to the selection. The suggested date is generated through machine learning and based on the existing document structure. You can also have OCR highlight all the dates and select and add a date manually.
Generate Suggested Document Dates
-
View a document and click the Organize icon .
-
Click to select a page or multiple related pages.
-
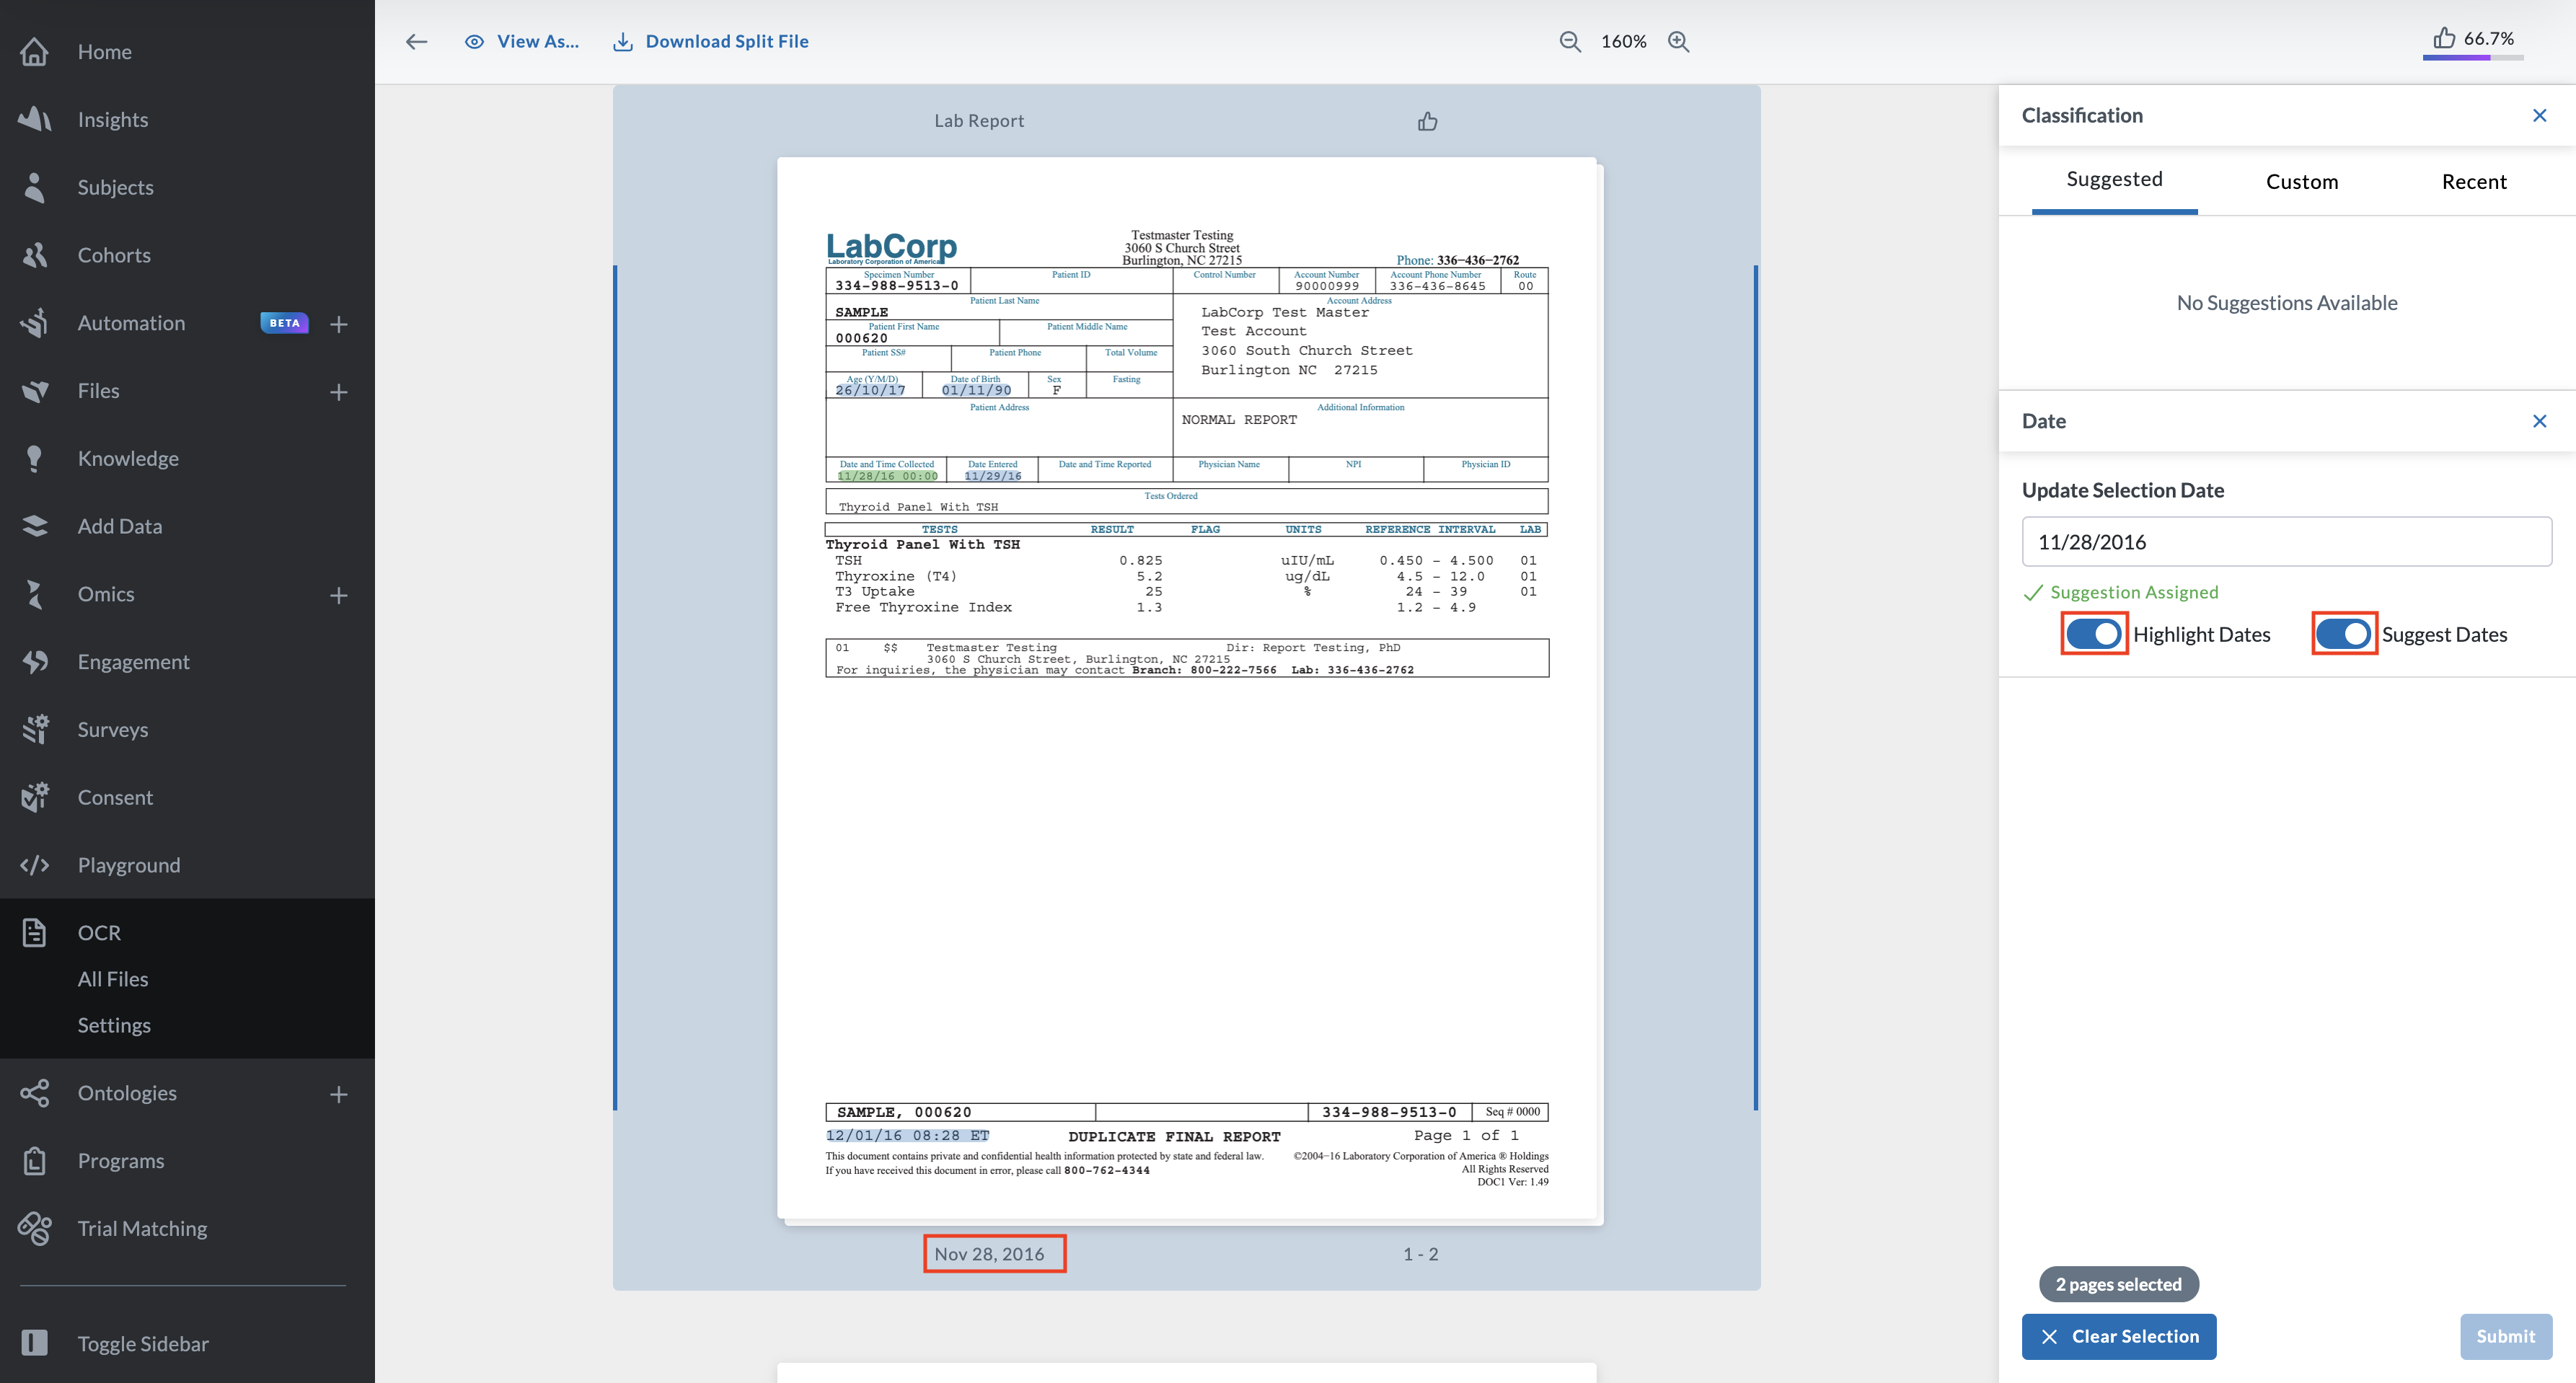
Click the Highlight Dates toggle to mark all dates in blue.
-
Click the Suggest Dates toggle to assign the suggested date for the selection. The LifeOmic Platform also marks the best candidate for the document date in green to populate the Update Selection Date field.
-
If the suggested date is not correct, click on the correct date highlighted in blue and populate the Update Selection Field. Click Submit to assign the date you selected.
-
Confirm the assigned date appears below the document.
Find and Set Document Dates Manually
-
Open a document.
-
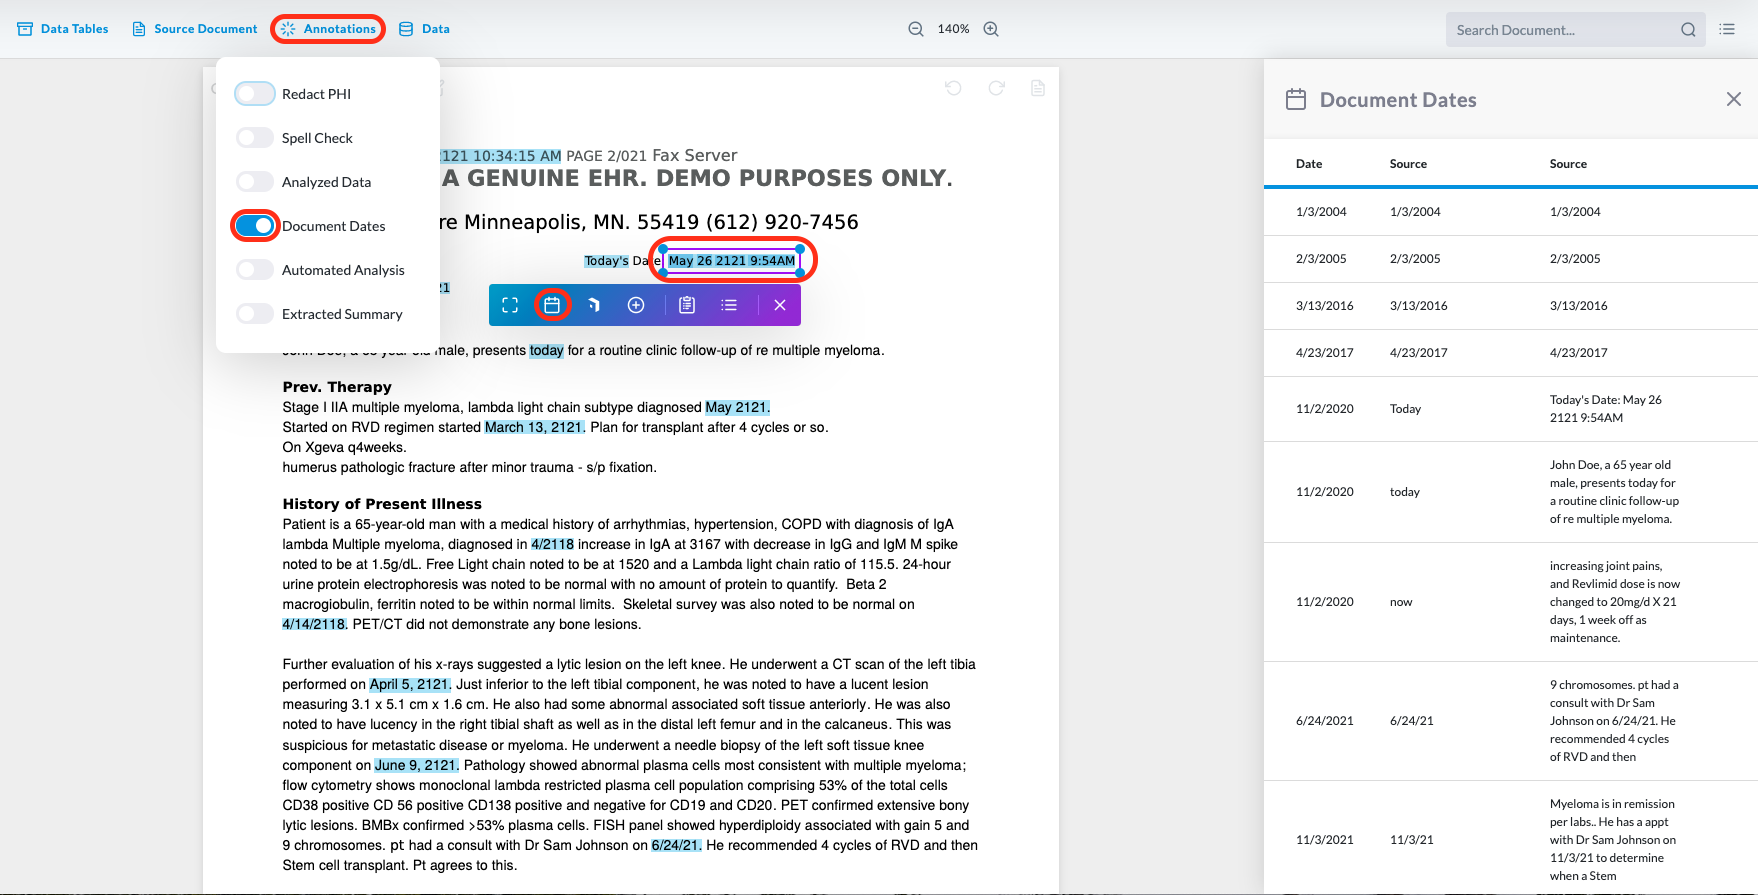
At the top of the screen, click the Annotations icon and click Document Dates.
OCR highlights all the dates in the document and displays a list of Document Dates.
-
Hold down your mouse button and highlight a date that you would like to set as the document date.
-
On the menu that appears, click the calendar icon and click either No, just this page to set the date for the specific page or Yes, update the whole document to set the date for the entire document.
Note: The selected date now appears as grey text on the lower left page of the document.
Assign an External ID to a Document
OCR allows you to attach a custom ID to a document. This allows you to manage documents with IDs from your own organization. This external ID is also retained in data exports.
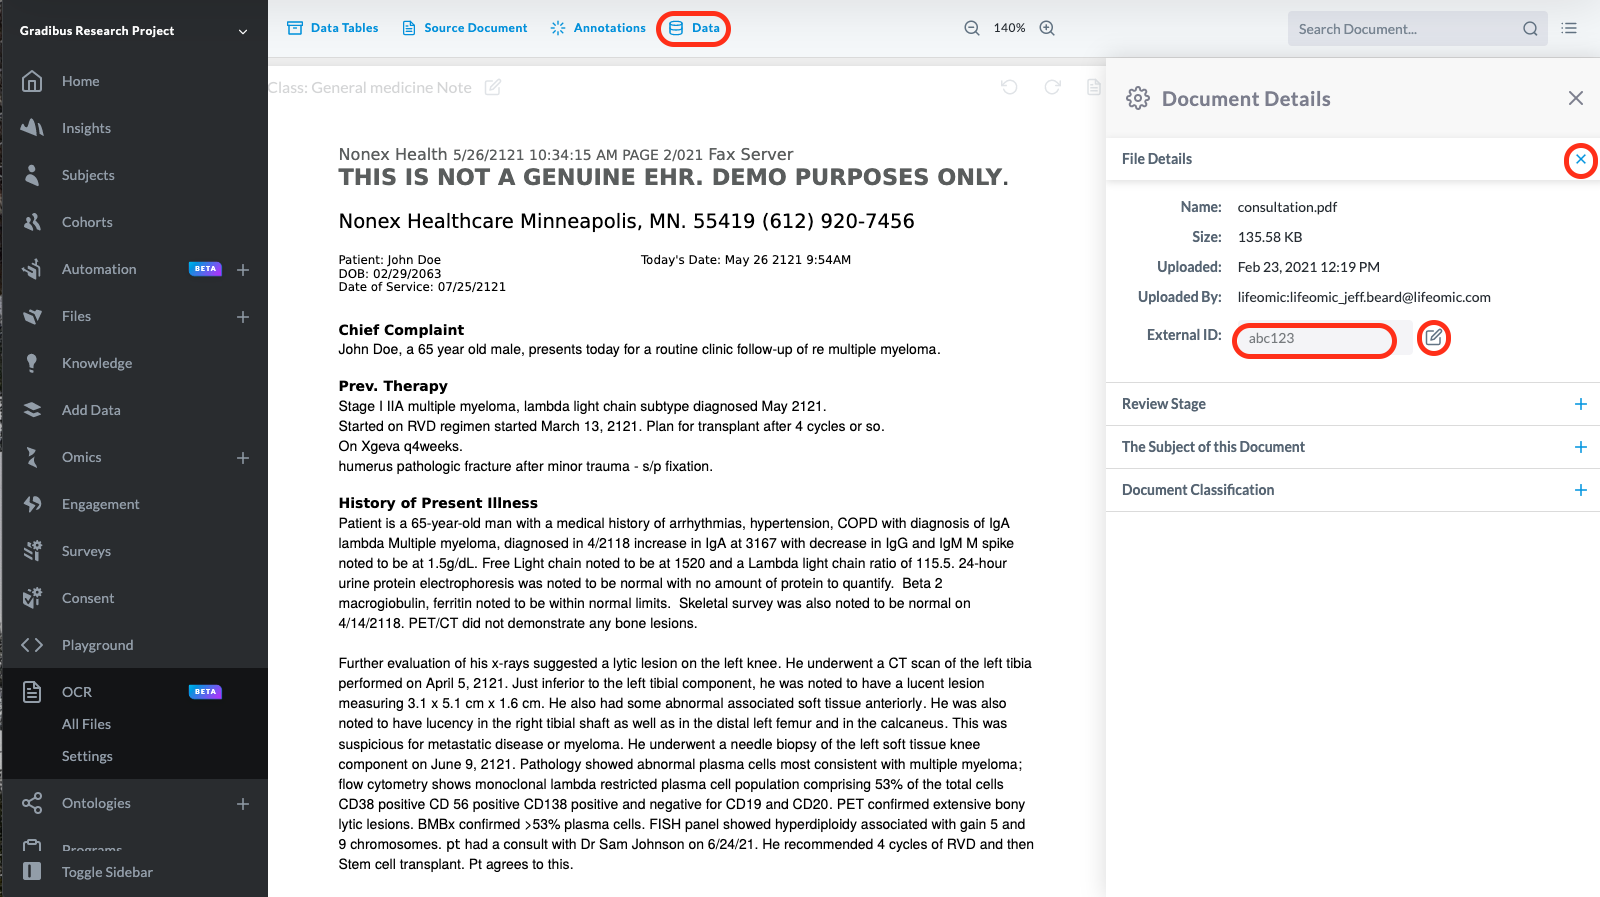
- On an open document, at the top of the screen, click the Data icon and click Document Details.
- On the Document Details pane, click to expand the File Details menu and click the Edit icon next to the External ID: field.
- Enter a unique external ID and click the check icon . The ID will continue to be available under Document Details.
Assign the Document to a Subject
If you do not import a document directly into a subject, you need to attach a subject to the document before you work with the data. This allows you to index, organize, and view data and documents by the patient's name in the LifeOmic Platform.
OCR gives you several subject assignment configuration options, see Suggest or Automate Subject Assignment.
-
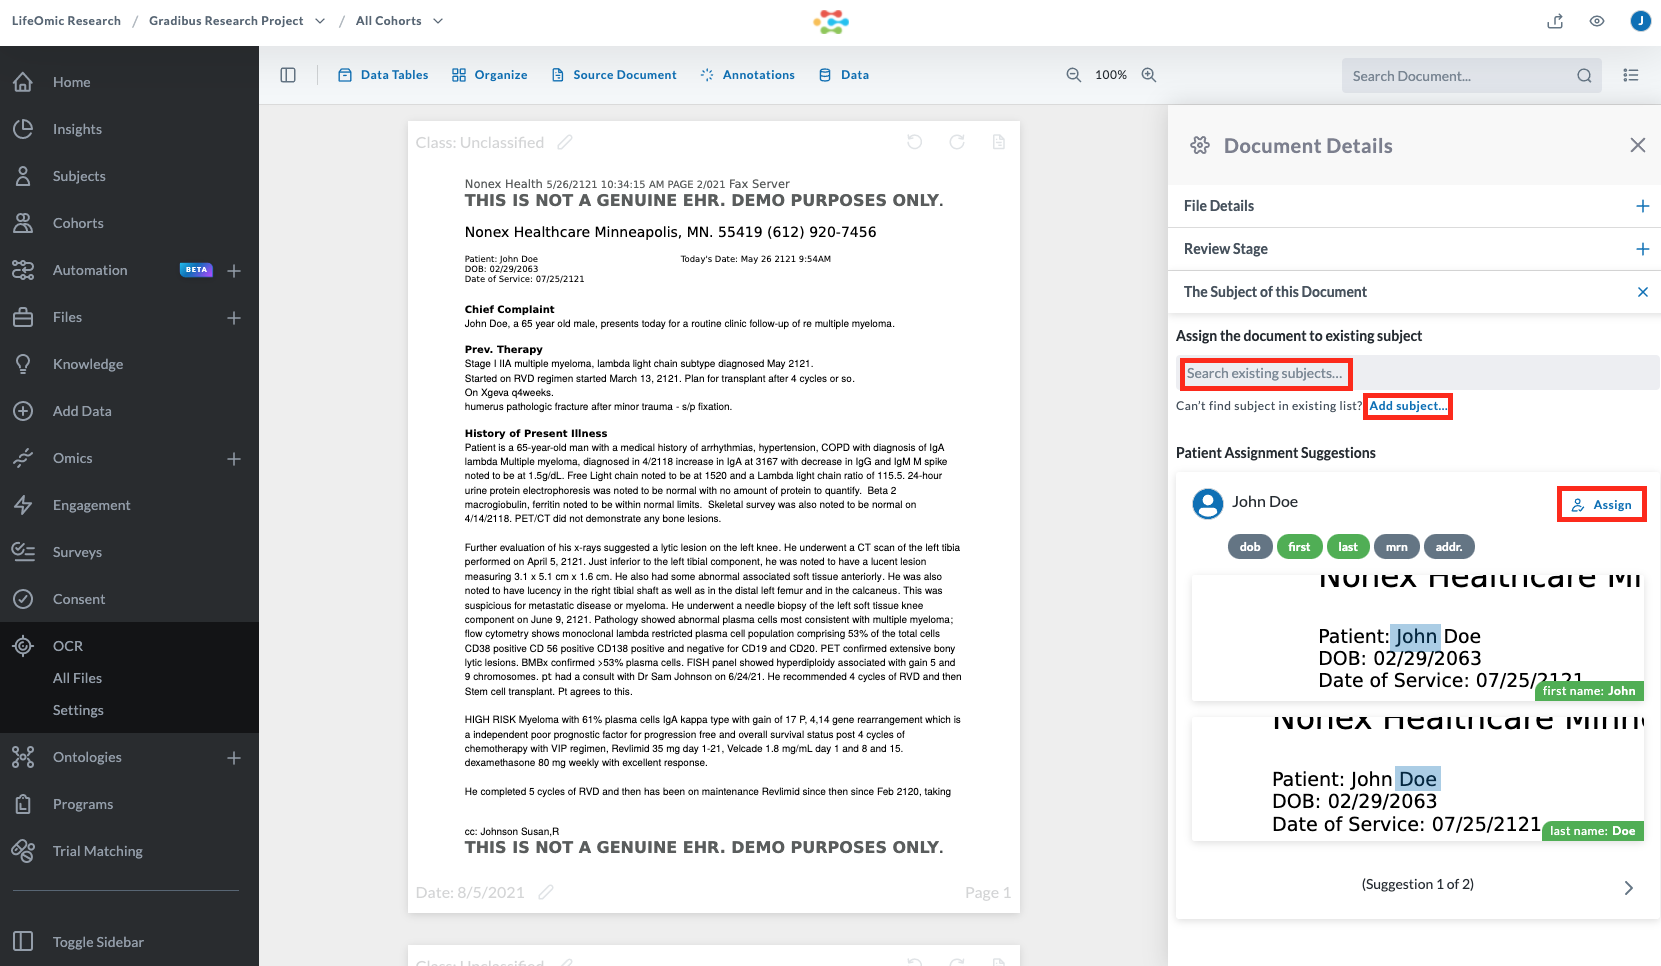
On an open document, at the top of the screen, click the Data icon and click Document Details .
-
On the Document Details pane, under The Subject of this Document, if OCR has correctly identified the subject, click Apply.
-
If the subject is not automatically identified but exists in the LifeOmic Platform, click in the Search existing subjects... field and click the subject name. Click Update Document with Changes to confirm.
-
If the subject is not automatically identified and does not exist in the LifeOmic Platform, click Add subject.... Fill out the First Name and Last Name fields and click Save. Click Update Document with Changes to confirm.
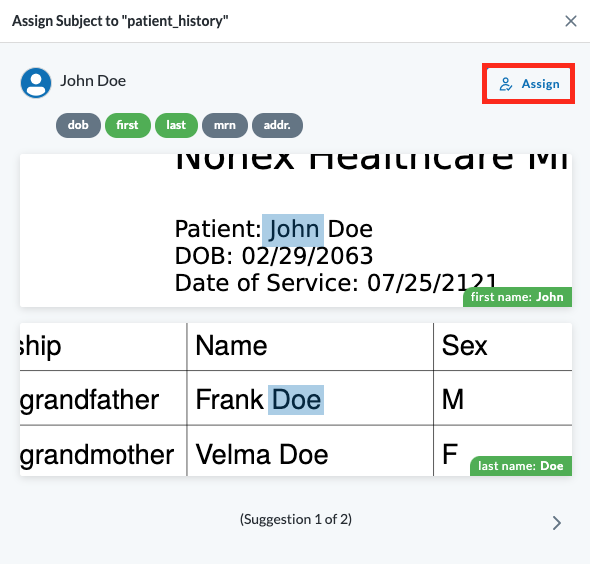
Streamline Suggested Subject Assignments
If you have a large quantity of documents to assign subjects, the streamlined workflow saves you from having to open each document.
-
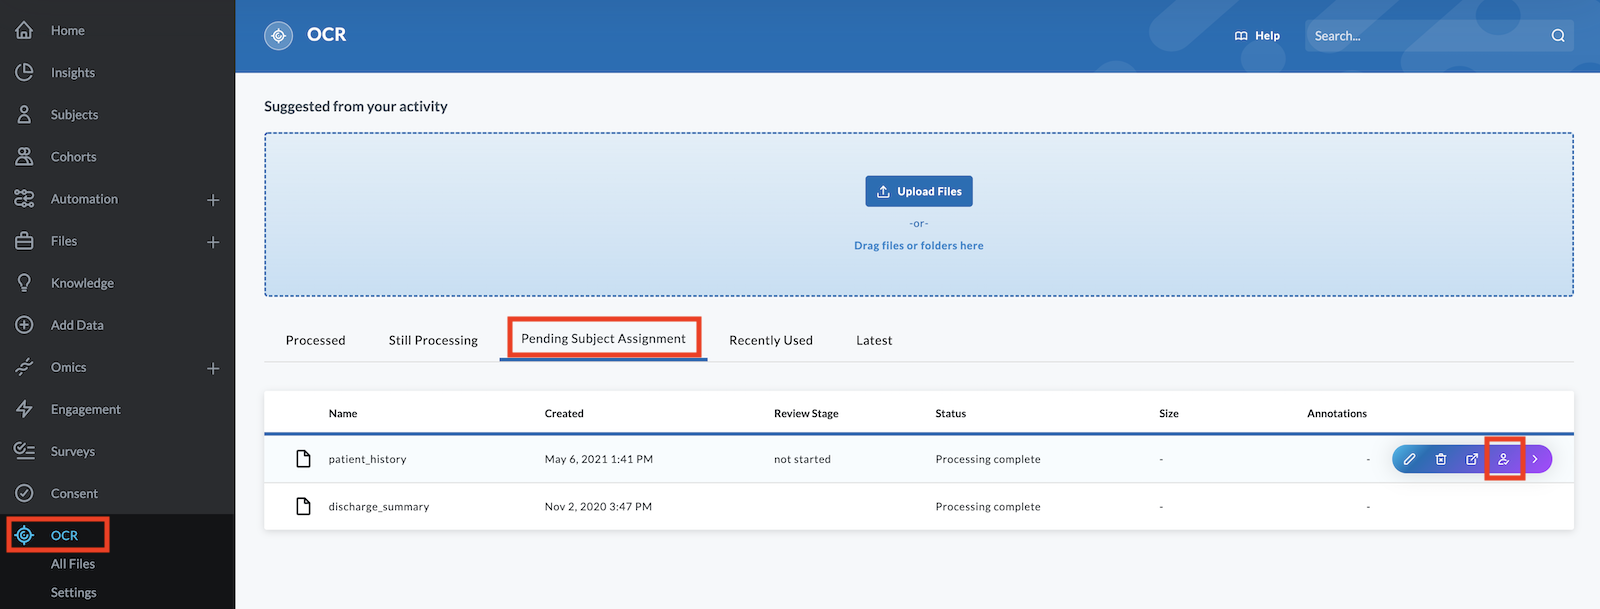
Under the OCR tab on the left side menu, click OCR.
-
Click the Pending Subject Assignment tab.
-
Mouseover a document row to reveal hidden icons and click the Assign subject to document icon.
-
On the dialog that appears, find the correct suggestion and click Assign.
Find and Set Document Dates
-
Open a document.
-
At the top of the screen, click the Annotations icon and click Document Dates.
OCR highlights all the dates in the document and displays a list of Document Dates.
-
Hold down your mouse button and highlight a date that you would like to set as the document date.
-
On the menu that appears, click the calendar icon and click either No, just this page to set the date for the specific page or Yes, update the whole document to set the date for the entire document.
Copy or Add to the Picklist
In addition to a standard copy function, OCR features a picklist that allows you to copy multiple items to a list and paste from that list.
Note: Your picklist is not saved when you close the document. To work in multiple documents at the same time, use multiple browser windows.
- In the document, hold down your mouse button and highlight a word or phrase.
You can hit the select icon to extend the selection to the entire line.
-
To make a simple copy, click the clipboard icon .
-
To add the text to a running list, click the picklist icon .
-
To access the picklist, click the picklist icon at the bottom right of the page or the Data icon at the top of the page.
-
When the picklist appears, scroll over a term and hit the copy icon.

Redact PHI and Download a Redacted Copy
OCR gives you the option to hide sensitive patient data. You can mask this data from LifeOmic Platform users viewing the document in masked mode. You can also download a copy of the redacted document as a PDF file.
- On an open document, at the top of the screen, click the Annotations icon and click Redact PHI. OCR automatically identifies potentially sensitive data and covers it with a redaction mark.
- If you need to determine what text was covered, you can click the Annotations icon and click Redact PHI again to remove the redaction marks. Click it again to add the marks back.
- To manually add or remove a redaction mark:
- Hold down your mouse button and highlight a sensitive term.
- From the menu that appears, click the mask selected text icon to add a mark or the unmask selected text icon to remove a mark.
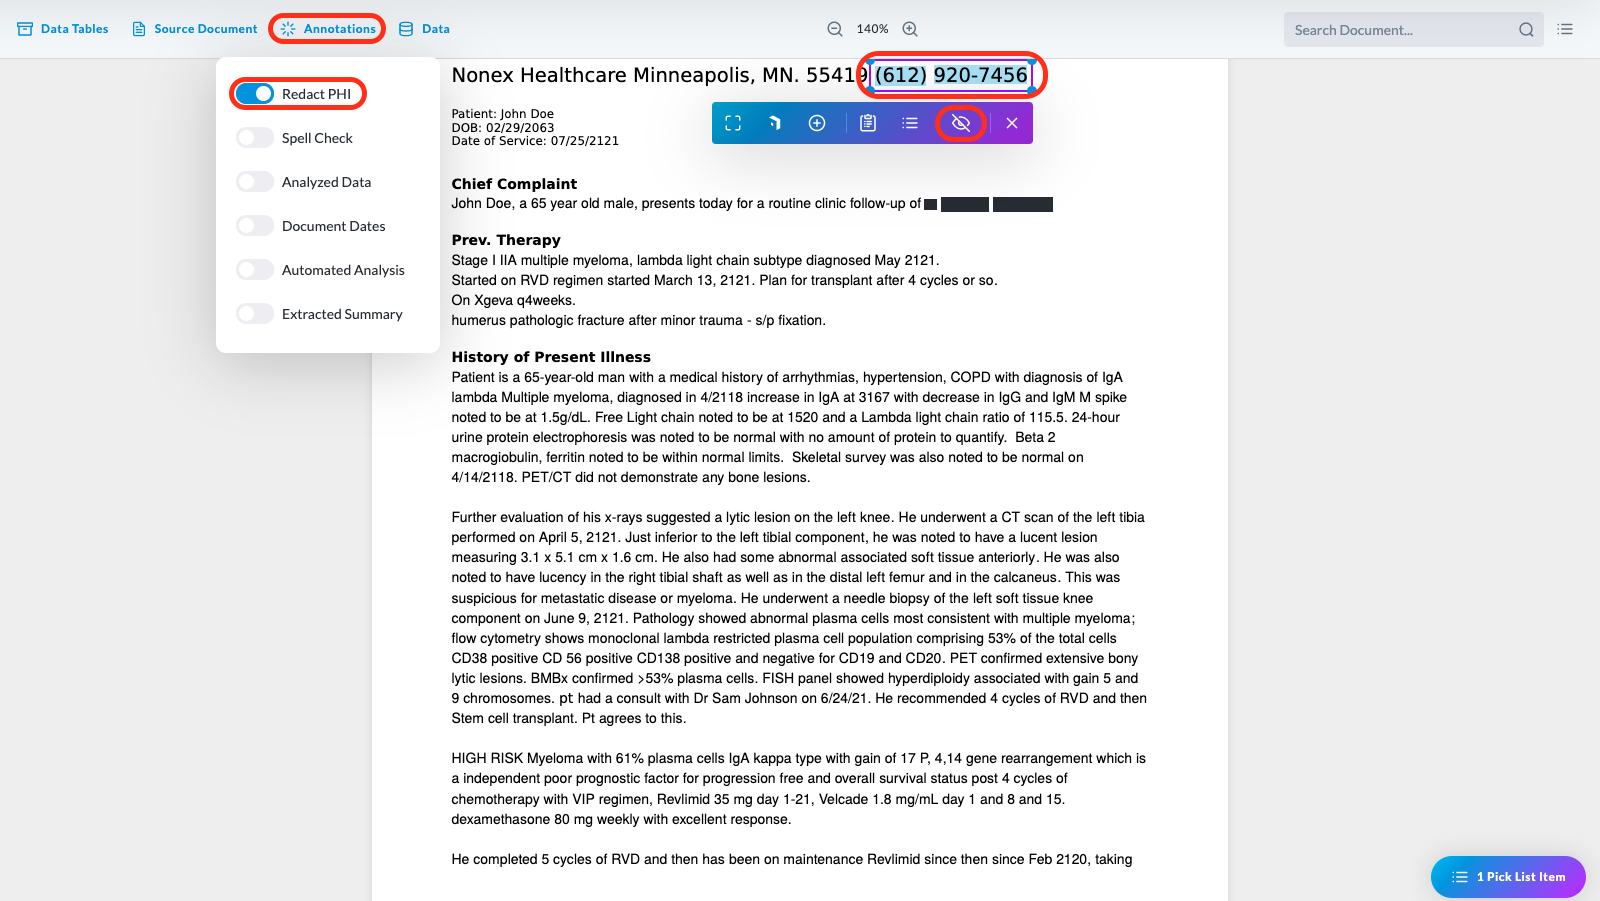
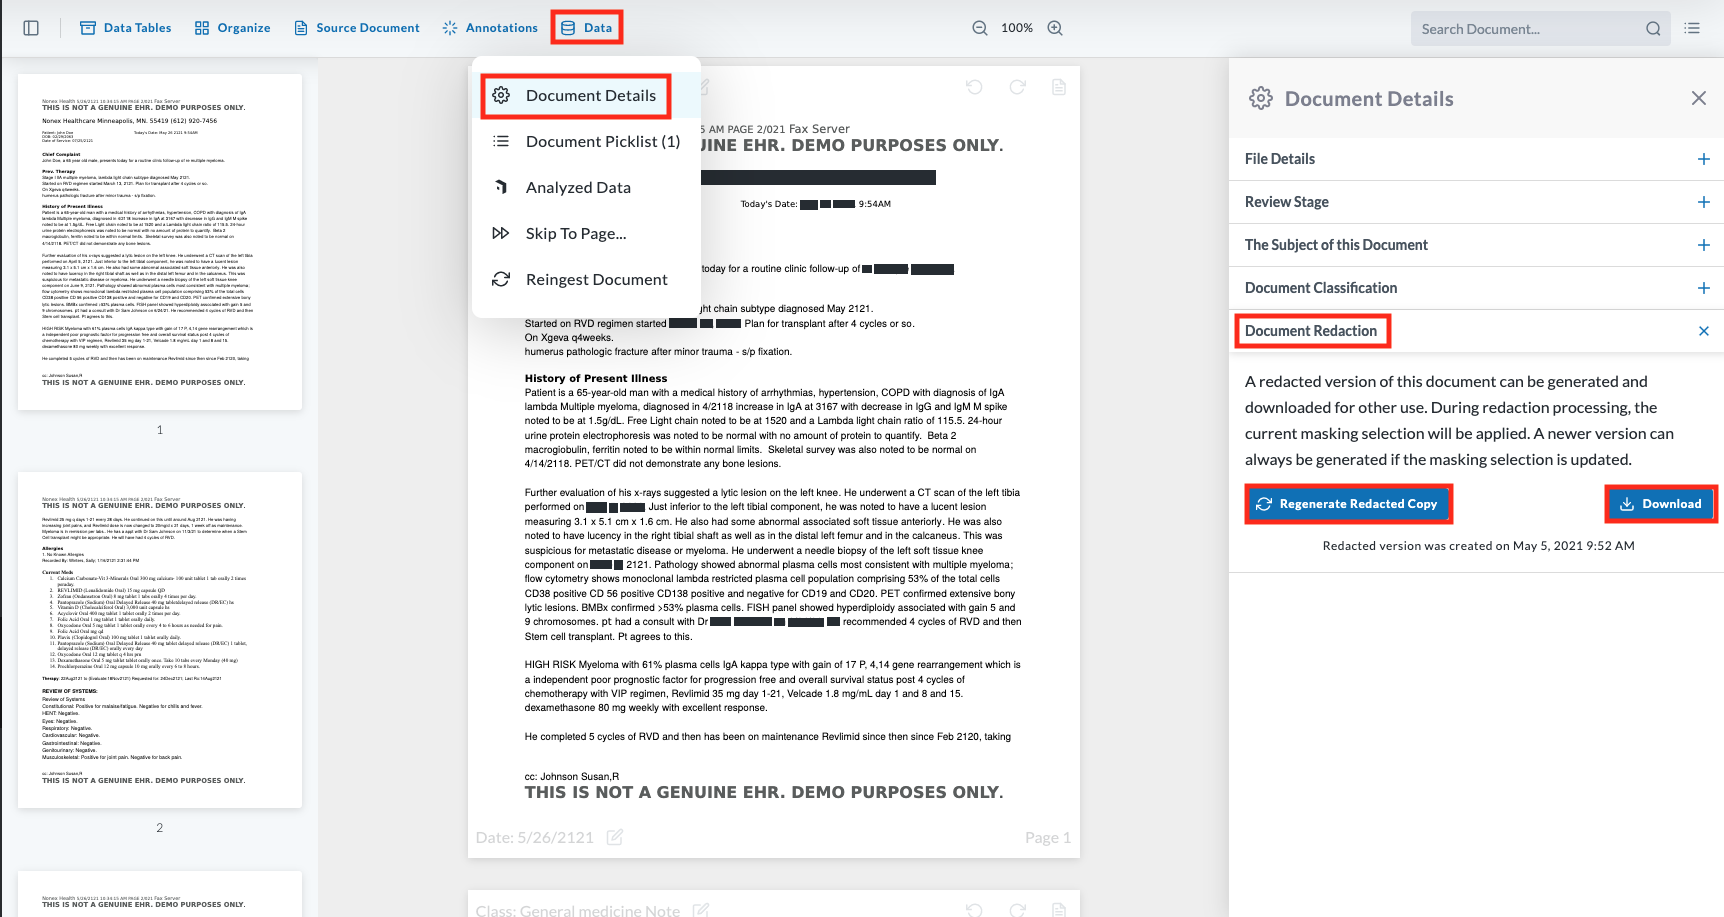
- To download a copy of the redacted document, click the Data icon and click the Document Details icon .
- Click the Document Redaction section and click Regenerate Redacted Copy to include the latest redactions.
- After the file processes, click Download.
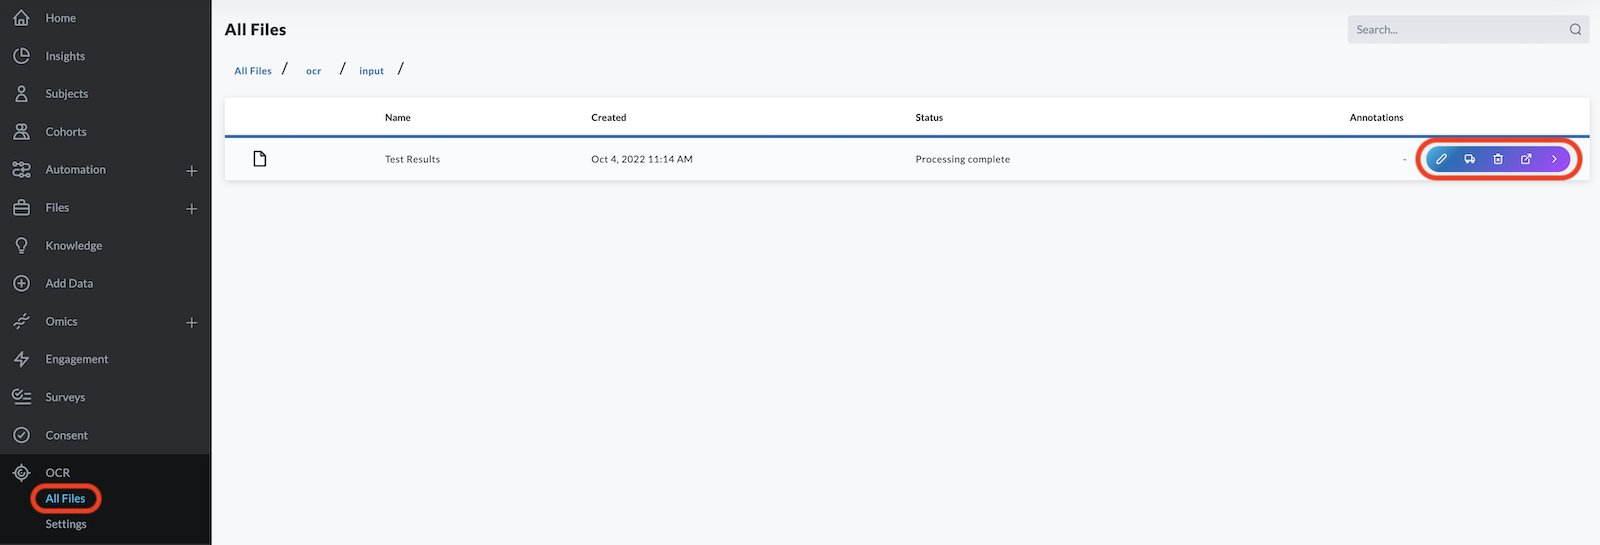
Manage Files and Create Folders
-
Under the OCR tab on the left side menu, click All Files.
-
Mouse over a listed file to reveal the file management menu. The icons appear in a blue and purple menu bar on the right side of the file.
-
To rename a document, click the Edit icon.
-
To create folders and move the file to a folder, click the Move document icon .
-
To delete the document, click the Delete Document icon .
-
To view a document, click the View icon .
-
To display a document thumbnail with information, click the View Details icon .
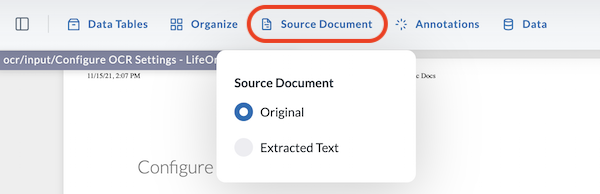
Compare the Source Document and the Extracted Text
You can always compare the original source document with the extracted text:
- Click on the document in the Processed Documents list.
- On the upper left of the screen, click Source Document.
- Click Original or Extracted Text.