Engagement Flow Overview
Engagement Flow is a system that lets you manage and track your users's enrollment and interaction with several subject-oriented features of the LifeOmic Platform. These functions include consent, demographic information, surveys, and programs. Progress through these features is tracked with Engagement milestones that show the completion of stages, such as responding to a survey. Engagement Flow can also auto-remind subjects that have failed to complete a task with a reminder email. The Engagement Flow is not enabled by default.
You must create and publish a consent, survey, or program for your project to have it available in the Engagement Flow.
Engagement Flow Provisioning
If the project has a consent published, it will automatically be added to the flow as a milestone for subjects to complete. You may also add one more multiple published surveys or programs. When Engagement Flow is enabled, all newly added subjects with an email address in the project will automatically be added to the flow and assigned the published consent, surveys, or programs if the Auto-add toggle is turned on.
Subjects are not added to the Engagement Flow automatically by default. However, the admin setting up the Engagement Flow can change the invite setting from manual to automatic by toggling on the "Auto-add all project subjects to the flow” in the Flow Settings . If Auto-add is turned on, new users and any existing users manually added to the flow will get invites, consents, and/or surveys and programs of your choosing.
Set up Engagement Flow
Enabling Engagement Flow and setting the flow parameters requires the Administration>Account (ABAC engagementAdmin) permission. To grant privileges, see Access Control.
-
Click on Engagement on the left side of the LifeOmic Platform. The Engagement page includes a Flow Checklist on the left of the screen (only available before engagement is set up), the Engagement Path with milestones, and an icon to access the Flow Settings.
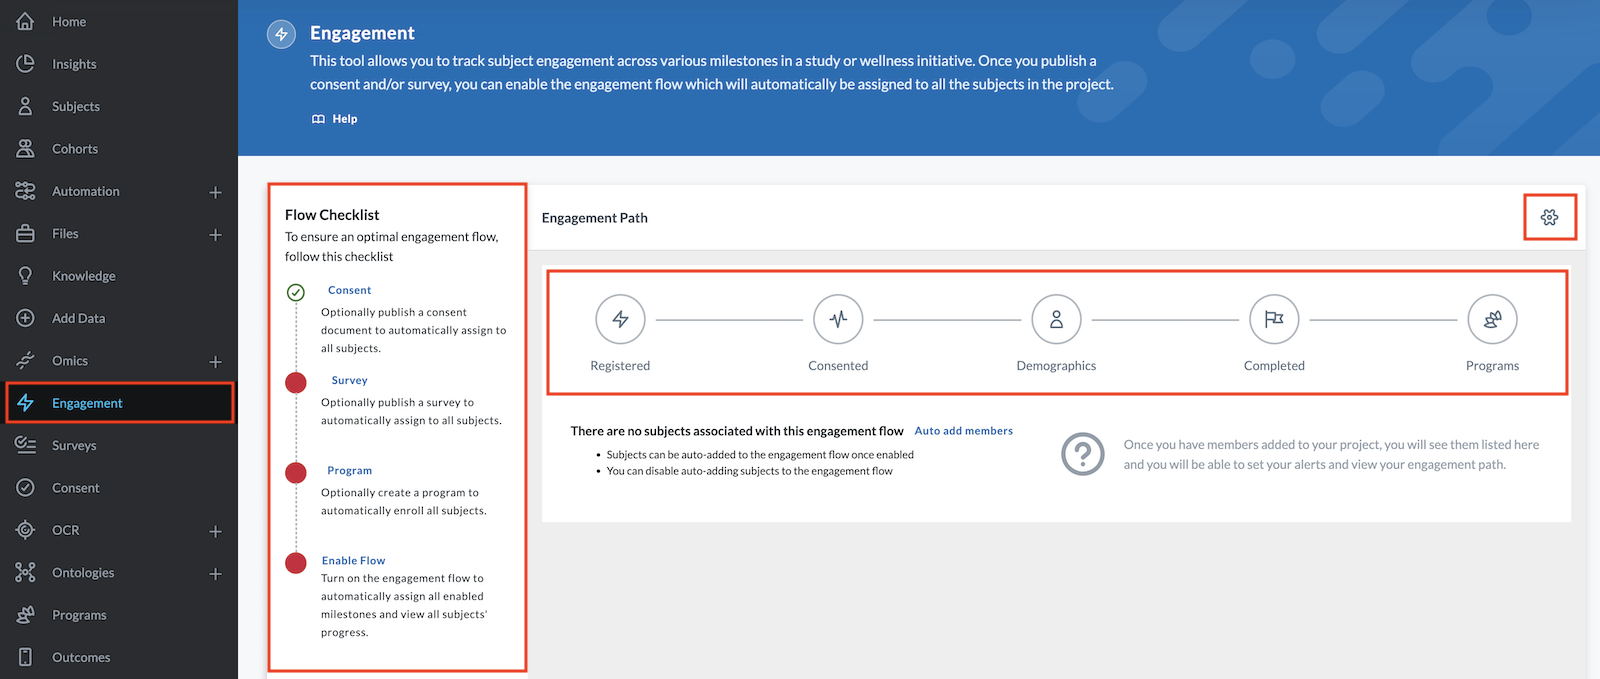
If you have a consent, survey, or program published for the project, a green check mark will appear beside those items in the Flow Checklist. The consent will automatically be added to the flow but the survey or program must be manually added to the flow via the Flow Settings .
-
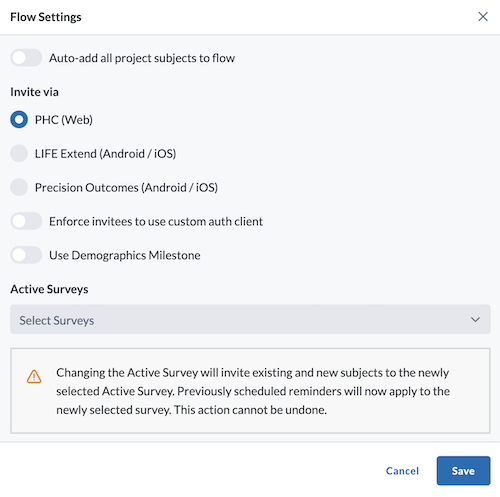
Click on the Flow Settings icon on the right side of the page. In the window that opens, adjust the parameters of your Engagement Flow.
-
Toggle on Auto-add all project subjects to flow if you want all newly added subjects to automatically complete the engagement flow (this can be changed at any time)
-
Select how you invite your subjects:
- LifeOmic Platform (web) - Selecting this will include demographics as a milestone to complete.
- the mobile app (Android/iOS) - Selecting this sends them an email invitation and push notifications. Learn more about syncing their mobile data with the LifeOmic Platform.
importantLifeOmic Platform admins that need access to a subject's mobile data must use the mobile app invite setting. The mobile data engagement flow must also include a Consent milestone.
-
To force your subjects to use your organization's SSO to log in and accept the invitation, toggle on Enforce invitees to use custom auth client (click to learn about configuring a custom auth client). The LifeOmic Platform account must have a custom auth client configured to be able to force subjects to use the organization's SSO.
-
Use Demographics Milestone toggle - If toggled on, users will be able to click the icon to specify what demographic info is needed and required (clicking on the symbol beside each of the demographic fields will switch between hide, show, and require).
-
Add one or multiple surveys to the flow using the dropdown menu (optional and can be changed at anytime). To deselect a survey, simply click on it. Changing the Active Survey invites new and existing subjects to the newly selected Active Survey. Previously scheduled reminders will now apply to the newly selected survey. This action cannot be undone. Subjects will only get one email for all surveys in the engagement flow if they are new or if the surveys already exist as part of the engagement prior to inviting them. Otherwise, they'll get an email for every new survey they're assigned.
-
Add one or more programs to the flow using the dropdown menu (optional and can be changed at anytime). To deselect a program, simply click on it.
importantOn the flow checklist, a green check mark next to surveys or programs indicates the creation and availability of these features. It does not indicate that subjects are automatically enrolled. Unlike consents, you must manually select surveys and programs to apply them to the engagement flow. .
-
-
Click Save.
Syncing Subjects' Mobile Data with the LifeOmic Platform Using Engagement Flow
The mobile data for subjects invited to a project with the mobile app will not sync with the LifeOmic Platform automatically. To communicate the subjects' wearable data with the LifeOmic Platform, you must do the following:
- Create and publish a consent.
- Enable an Engagement Flow with at least the Consent milestone (subjects can be either manually or auto-added to the flow).
- Ensure the "Invite via" option is set to the proper mobile settings (the mobile app).
- Once they are added to the flow and accept the consent, their mobile data replicates into the project.
Flow Checklist
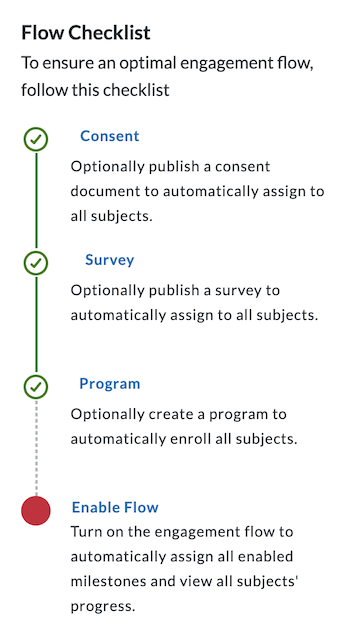
The checklist on the left of the Engagement page is only visible prior to enabling Engagement Flow. Once enabled, this list will no longer exist on the Engagement screen. Each flow checklist item is clickable and will take you to the corresponding page (for example, clicking "survey" takes you to the survey page of the LifeOmic Platform). Once each item is completed for the project, a green check displays next to it rather than a red circle.
- Consent – (Optional) Publish a consent document to automatically assign to all subjects. Clicking this will take you to the Consent page. A consent must be created if you are inviting subjects through the mobile app and wish to sync their mobile data.
When you create a subject and add them to the Engagement Flow, the Engagement Flow creates a consent record for the new subject even though they have yet to register. However, subjects in the project created before the Engagement Flow was enabled will not have been given a consent record. Thus, if you were to click on the Subjects tab and filter subjects with a Consent Status of Pending, it would only show those subjects created after Engagement Flow was enabled.
-
Survey - (Optional) Publish a survey to automatically assign to all subjects. (Clicking this takes you to the Survey page. If no survey exists in your project, you can create one now.)
-
Program - (Optional) Create a program and automatically enroll all subjects. (Clicking this takes you to the Programs page. If no program exists in your project, you can create one now.)
-
Enable Flow - Clicking this opens the Flow Settings, which you can also access by clicking the icon on the right side of the page. Use the settings box that opens to set up the engagement flow. Once you enable the flow, it will create a shareable invite link in the page's blue header for users to join the project.

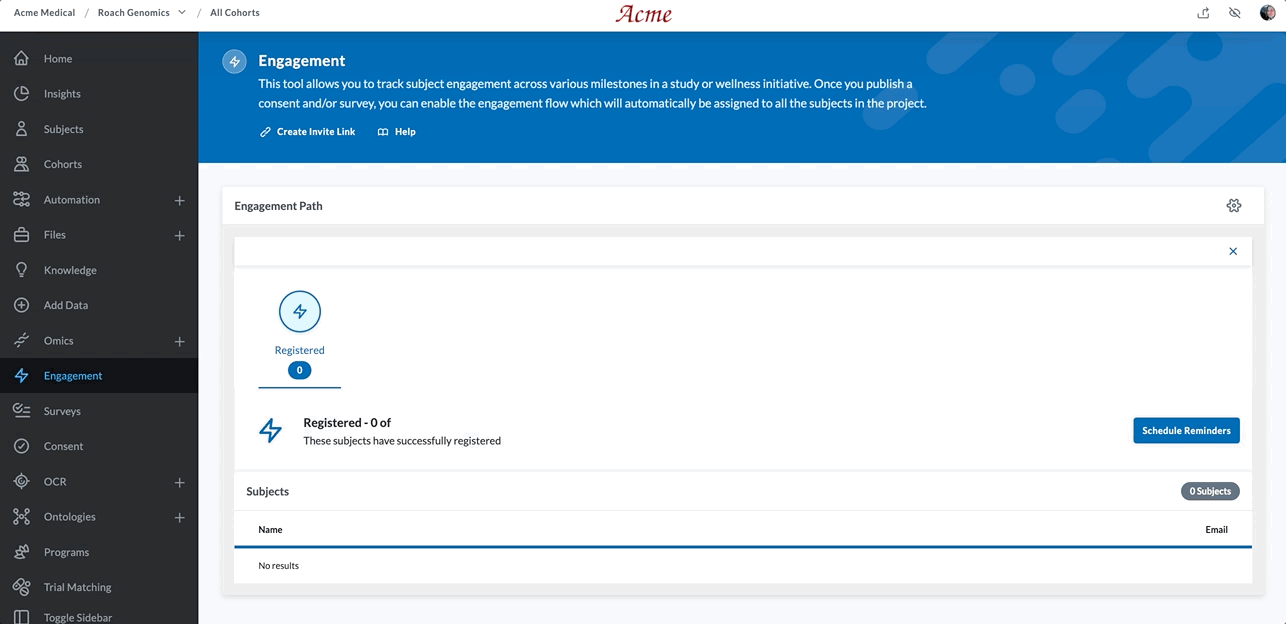
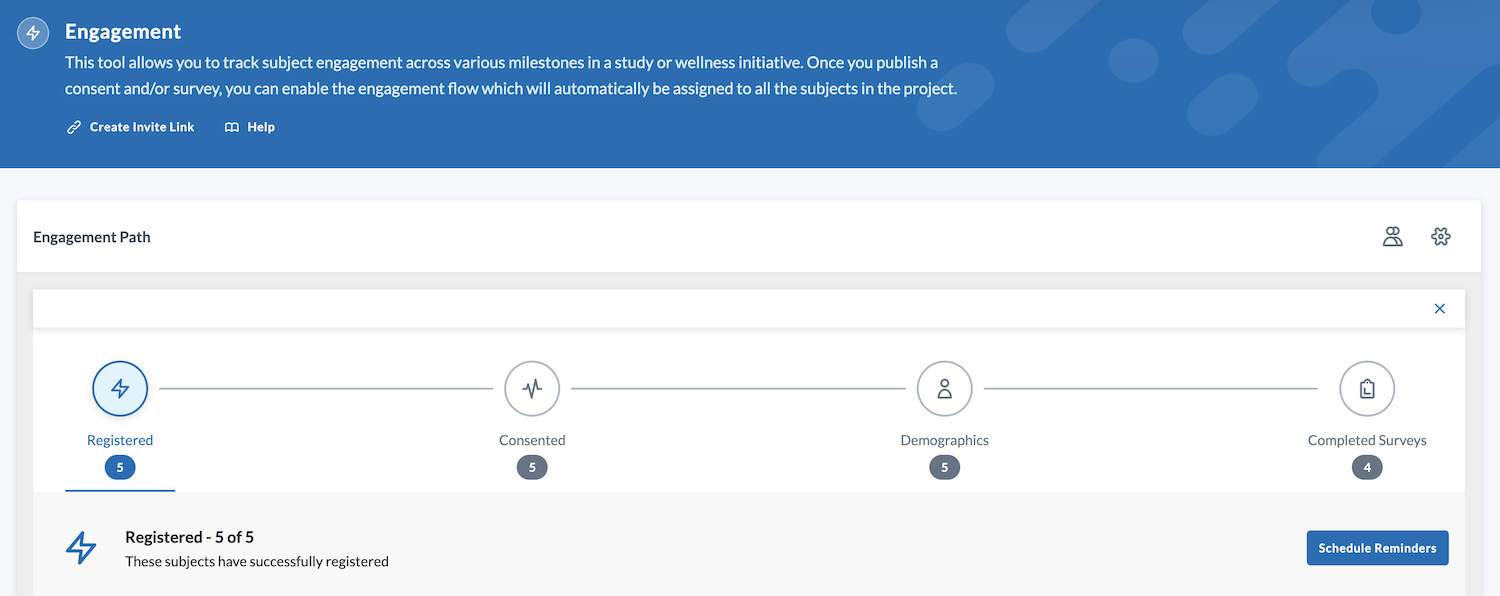
Engagement Milestones
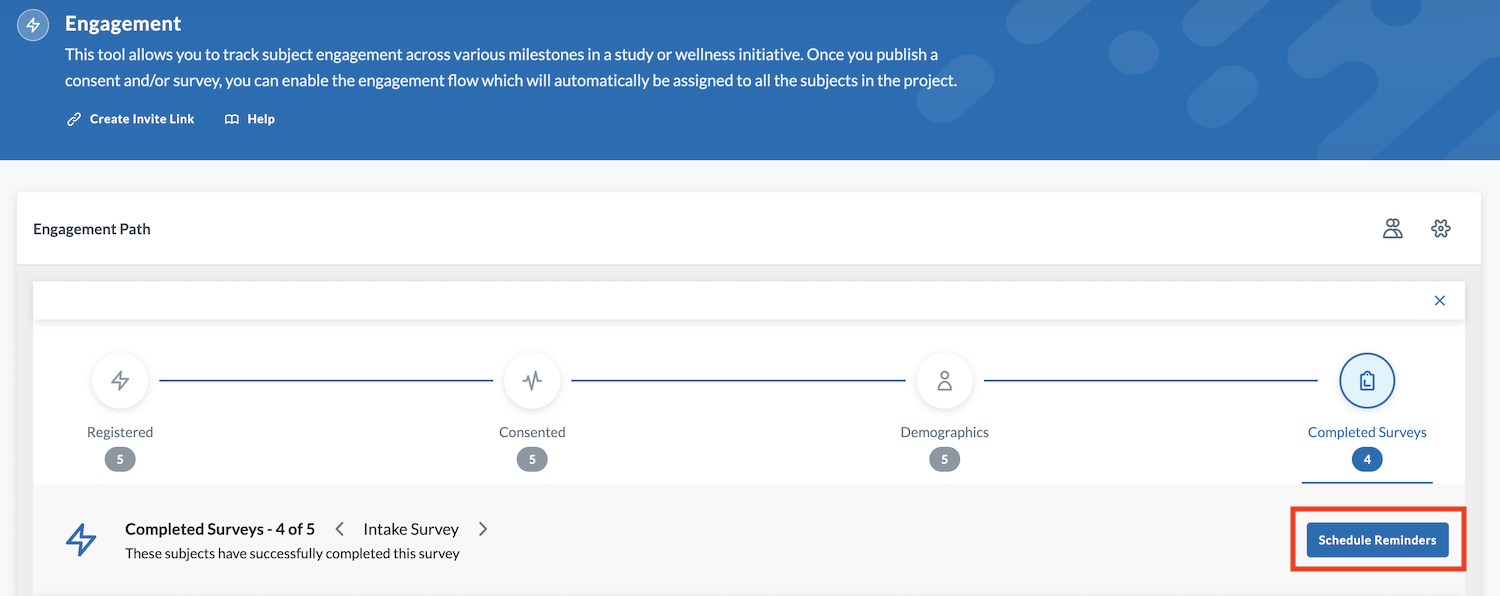
Milestones map where a user is in the Engagement Flow. Once the Engagement Flow is enabled, you can click on a milestone and the table listed beneath it shows which subjects have completed the selected milestone. All five Engagement milestones will not display if you are not utilizing all five options in your project.
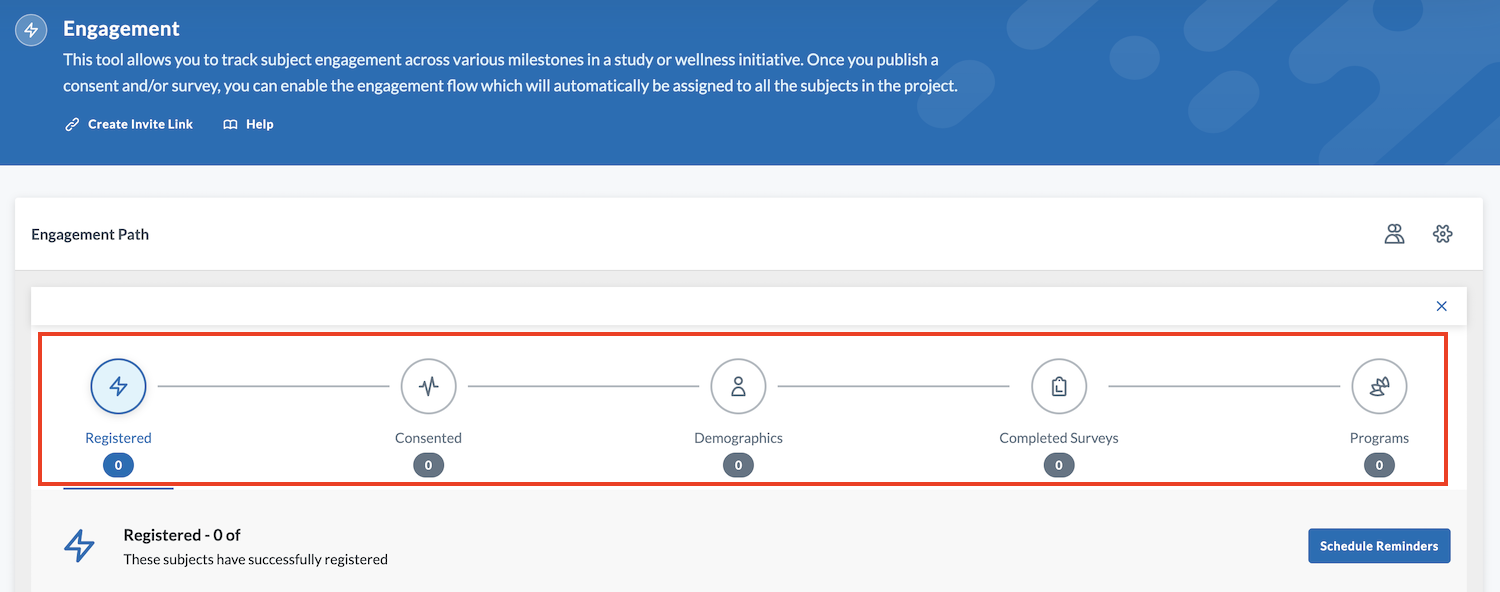
The five possible Engagement milestones include:
- Registered - Registration has been completed
- Consented - Consent has been completed
- Demographics - Demographics has been completed (if you’ve sent them an invitation, if they are accessing the LifeOmic Platform through the web, or if this milestone is toggled on in engagement flow settings they will be asked to complete the demographics piece).
- Completed Surveys - This relates to the survey(s) connected to the Engagement Flow. If more than one survey is connected, you can click the and to advance through the surveys in the flow. The Milestone Table results will reflect the selected survey.
- Programs - This relates to the programs(s) connected to the Engagement Flow. If more than one program is connected, you can click the and to advance through the programs in the flow. The Milestone Table results will reflect the selected program.
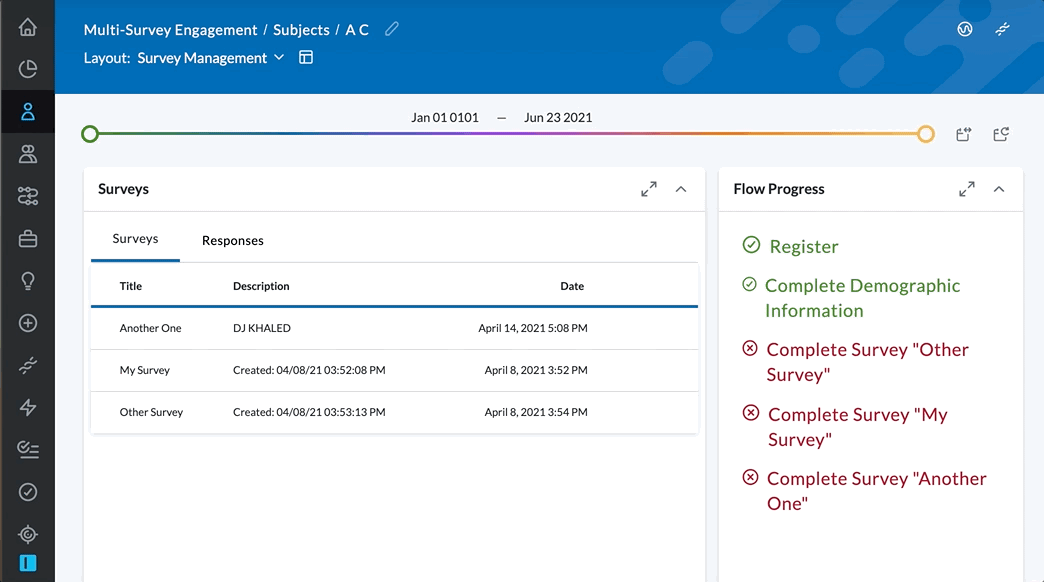
In the example below, all of the subjects have completed their registration, consent, and demographics. Only four subjects have completed the survey attached to the Engagement Flow. No programs have been created for this project, so the Programs milestone does not display in the Engagement Path.
Engagement Flow Operations
Auto-add or Manually Invite Subjects
Engagement Flow can be set to automatically add subjects to the flow or set to manually invite the subjects. By default, users must manually invite subjects to the Engagement Flow. If Auto-add is turned on, new subjects will be invited to the flow when the Engagement Flow is enabled as soon as there’s an email address associated with the subject. Email addresses are required for subjects to be invited to the project and flow. If you've enabled the flow and add a new user without an email address, they will not automatically be added to the flow until you add their email address.
-
Automatic - If the Engagement Flow is set to automatic ("Auto-add" is toggled on in Flow Settings), new users and any existing users manually added to the flow will get invites, consents, and/or surveys of your choosing.

-
Manual (Default Setting) - If the Engagement Flow is set to manual (“Auto-add all project subjects to the flow” is toggled off), you must:
-
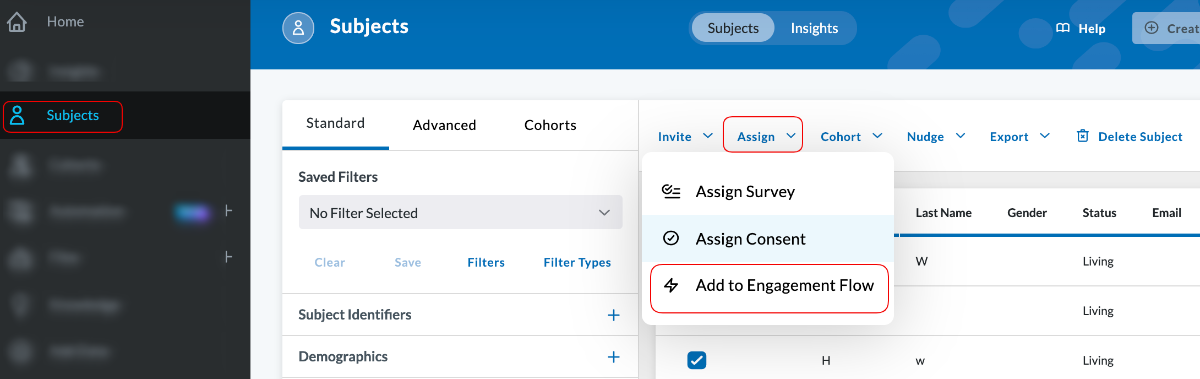
Invite your subjects by clicking the Subjects tab on the left of the LifeOmic Platform interface and inviting users via the "Invite" action button. The newly invited subjects can log in, complete the consent (if one exists), and complete demographics.
-
Add the newly invited subjects to the Engagement Flow. This is done in the Subjects tab, by selecting the subject(s) you wish to add to the Engagement Flow, clicking the "Assign" action button, and selecting "Add to Engagement Flow" from the dropdown menu. You'll then be asked if you want to add them to the Engagement Flow. Click Add.
-
When you enable the "Auto-add" flow, existing users will not be automatically invited to the Engagement Flow. The best way to add them to the flow is to add their email address to their existing LifeOmic Platform account. Once an email is associated with a subject, an invite will automatically be sent to them. Do not add them to the flow by sharing the invite link generated when the flow was enabled, as clicking the link within the invite email would create a second and unnecessary LifeOmic Platform account for that subject.
Subjects' Experience of being Added Manually to Engagement Flow
Once Engagement Flow is set up, new subjects added manually will:
- Receive an email invitation.
- Click the link in the email and create a LifeOmic Platform account on the page that opens.
- Receive the project consent and can agree or reject it.
- If they agree to the consent, they will be directed to the demographics page where they can verify/change their information.
- Click Save.
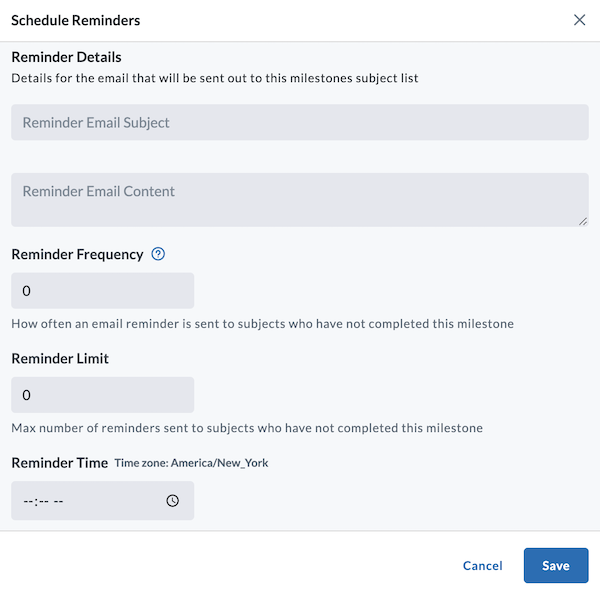
Schedule Reminders
You can schedule a reminder for any or all Engagement milestone(s) to nudge subjects who have not completed a milestone of the flow. If someone in your project has not completed that milestone, they will get a reminder email sent at whatever cadence you select. The subject will only be reminded of the first milestone they have not completed. Once they complete that milestone, you can remind them to complete the next milestone if need be.
How to set up a Scheduled Reminder:
-
Click on the milestone you wish to send a reminder email about.
-
Click the Schedule Reminders button.
-
In the window that opens, give your reminder email a subject.
-
Type the content of the reminder email.
-
Set up the frequency of how often the email is sent to subjects who have not completed this milestone (# of days for repeat).
-
Set the reminder limit (max number of reminders sent to subjects who have not completed this milestone).
-
Set the time you wish the reminder email to be sent. (HH:MM military time is based on time zone of person setting the reminder).
-
Click Save.
View Engagement Flow, Survey Status, and Program Status of a Single Subject
Users can view a single subject's engagement flow, survey status, and program progress status via the Subjects tab found on the left menu of the LifeOmic Platform app.
-
Click on the Subjects tab.
-
Click on the subject you wish to check the status of - this will bring you to the Subject Viewer page.
-
Users can view a single subject’s Engagement Flow by adding Subject Viewer modules to a new or existing layout:
- Subject Engagement Progress Module - displays a checklist of which milestones a subject has completed or has yet to complete
- Engagement Interactions Module - provides a clickable milestone map of a subject's progress in the Engagement Flow with detailed timestamp information
- Surveys Module - lists all of the surveys sent to a single subject along with the completion status
- Program Progress Module - lists all of the programs a subject is enrolled in and how far along they are in completing the programs.