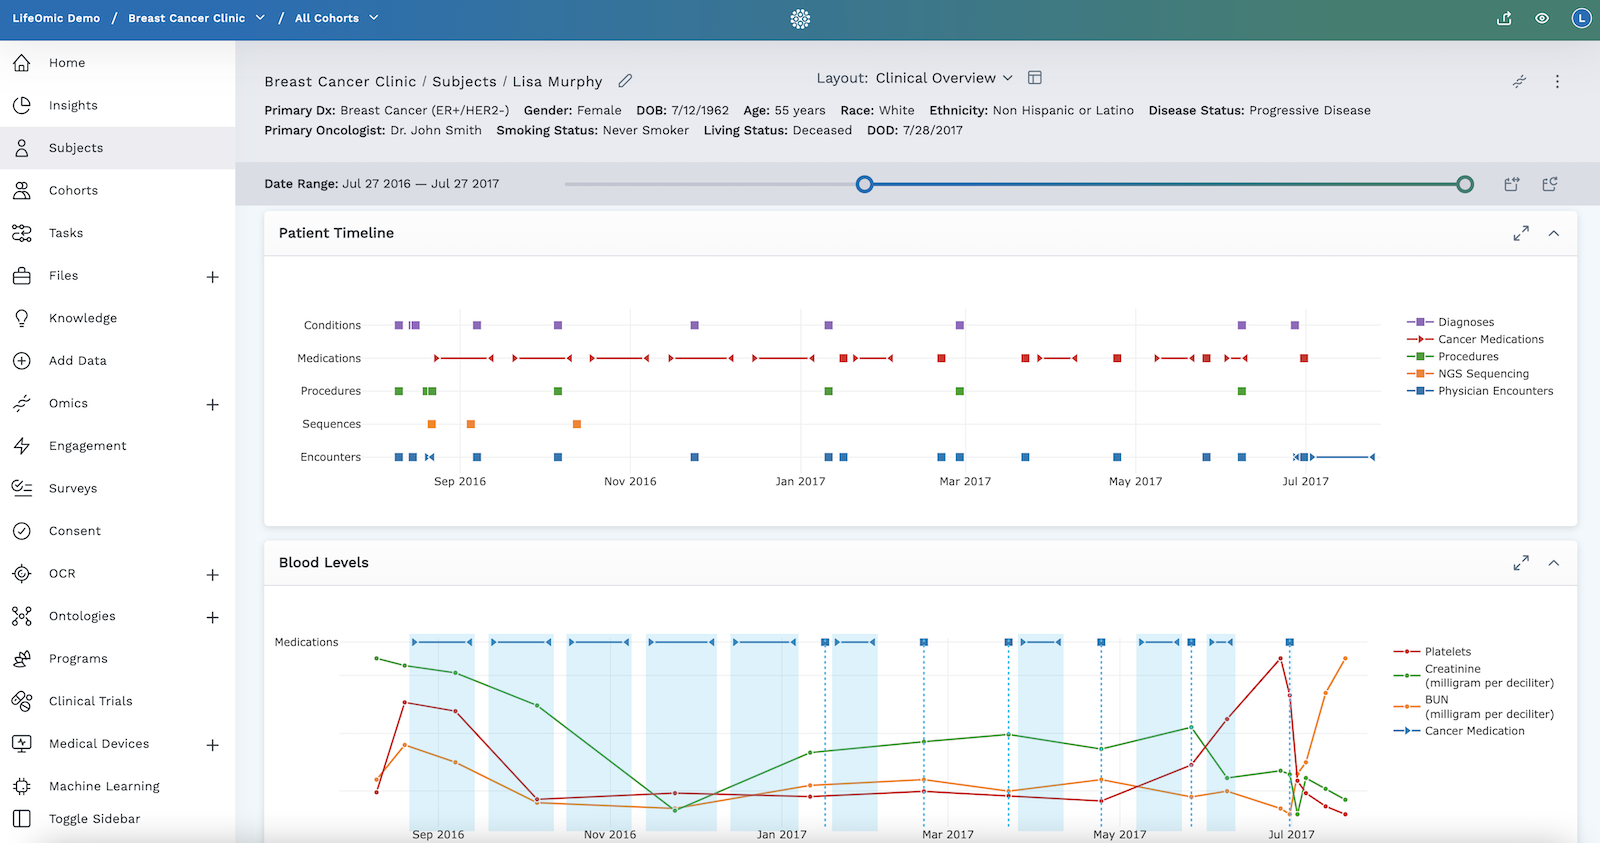
Subject Viewer Overview
The Subject Viewer allows you to view subject data in various layouts. This data may include procedures, medications, omics data, documents, images, survey results and more, as graphs and in tables. It is accessed by clicking anywhere within the row of a subject in the Subjects tab. The data displayed on the Subject Viewer page will depend on the layout selected and which modules are in the layout.
Layouts
A layout is a page comprised of the header section and various modules displaying subject data. Layouts can be customized to show the data you're most interested in viewing. A project can have multiple layouts which users can select from the dropdown menu in the header.
You can easily add common layouts from the LifeOmic Platform library to your project, or you can create a custom layout.
Add a Layout
How to Add a Layout to a Project:
-
Navigate to the Manage Layouts page:
-
If this is the first layout in the project: In Subject Viewer, click Create Layout in the header to open the Manage Layouts page.

-
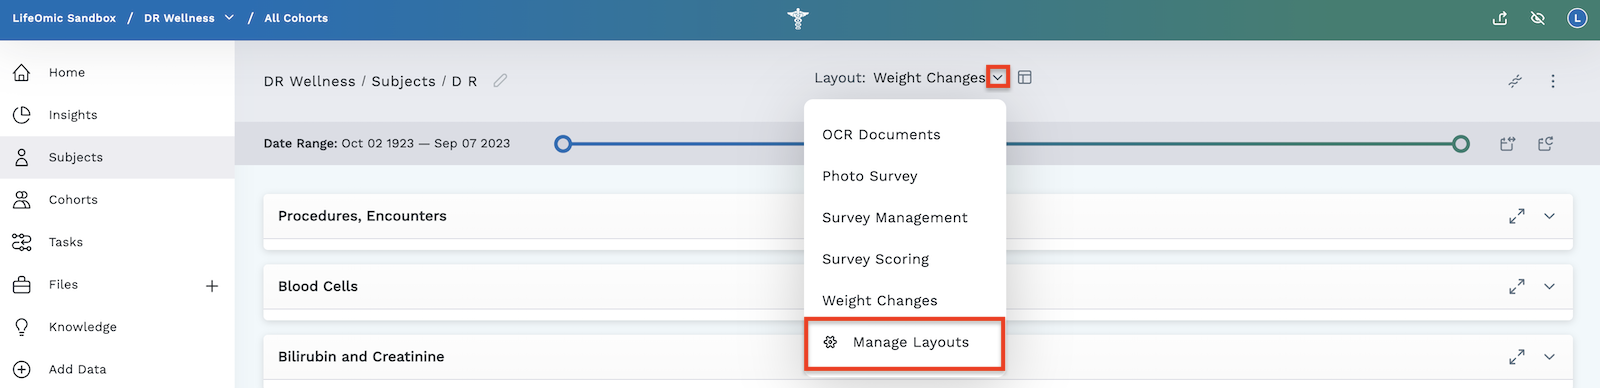
For adding an additional layout to a project: Click on the Layout dropdown and click Manage Layouts .
-
-
Once in the Manage Layouts page, click to open the Add a Layout page (shown below).

-
Select from a prebuilt layout or craft a new layout:
- Prebuilt Layout:
- Click on the Layout Library tab.
- Scroll through available layouts or use the Search Library search box.
- In the layout row you wish to add, click on the (far right of the row).
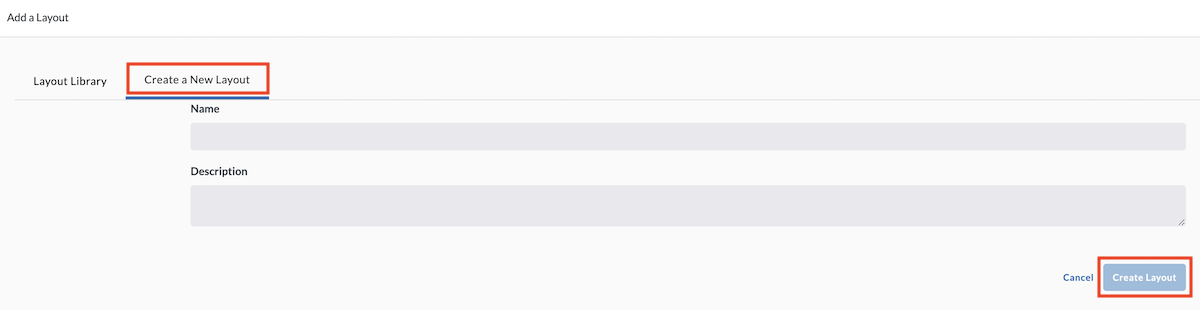
- Create a New Layout (this gives you a blank layout where you can add modules):
-
Click on the Create a New Layout tab.
-
Give the layout a name and description, then click Create Layout.
-
You'll return to the Manage Layouts page where you can see your new layout. On this page you can also:
- Select the default layout.
- Add another layout by clicking .
-
Click Done to return to the Subject Viewer page.
-
- Prebuilt Layout:
Layout Edits
You can access the Layout Edit tools by clicking the Layout icon . The following tools display to the right of the layout name:

The tools available include:
-
- Allow subjects to view this layout - This toggle will either let subjects view this layout when they are in the LifeOmic Platform or prevent them from viewing it.
-
- Raw Edit: Here you can view and copy the JSON code of the current layout. This is helpful if you want to copy a complex layout you created in one project and place a copy of it in another project.
- Click the Raw Edit .
- Click the Copy to Clipboard button at the bottom of the screen with the JSON code.
- Click the "X" in the top right corner of the JSON code screen to leave that screen.
- Click to a different layout or a layout in a different project.
- Click the Raw Edit in this current layout.
- Select all the code on the screen (to delete existing layout) or add the copied layout to an existing layout by clicking the screen in the location you want to add the new layout.
- Paste the code onto the page using ++ctrl+v++ (Windows) or ++cmd+v++ (Mac).
- Click Save at the bottom of the screen.
- This takes you to the Layout Dashboard. Any data in the current project that applies to the newly added layout modules is applied.
-
- Clear - This clears your entire subject viewer dashboard.
-
- Save Changes - This saves any changes you've made to the existing layout.
-
- Cancel - This cancels anything you've added since your last save and takes you out of the Edit Layout menu.
Subject Viewer Header

The header at the top of the page by default includes:
- Breadcrumb path of users location in LifeOmic Platform: Project Name/Current Tab/Subject
- to access and update the subject's demographics
- to select your layout from the dropdown or access the Manage Layouts page
- to edit the layout
- to access Omics Explorer
- to assign a survey or enroll a subject in a program
The header can be configured to include more information about the subject and data can be displayed or available in a dropdown format (to reduce clutter and save space). This information often comes from the subject's medical record but can come from other sources as long as it’s tagged appropriately to make them accessible.
Adding to or editing the Header data requires (ABAC layoutAdmin) permission. To grant privileges, see Access Control.
Add Header Data to a Layout
Users with the layoutAdmin ABAC access have access to and the ability to add and modify what data is displayed in the page header.
How to add header data to a layout:
-
Navigate to the layout that you'd like to customize with specific header data. Click on any subject, then select the drop down arrow to find the desired layout.
-
Click the layout icon to open the layout tools. This also reveals the Header Data button.
-
Click the Header Data button.

-
Add data fields to be displayed in the Header or Dropdown by clicking on the tab desired in the window that opens.
-
Click the + Add Field button.
-
Select the field from the dropdown.
-
Edit the label (optional).
-
To switch the field to Header or Dropdown, click the Move Field to Header/Dropdown button.
-
Click Apply to commit changes.
-
Click the Save Changes button in the row of layout tools to save these changes.

It is important to complete step 10 and click the Save Changes button. If you only click Apply and fail to also save the layout, the header data customization will not be saved once you navigate away.
In the example below, we customized the OCR Documents layout to display the subject's age in the header. Age now displays in the subject viewer header for all subjects in this layout in this project.

Header Shortcut to Assign a Survey or Enroll in a Program
Use the quick access button in the header to easily assign a survey to a subject or enroll them in a program.

- Click the button to the right of the header.
- Select either Assign Survey or Enroll in Program.
- In the window that opens, use the dropdown menu to select the survey to assign or the desired program.
- To assign a survey, click Assign. To enroll a subject in a program, click Enroll.
Edit Header Settings
Use the Header Data button to adjust, edit, or remove what data is seen and located within the header/header dropdown.
To Adjust Header Fields:
-
Click the Header Data button (if you do not see this button, try clicking on the layout icon in the header )
-
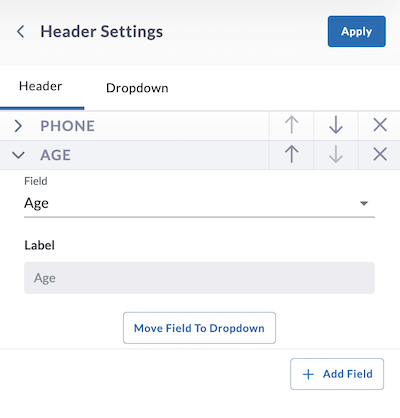
Click on either the Header tab or Dropdown tab (see image below) to adjust the fields there.
-
To edit Header fields:
- Move a field up or down: Move a field up or down in the display (as shown in the image above) by clicking the up or down arrow beside the field.
- Delete a Field: Clicking the "x" deletes a field.
- Move Field to Dropdown/Header: Clicking this button will move the field you select to the other location (either dropdown or header).
- Add a Field: Clicking + Add a Field lets you add more fields to be displayed.
-
Click Apply to save changes.
-
Click the Save Changes button in the row of layout tools to save these changes.
If in masked mode (icon to toggle this on and off is found on the top right of the page, above the header), identifying data (such as DOB and name) is altered to a more vague display (such as birth year and initials).
Timeline Slider
A timeline slider is situated at the top of the Subject Viewer page. It dictates the timeline for everything in the view. A default time range can be set and is specific to the layout you are viewing. Whenever you open any subject, it will show this default timeline you've set.

The timeline slider can be adjusted by grabbing a handle and pulling it to show the time range you are seeking. If you grab the handle and drag it all the way to the left, it will show about 30% more of the subject's timeline. This can be repeated to widen your view.
To the right of the timeline are two icons to return you to common views:
- Maximize Date Range - shows everything since the subject's DOB
- Reset to Default Date Range - returns to the preset date range
You can also adjust the time range you view by zooming in on the graph. This is done by hovering your cursor on the graph, clicking the zoom tool (which is selected by default) on the graph, then click and drag the cursor to dictate the time range you wish to zoom in on.
Modules
Modules are the graphs, tables, and other configurable ways of displaying a subject's information in a layout. After creating a layout, you can customize it by adding modules to quickly and easily display subject data. The LifeOmic Platform has some common modules available in a library for easy adding to your project, or users can create a custom module.
Visit the Modules section for more detailed information about: