Analyze your Document and Build Ontologies
These operations are found under OCR > Settings > Analysis.
Run Automated Analysis
OCR uses automated analysis to identify and highlight phrases with data potential. You can configure full or project data based analysis.
Full analysis triggers Amazon Comprehend Medical processes and includes large, standard medical databases, such as ICD-10-CM. Full analysis also includes all the operations of project data based analysis. This includes using your LifeOmic Platform project data and any ontologies you have loaded for that specific project. Both analyses also look at your project's previously extracted data and infer similarities.
Project data based analysis does not employ Amazon Comprehend Medical.
If you are unsure of the type of analysis needed, configure project data based analysis. Project data based analysis is faster and consumes less resources.
-
Under the OCR tab on the left side menu, click Settings.
-
Under Analysis, click Project data based analysis or Full Analysis.
-
Click Update Settings.
-
Import a document or view an existing document under the All Files tab.
- If you are viewing an existing document that was imported before you configured automated analysis, click the Data Tables icon and click Reanalyze Document.
- After automated analysis is configured, importing a document automatically triggers the analysis.
-
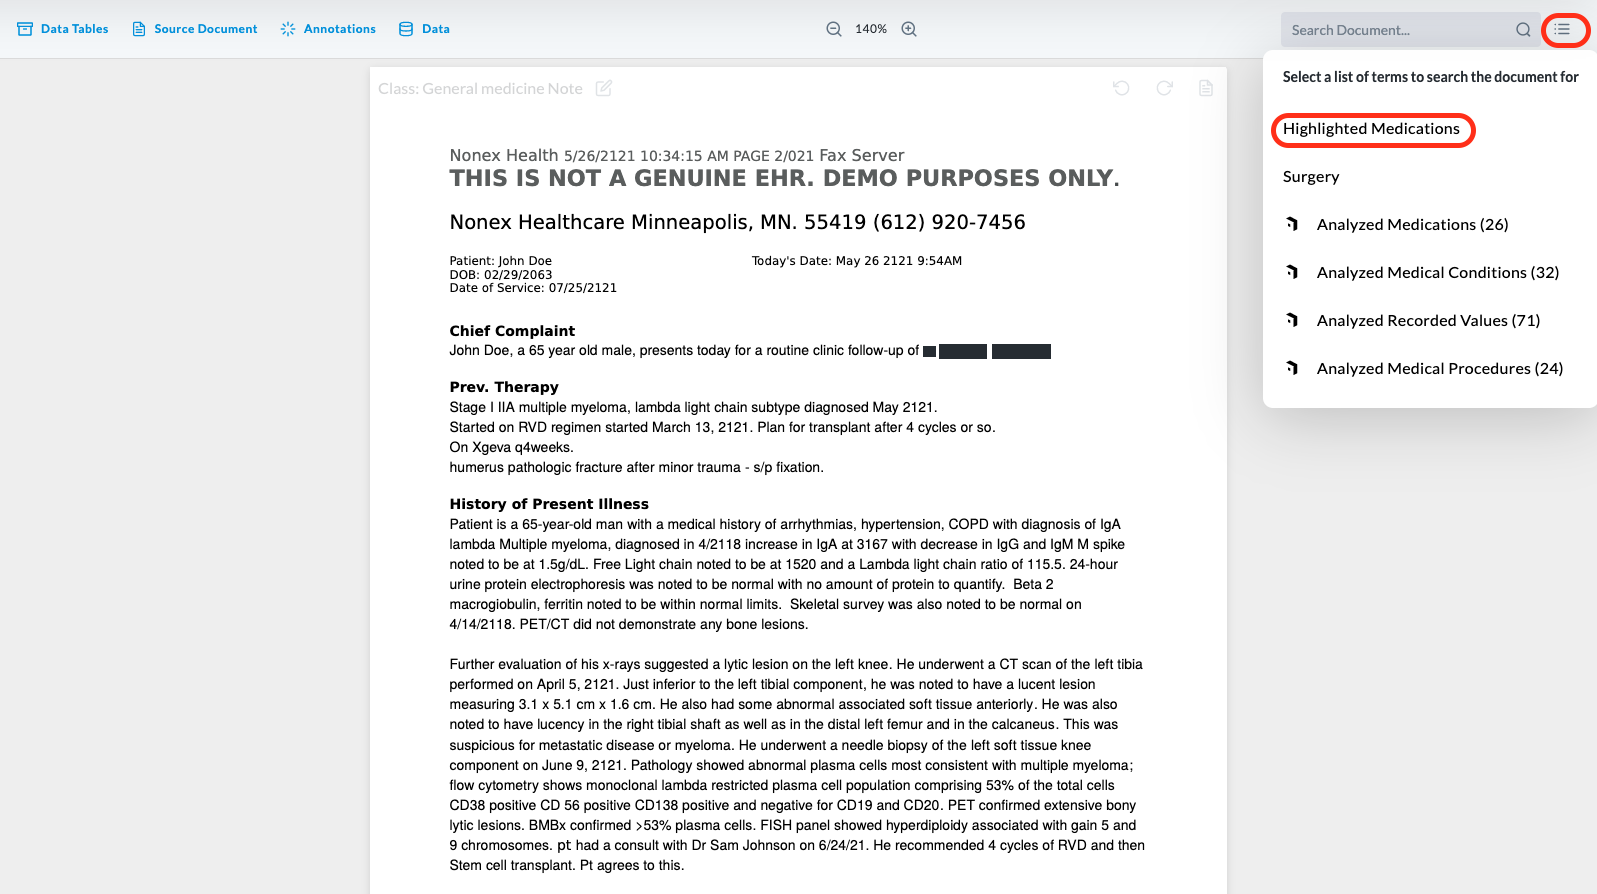
At the top of the screen, click the Annotations icon and click Automated Analysis.
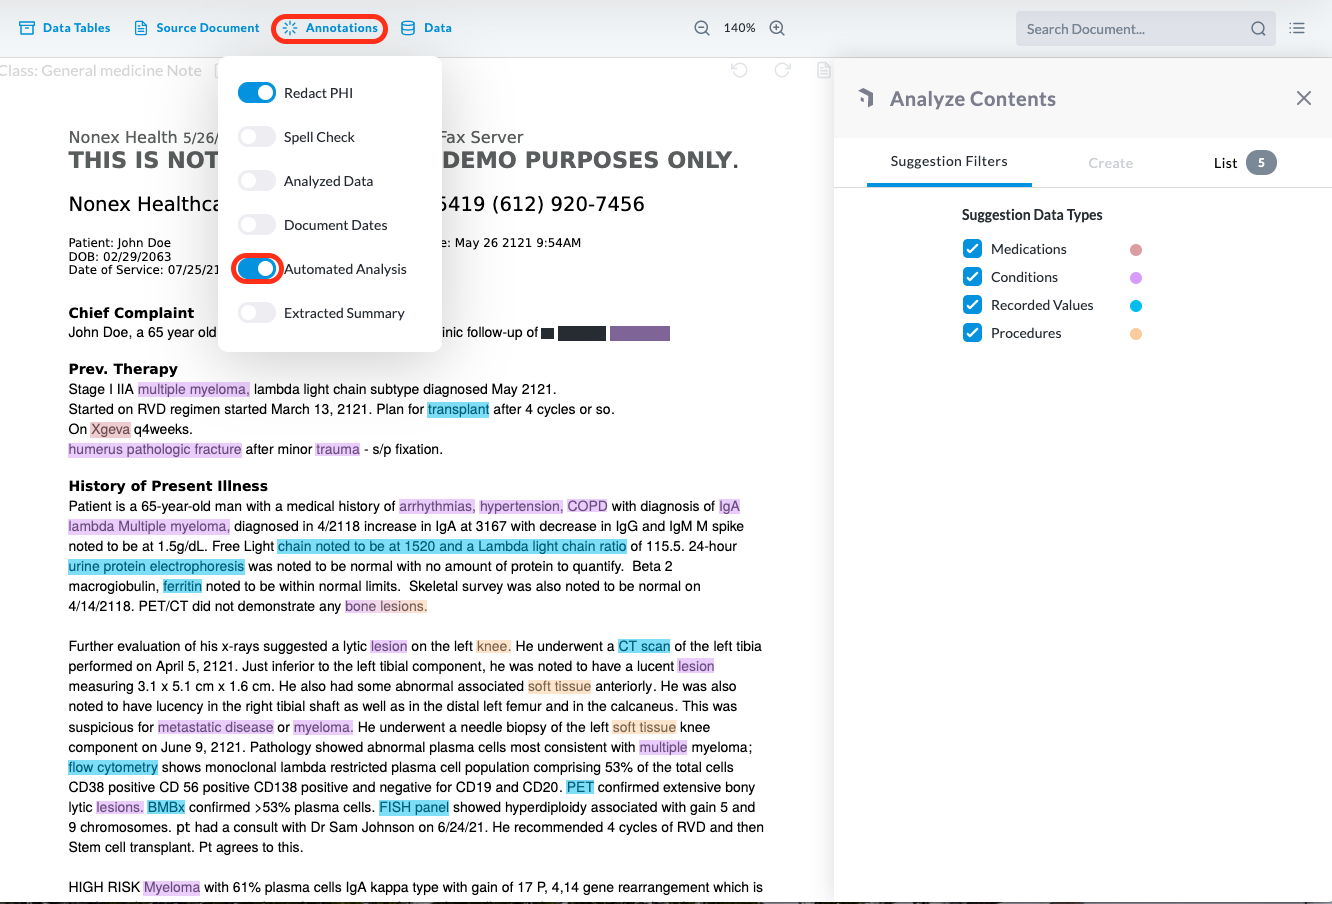
-
Hold down your mouse button and select a highlighted term.
You can hit the select icon to extend the selection to the entire line.
-
From the menu that appears, click the Analyze Selection icon
 .
.The Analyze Contents menu appears with suggestions for FHIR data.
-
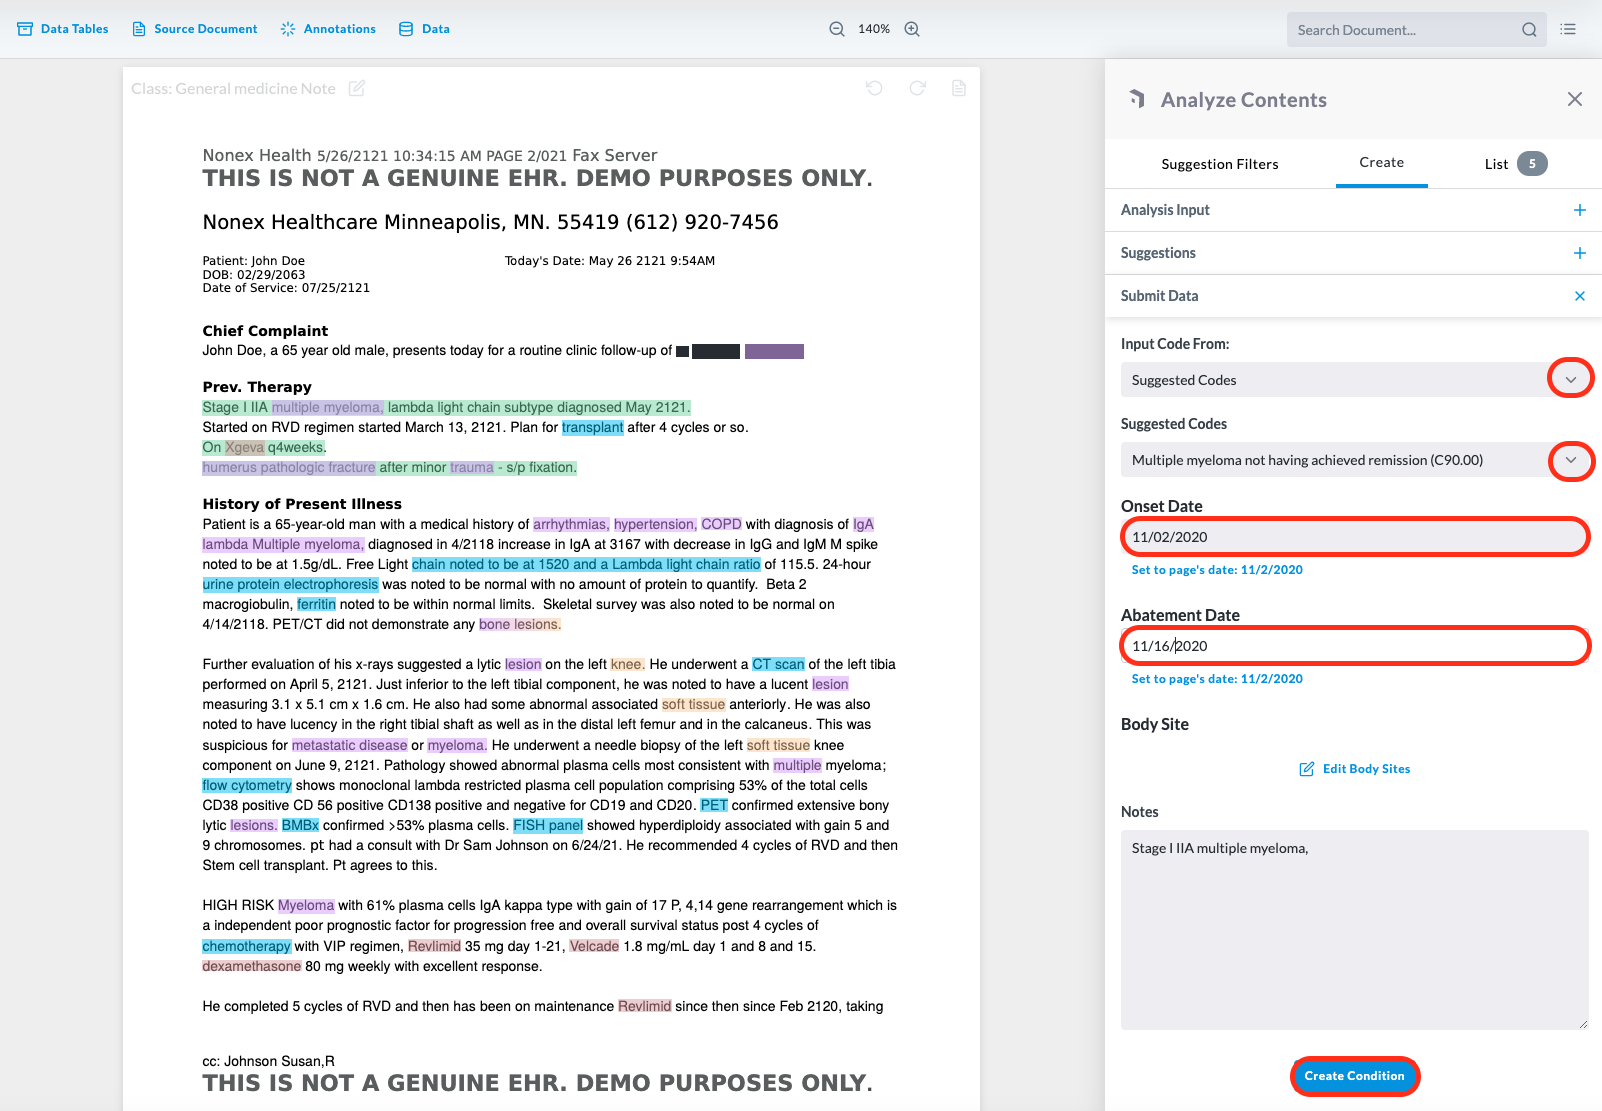
Click on the most accurate suggestion. Your choice populates other fields.
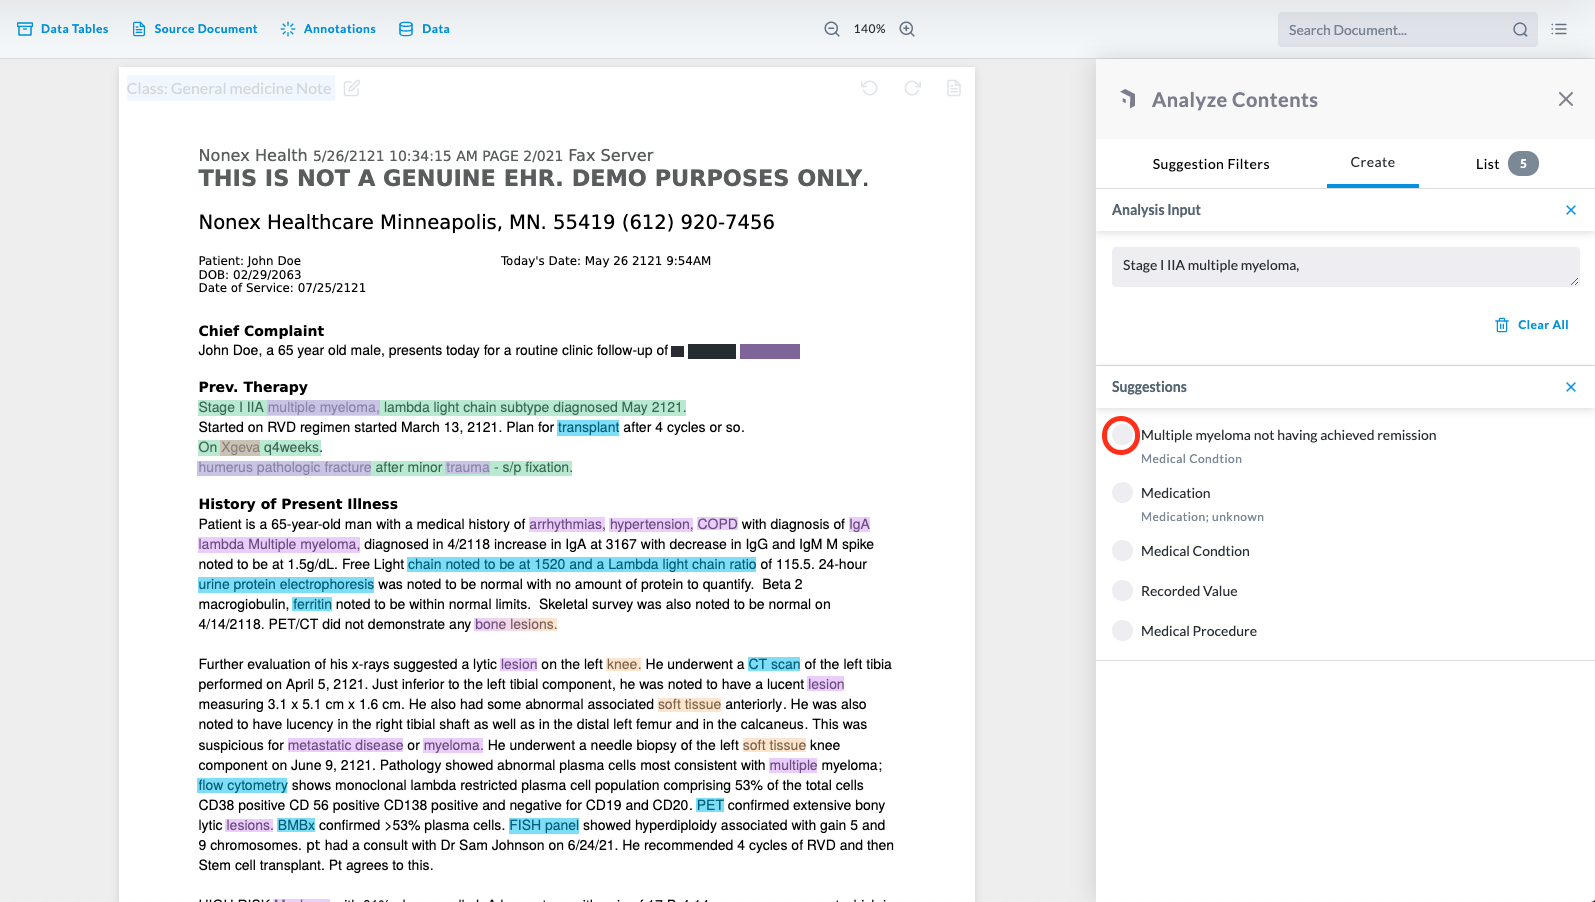
-
Go through the drop-down menus and select the most accurate options and confirm the suggested information or enter more accurate information in the fields.
-
Once you are satisfied with the information, click Create ....
-
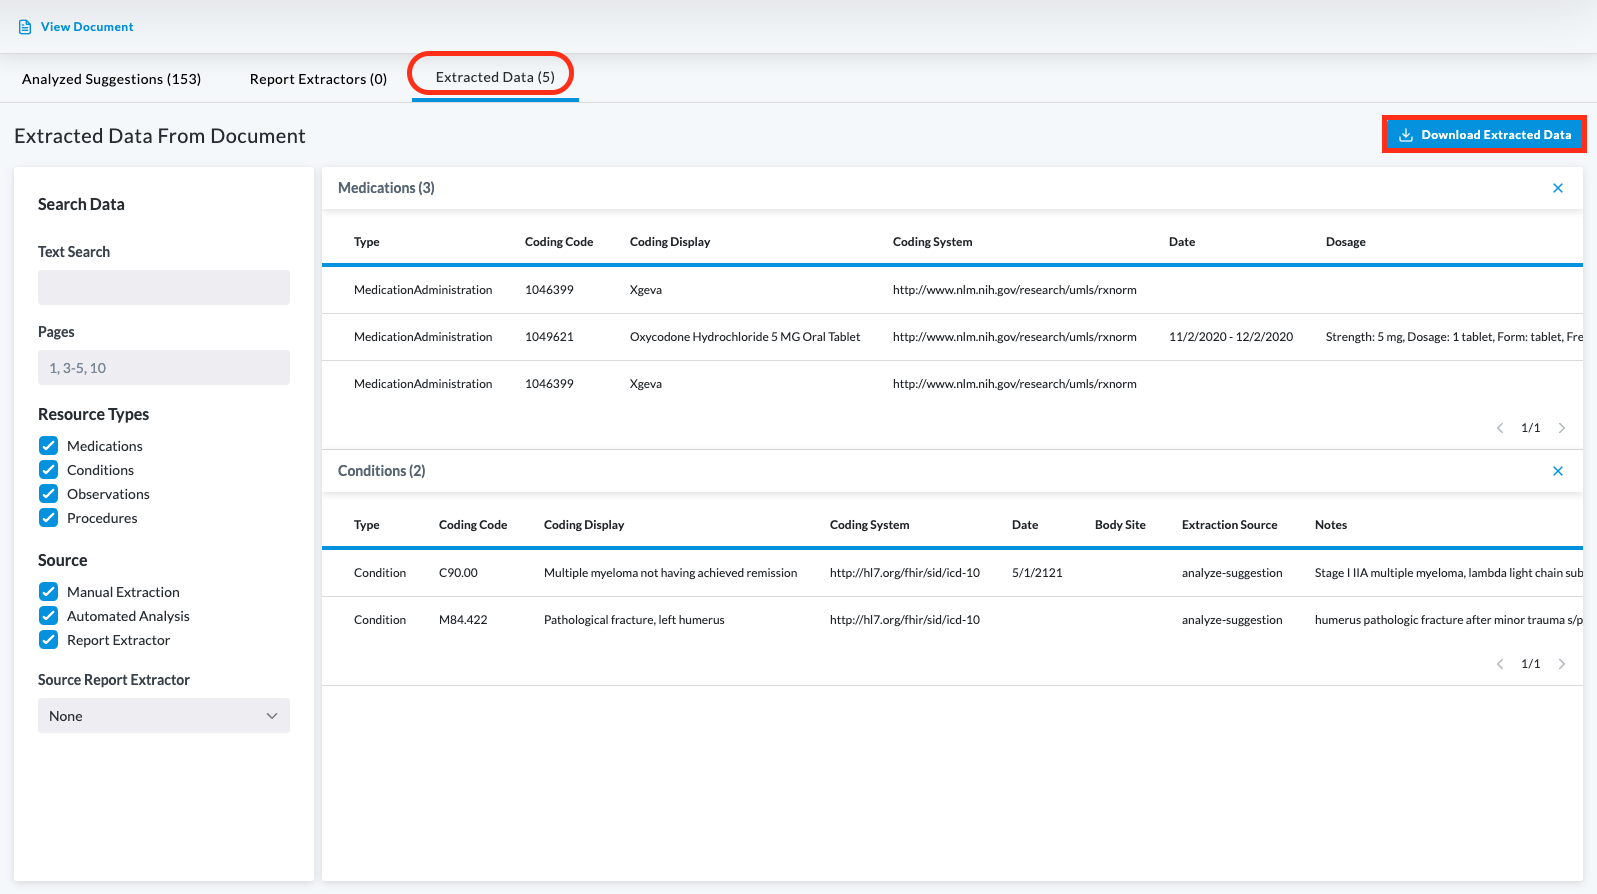
To view the created data, at the top of the screen, click the Data icon and then the Analyzed Data icon
. -
To view tables of the suggested data, click the Data Tables icon and click the Analyzed Suggestions tab.
-
To download a CSV file of the extracted data, click the Extracted Data tab, and click Download Extracted Data.
Analysis Confidence Threshold
You can choose a level of certainty and configure OCR to only display analyzed suggestions that are above that threshold. The default setting is for OCR to show all analyzed suggestions.
Understanding the Analysis Confidence Threshold
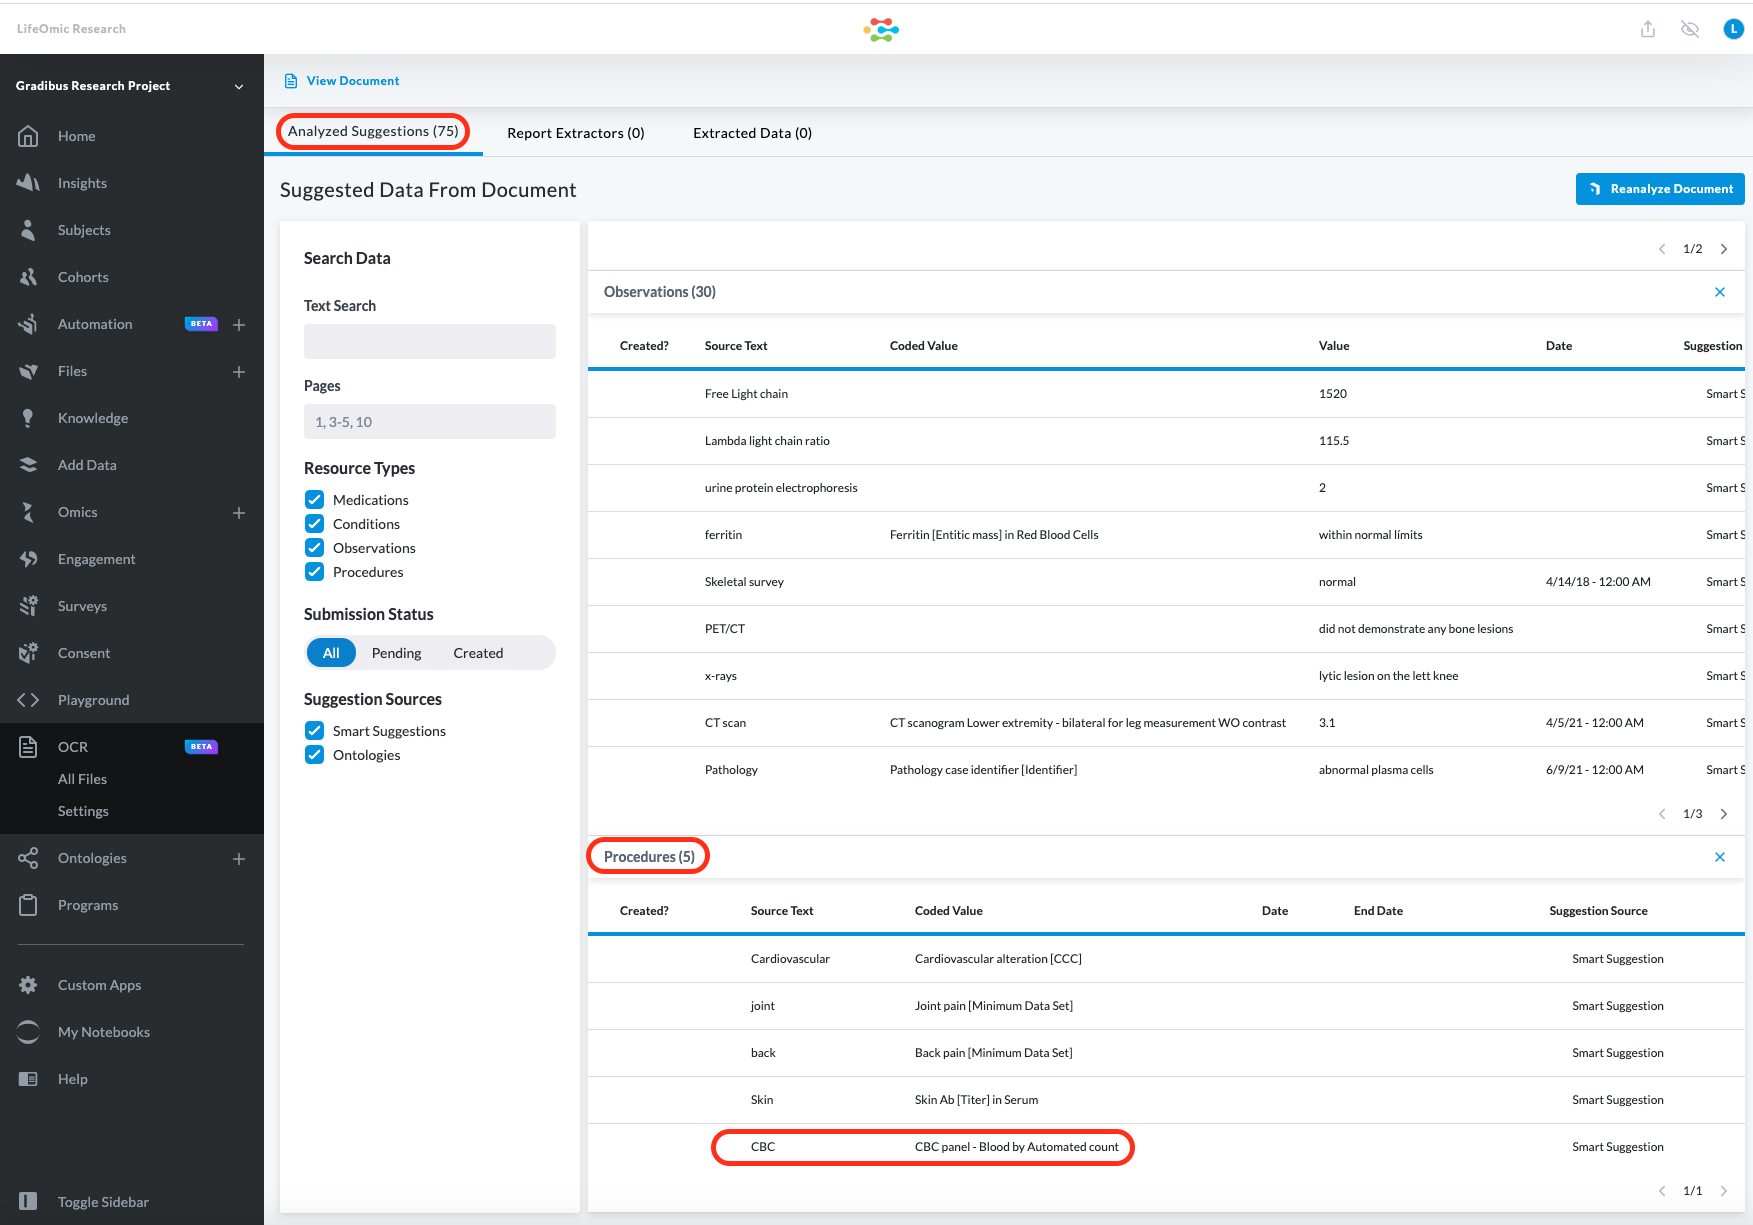
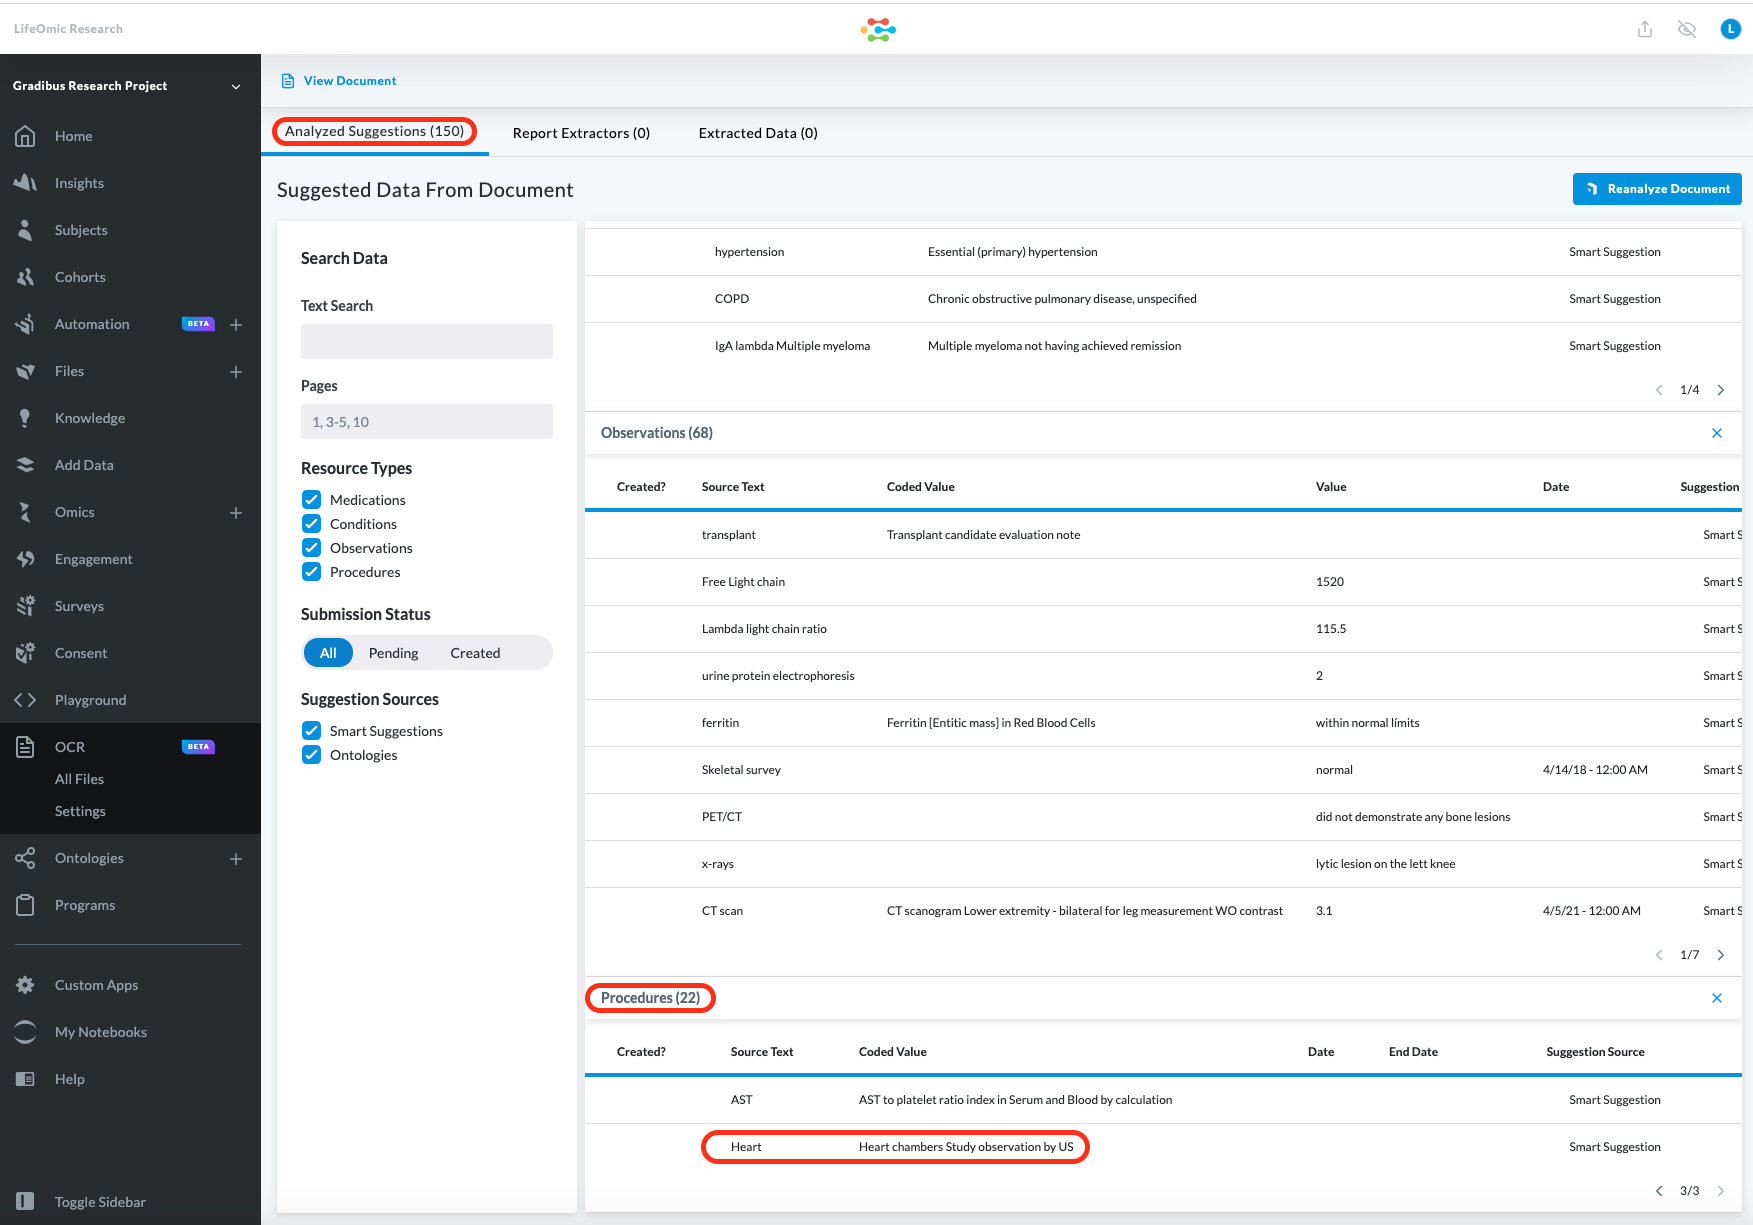
When OCR analyzes a document and generates suggestions, the system assigns different levels of certainty to the results. For example, the system may assign a very high level of certainty to the correlation between the term CBC in the source text and the code 58410-2 for a CBC panel, but it may assign a lower level of certainty to the correlation between the term Heart in the source text and the code 18142-0 for a Heart chambers study observation.
In our first example, the user sets the confidence threshold for the OCR analyzed suggestions to Very High Confidence. The Data Tables page displays only the 75 analyzed suggestions that meet or exceed that threshold. In the Procedures section, only five suggestions are shown, including CBC. The Heart suggestion is not displayed, since its degree of certainty falls below the Very High Confidence threshold set by the user.
In our second example, the user sets the confidence threshold for the OCR analyzed suggestions to Low Confidence. The Data Tables page now displays the 150 analyzed suggestions that meet or exceed this lowered threshold. In the Procedures section, the number of suggestions increases to 22. The Heart suggestion is now displayed, since its same degree of certainty now meets or exceeds the new Low Confidence threshold set by the user.
Set an Analysis Confidence Threshold
- Under the OCR tab on the left side menu, click Settings and the Analysis tab.
- Under Analysis Confidence Threshold, expand the menu and click a confidence level.
- Click Update Settings.
- To see the Analyzed Suggestions using your set confidence threshold, view a document by clicking the All Files tab and the View Document icon next to a file.
- At the top of the screen, click the Data Tables icon .
Add a Search List
In addition to a standard document search function, OCR lets you create a search list of multiple terms that you can access from any document within the project.
-
Under the OCR tab on the left side menu, click Settings and the Analysis tab.
-
Click Add Search List.
-
Enter a descriptive name in the List Title field.
-
Enter a search term or multiple search terms separated by commas.
-
Click Add Search Term.
-
Click Update Settings.
-
To access the search list, view a document.
-
Click the list icon to the right of the search field and click your choice of search lists.
The terms on the search list are then highlighted in the document.
-
Click the list icon to the right of the search field to display a list of search results.
OCR Ontology
In addition to the machine learning analysis driven by Amazon Comprehend Medical and its general, public databases, such as ICD-10-CM, OCR can analyze documents using a custom ontology created by your organization. The ontology-based analysis is driven by your needs and a set of key terms and details you provide. This targeted focus allows the ontology-based analysis to be very accurate and efficient.
Creating an OCR ontology is simple. You download the spreadsheet template from under the OCR Analysis tab and add your desired terms and additional information, such as medical coding. You then upload the completed spreadsheet and complete the Index a Project with an Ontology procedure.
When you configure the automated analysis full analysis option, OCR automatically runs both types of analysis during document ingestion. When you configure the project data based analysis option, OCR runs only the ontology-based analysis. Both the resulting Ontologies Suggestions from the ontology analysis and the Smart Suggestions from the Amazon Comprehend analysis display on a document's Data Tables page, which also allows you to filter the sources.
OCR ontology is one of two OCR tools that search a document for a set of terms you provide. The search list is a basic tool that is simple to configure in the app and highlights a limited number of terms. OCR ontology is a sophisticated tool that uses a versioned spreadsheet of potentially thousands of terms and provides detailed suggestions to help you create recorded values.
Create and Upload an OCR Ontology
-
Click the OCR tab on the left side menu, click Settings and Analysis.
-
Click Download Template.
-
Open the template spreadsheet with Microsoft Excel or any spreadsheet program compatible with the Microsoft Excel Open XML Format (.xlsx).
-
Fill in the spreadsheet cells with the appropriate information using the example and chart below:
Ontology Example
 Ontology Cell Description Chart
Cell Type Description Category This is a user-defined subset of information that includes the display term. For example, the display term heart attack might fall under the category cardiac. You can include multiple terms and separate them with a pipe delimiter ```( Display OCR searches for this term and displays it in the analysis suggestions (required). Code Any code, such as an ICD-10-CM code or laboratory testing company code, that you want associated with the display term. If you do not have a code, you can add the display term to this field (required). System The source for medical coding. If you are not concerned with proper medical coding, you can use http://lifeomic.com/temp(required).Synonyms OCR searches for words or abbreviations that have the same meaning as the display term but uses the display term in the suggestion. You can include multiple terms and separate them with a pipe delimiter ```( IsObservation Put Yes if the display term falls under the FHIR Observation resource. Leave blank if it does not. (It is required that at least one of the four resources is marked Yes.) IsMedication Put Yes if the display term falls under the FHIR Medication resource. Leave blank if it does not. IsCondition Put Yes if the display term falls under the FHIR Condition resource. Leave blank if it does not. IsProcedure Put Yes if the display term falls under the FHIR Procedure resource. Leave blank if it does not. -
Delete row 2 (the example row) in the spreadsheet and save the ontology spreadsheet to your computer with a useful name.
-
Click Upload New Ontology Version.
-
Navigate to your saved ontology .xlsx file and click Open.
-
Complete the Run Automated Analysis procedure.
-
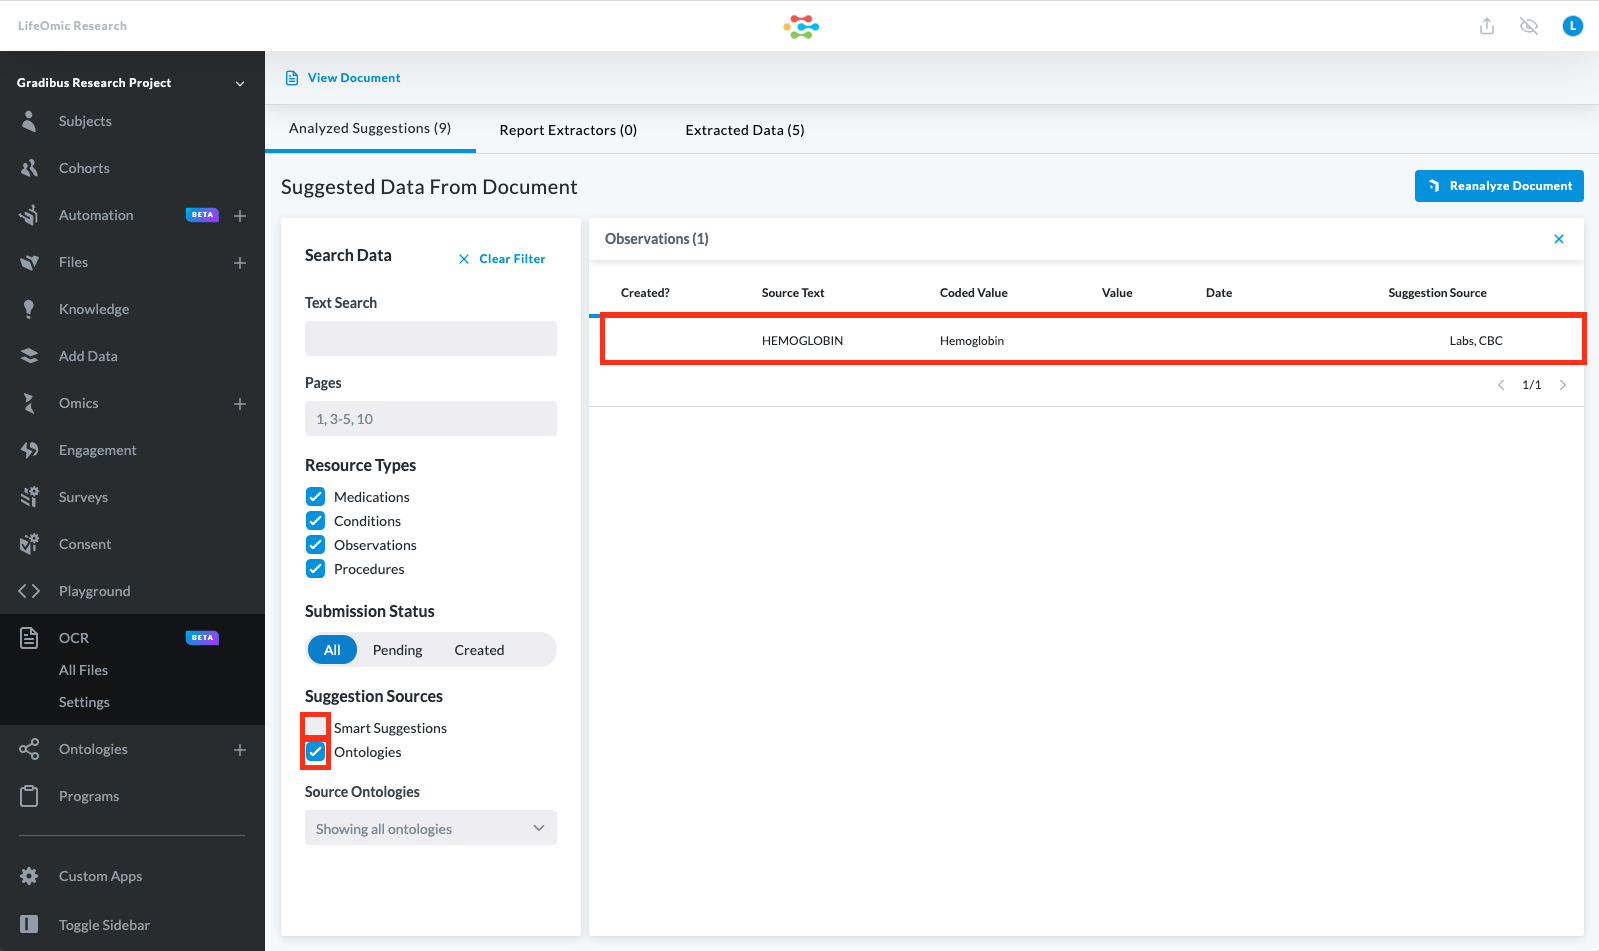
To view tables of the ontology suggestions, from an open document, click the Data Tables icon and click the Analyzed Suggestions tab.
-
Under Suggestion Source, confirm the Ontologies box is checked to display the ontology-based suggestions. If Smart Suggestions is checked, click it to deselect Smart Suggestions and hide any Smart Suggestions. Smart Suggestions are generated from the AWS Comprehend Medical analysis.
-
Under Source Ontologies, select a specific ontology if you do not want to show all ontologies and click Reanalyze Document. Note: You can filter Ontologies results by category in the Data Tables view or the Document view with suggestions turned on.
Index a Project with an Ontology
Indexing a project with an ontology searches for all of the terms in the ontology in all of the documents in a project. It creates an index document that highlights the location of all of the ontology terms in the documents along with other relevant information. You can download the index document in CSV format.
- Click the OCR tab on the left side menu and click Settings and the Analysis tab.
- Scroll down to the Ontology Project Index section and click Index Project or Reindex Project. The indexing can take several minutes for larger projects.
- Click the Download Index CSV. The LifeOmic Platform generates the index file and starts a download to your PC.
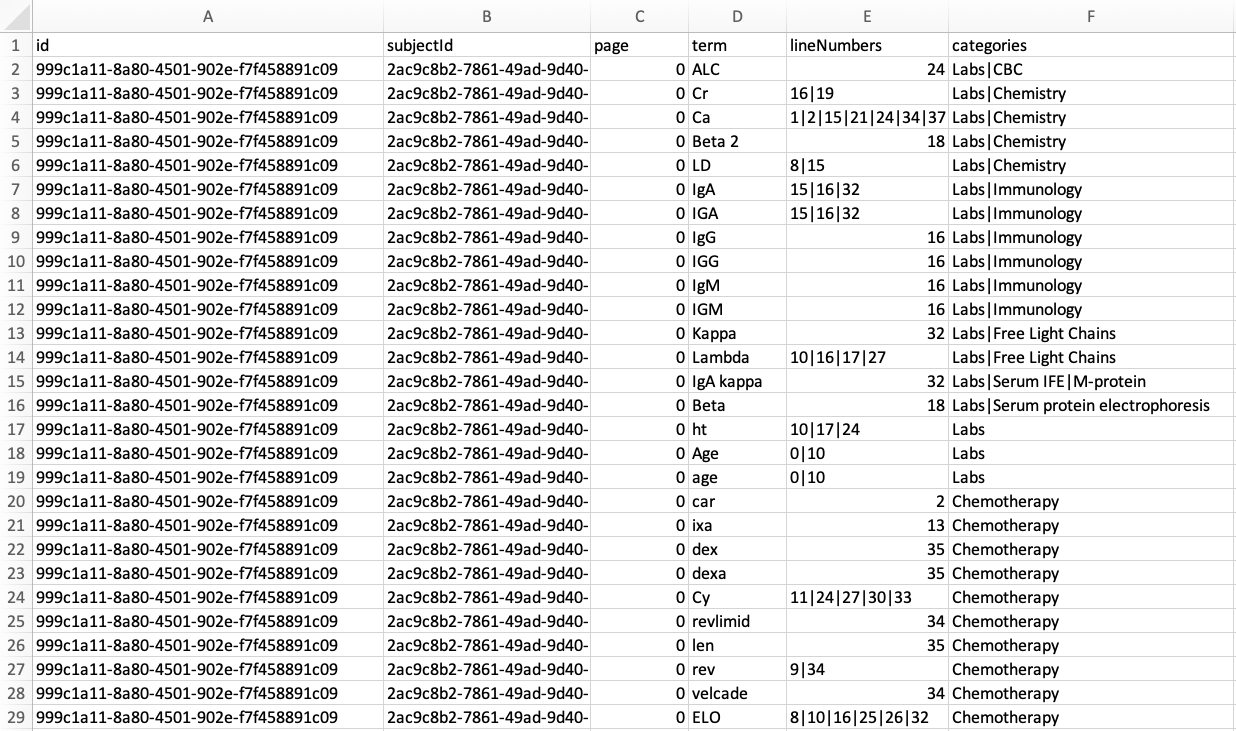
- Find the index file in the Downloads folder or other location on your PC. The file name is
ocr_ocr-ontology-index.csvor something similar. - Open the file with a spreadsheet program, such as Microsoft Excel, and use the chart below to help read the data.
| Column Name | Description |
|---|---|
| id | This is the document id of the indexed document. |
| subjectid | A subject ID appears if the document was imported under a specific patient in the subject viewer or a subject was manually assigned under Document Details. |
| page | The document page that contains the term. |
| term | The indexed term from the ontology. |
| lineNumbers | The line on the page that contains the term. Multiple lineNumbers appear for multiple occurrences of a term. |
| categories | The root of the ontology term if available. |