Advanced Filters
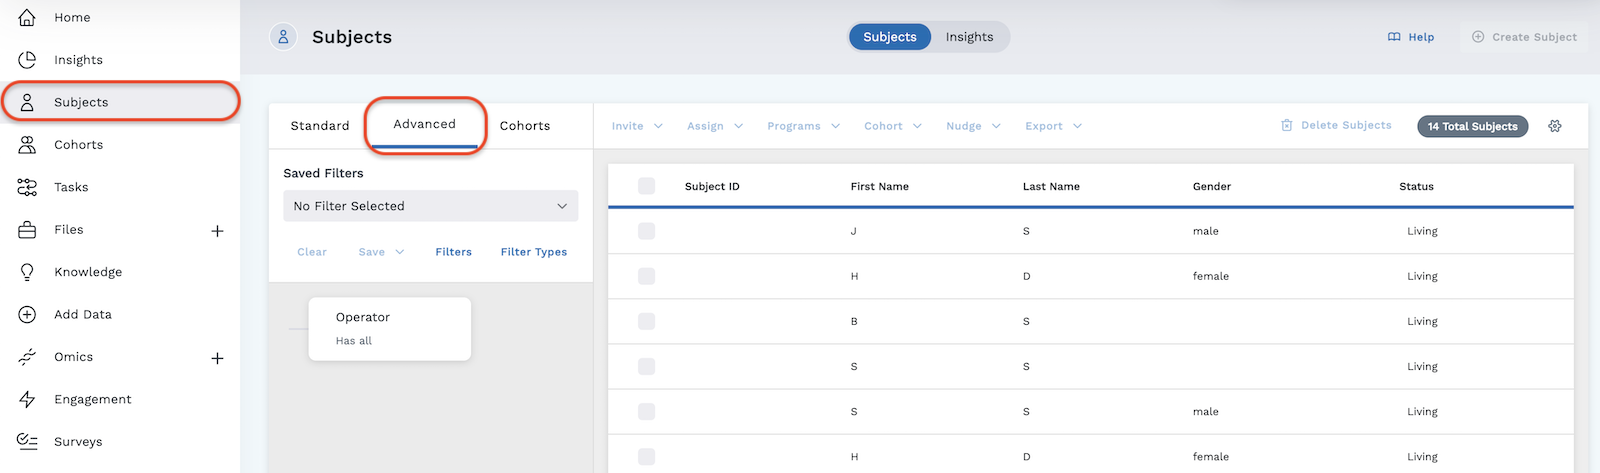
The Advanced tab of Subjects is where users can build complex filters. From the left side menu, click the Subjects tab, then click the Advanced tab.
While all Standard filters are Advanced filters, not all Advanced filters are Standard filters.
An Advanced filter is a complex filter with one of the following:
- Multiple Operators
- An Operator set to either:
- Subjects in ANY sub-filter
- Subjects NOT IN ANY sub-filter
- Competing criteria (For instance, setting a filter to find subjects that have a birth sex of both male and female. This is competing because they cannot be born as both genders.)
Terms
Filter Tree - The Filter Tree is a layout of your selected filters and their Operators. Filter Trees are found on the Advanced tab of the Subjects page.
Operator - An Operator is the root of the filter tree. Each Operator represents a grouping of filters (one or more filters) you've selected. Operator conditions can be set to:
- Has all - Subjects in EVERY sub-filter (All subjects matching these filters)
- Has any - Subjects in ANY sub-filter (Subjects meet one filter or another)
- Has none - Subjects NOT IN ANY sub-filter (Subjects do not match any filter)
Node - A node is like a leaf on the filter tree, representing a filter.
Advanced Layout
The Advanced tab is laid out in a similar fashion as the Standard tab. Orange is the designated color for Advanced filters and is reflected in the orange line across Subjects as well as the colored "filtered subjects" oval located above the Subjects Table.
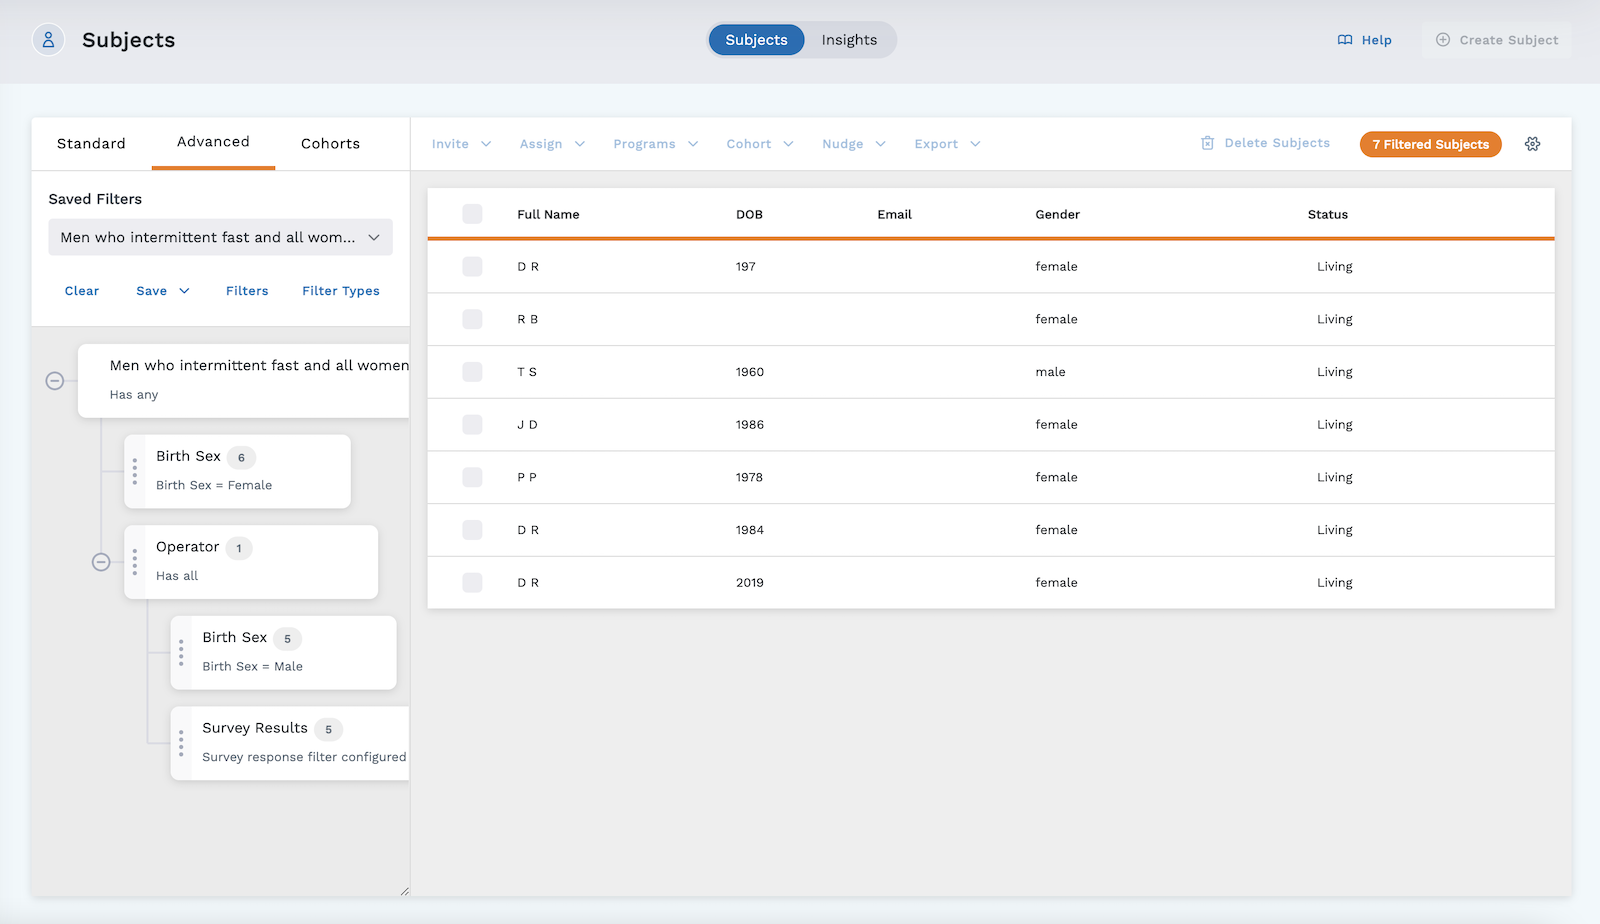
On the left side of the Advanced tab:
- Standard tab, Advanced tab, and Cohorts tab
- Saved Filters - preset complex filters created for the project
- Filter Toolbar - quick tools (clear, save, filters, and filter types)
- Filter Tree - shows the architecture of your filtering criteria
On the right side of the Advanced tab:
-
Subjects and Insights tabs
-
Action buttons - allow you to perform an action on the selected subjects in your project (these become active once you select one or more subjects)
-
Filtered Subjects count - shows how many subjects match your filtering criteria
-
Subjects Table - displays all subjects in the project that meet the filtering criteria you've selected
-
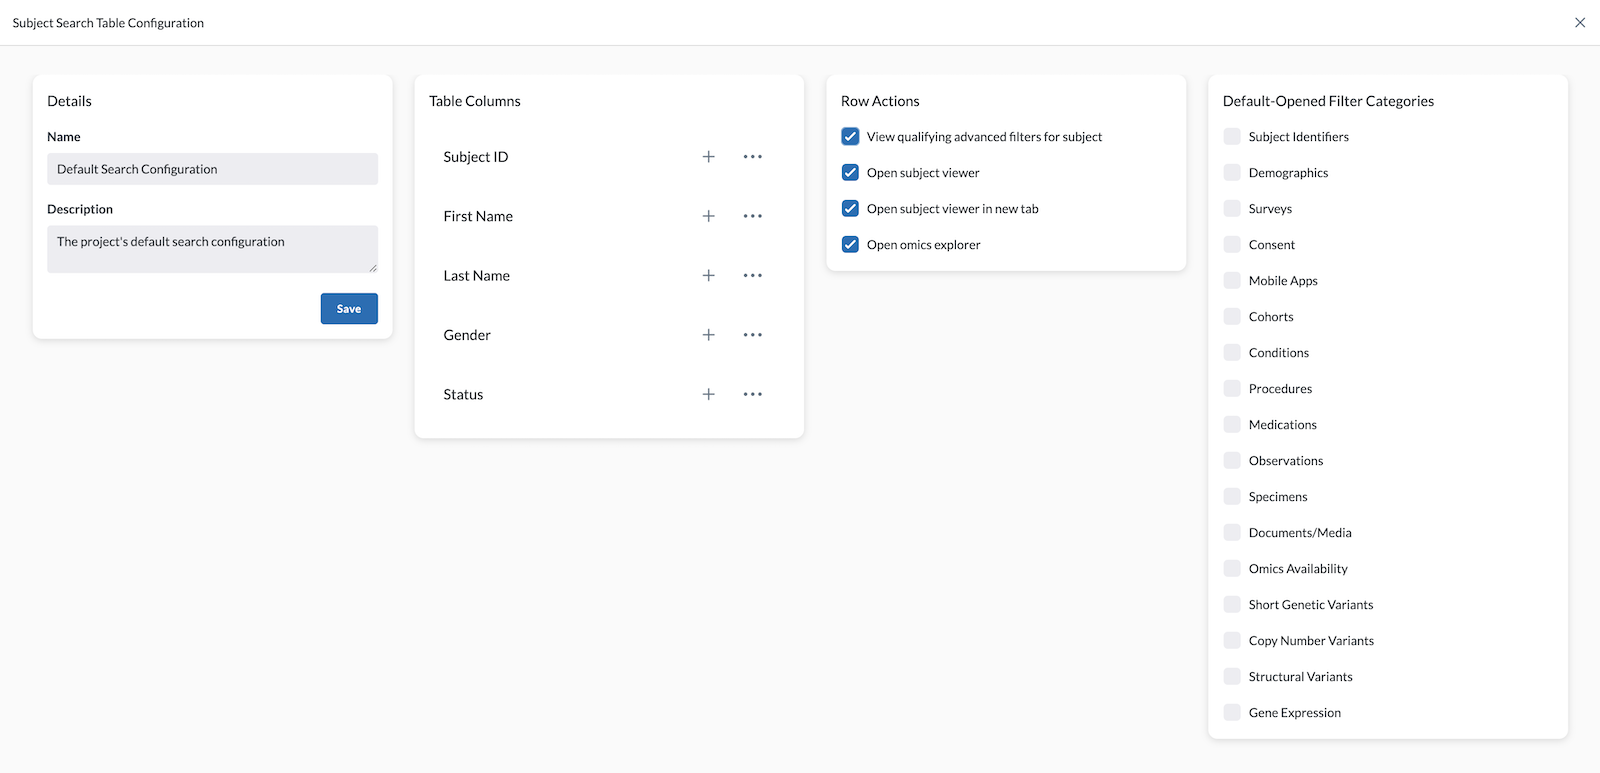
Subject Search Table Configuration - select the table columns, row actions, and default-opened filter categories users will view and interact with
Filter Tree and Adding a Filter
The Filter Tree displays the architecture of your filtering criteria. It is comprised of nodes representing the Operator (root) and the filters (branches) selected. Users can build a complex filter using the filter tree. You can modify your filtering using the filter tree by:
-
Clicking on a node to access the settings and options for that filter
-
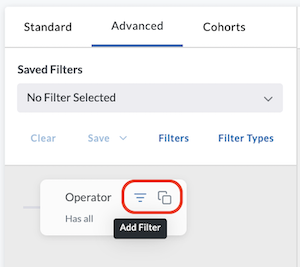
Hovering on the node to access icons to:
-
Add a filter - lets you add a filter to the tree and specify its parameters
-
Clone a filter - lets you clone and modify a filter
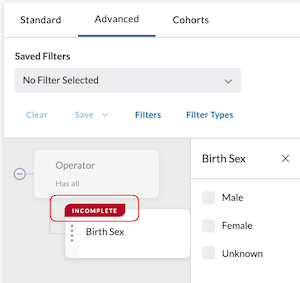
Note: When you add a filter that has more parameters to define, an "incomplete" banner will display on the new node, prompting you to add the parameters to complete the filter.
-
-
Rearranging the nodes on the tree (drag and drop using node handles). When nodes are rearranged, the filtered subjects table updates with the new placement of the Operator.
Operator
The Operator, or root of the Filter Tree, dictates whether the filters branching off from it will find and display subjects that meet every filter, any filter, or no filter. A filter tree can have multiple Operators.
To Configure an Operator:
- Select the Advanced tab. An Operator node appears.
- Click on the Operator node to bring up selection options. In the window that opens, select one of the following (your selection will be denoted on the note):
- Has all - Subjects in EVERY sub-filter
- Has any - Subjects in ANY sub-filter
- Has none - Subjects NOT IN ANY sub-filter
- Select the "x" to close the window.
- Hover on the Operator node to bring up the filter and clone icons.
- Click on the filter icon .
- In the window that opens, select your filtering criteria. Or, to add an additional operator, click the + Add Operator button. Click "x" when finished.
Operator nodes can be relocated within a filter tree and thus altering its filtering outcome. This is done by grabbing the node handle and dragging it to the new, desired location.
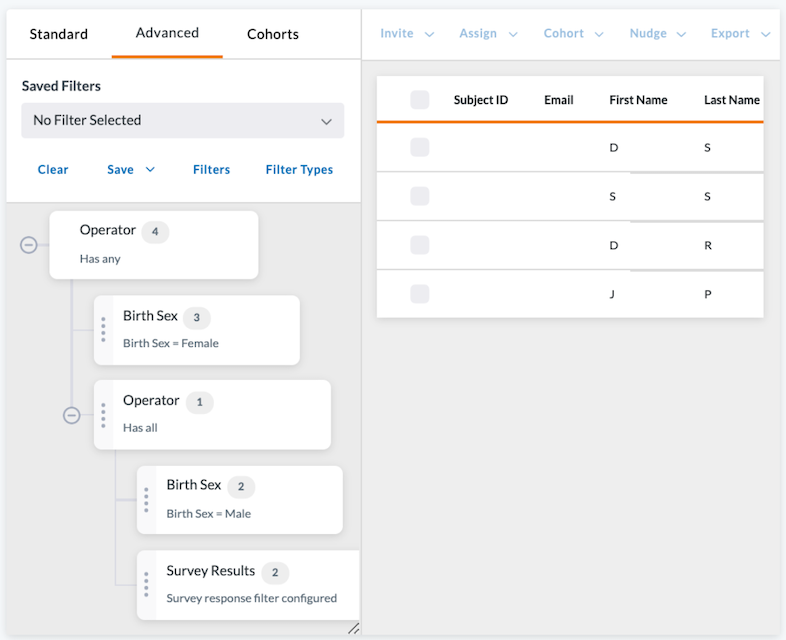
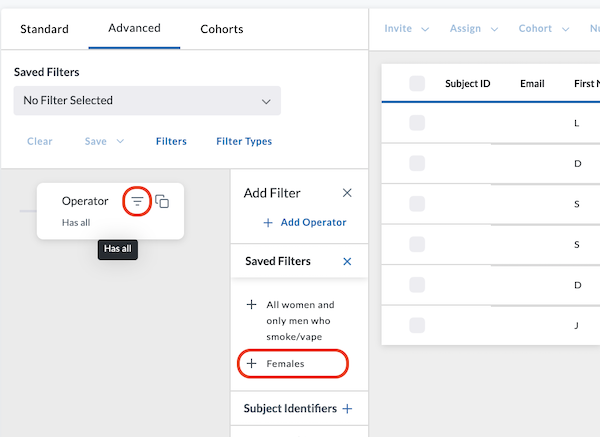
There can be more than one Operator on a filter tree, as shown in the image below. In this example, we filtered our subject pool for the following:
- Everyone who is female
- Everyone who is male that answered "yes" to the survey question, "Do you vape or smoke?"
Saved Filters
Saved Filters are complex filters created and saved by users with the Layout Admin
ABAC privilege. Saved Filters allow other users to access these complex filters with a simple dropdown menu. (For instance, an admin may select filtering criteria seen in high risk cancer patients and save it as a filter named "High Risk Cancer Patients." Other users can access this filter from the Saved Filters dropdown in the Subjects tab.)
How to Save a Filter
There are two options available for saving a filter:
-
Save All - saves the entire filter tree
- Click the Save dropdown.
- Select Save All.
- In the window that opens, give it a descriptive name (to make it easier to select in the future) and a description (optional).

-
Save Selected Nodes and All Children - only saves the selected node and any children nodes connected to it
- Select the Node you wish to save. Any children nodes will also be saved.
- Click the Save dropdown.
- Select Save Selected Node and All Children.
- In the window that opens, give it a descriptive name (to make it easier to select in the future) and a description (optional).
Saving a Filter requires the Administer Layouts permission. This permission is not contained in the default Administrator privileges. To add this permission, see Create a Custom Policy for Access Control.
Accessing Saved Filters
Any Saved Filters created in a project are accessible to users in the following places:
-
Saved Filters dropdown menu at the top left of the Standard or Advanced tabs.
When you click on the Saved Filters search box, each name of the available filters has either Standard or Advanced beneath it, letting you know which type of filter it is.
Also, clicking on a Saved Filter will open the corresponding tab (Standard or Advanced).
-
Advanced tab via a Operator node:
- Hover your cursor on the Operator node
- Click the Add a Filter icon
- In the Add Filter window that opens, select the "+" beside Saved Filters
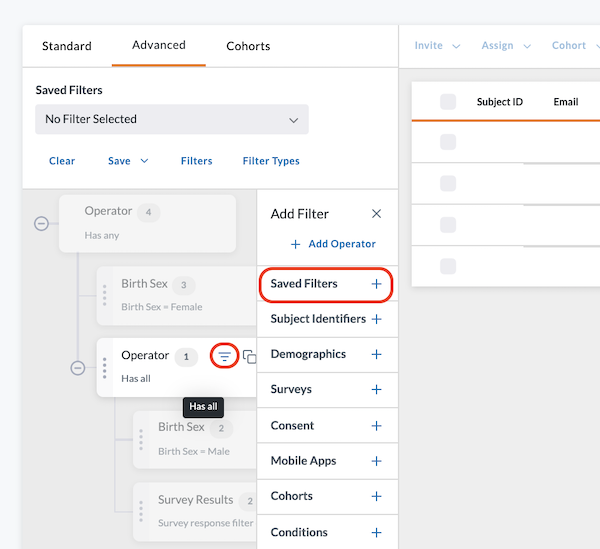
- In the window that opens, select the Saved Filter you wish to apply.
Users can see a view only list of Saved Filters by clicking the Filters button of the Filter Toolbar.
Delete Filter requires the Administer Layouts or Administer Projects permission. These permissions are not contained in the default Administrator privileges. To add these permissions, see Create a Custom Policy for Access Control.
Saving a Sub-Filter
You may also save a sub-filter, or a single node on the filter tree to use later. (For example, you may want to save the filter "subjects who answered 'yes' to 'Do you intermittent fast?'" for easy filtering.) Because this saved filter is not saved at the root (or Operator), it will not be available in the Saved Filters dropdown at the top of the screen.
To save a sub-filter or single node (any children nodes connected will also be saved):
- Navigate to the filter tree found in the Advanced tab.
- Click on the sub-filter or single node you wish to save.
- Click the Save dropdown above the filter tree.
- Select Save Selected Node and All Children (if any children nodes are connected, they also will be saved).
- Name this sub-filter and give it a description (optional).
- Click Save.
- Close the node window by clicking the "x".
Saved sub-filters or single nodes can be viewed from the Advanced tab by clicking on Filters within the Filter Toolbar.
To add saved sub-filters or single nodes to your filter tree:
- Hover your cursor on the Operator node
- Click the Add a Filter icon
- In the Add Filter window that opens, select the “+” beside Saved Filters and select the saved sub-filter from the list - remember, the saved subfilter is not accessible from the Saved Filters dropdown because it was not saved at the Operator level
Updating a Filter
To update an existing filter in the Advanced filter tab:
-
While in the Advanced tab, load a saved filter from the Saved Filter dropdown.
-
Within the filter tree, adjust, add, or delete filter parameters by using the following tools:
- Clone - Clicking this makes a copy of the filter chip and adds it to the tree.
- Delete - Clicking this removes the filter from the filter tree.
- Add Filter (available on Operator chips) - Allows you to add another Operator, a Saved Filter, or a new filter.
-
Click Save and give the filter a new name.
-
Delete an old filter by:
- Click on Filters.
- On the Configured Filters page, click the trash icon beside the filter you wish to delete.
Scoring Preview Example
Example #1: Building a Complex Filter
In the clip below we demonstrate how you can build a complex filter by beginning in the Standard tab, then switching to the Advanced tab to add complexity.
Below are the steps taken to achieve this:
- Begin in the Standard tab of Subjects
- Under Demographics, select subjects with the birth sex of female
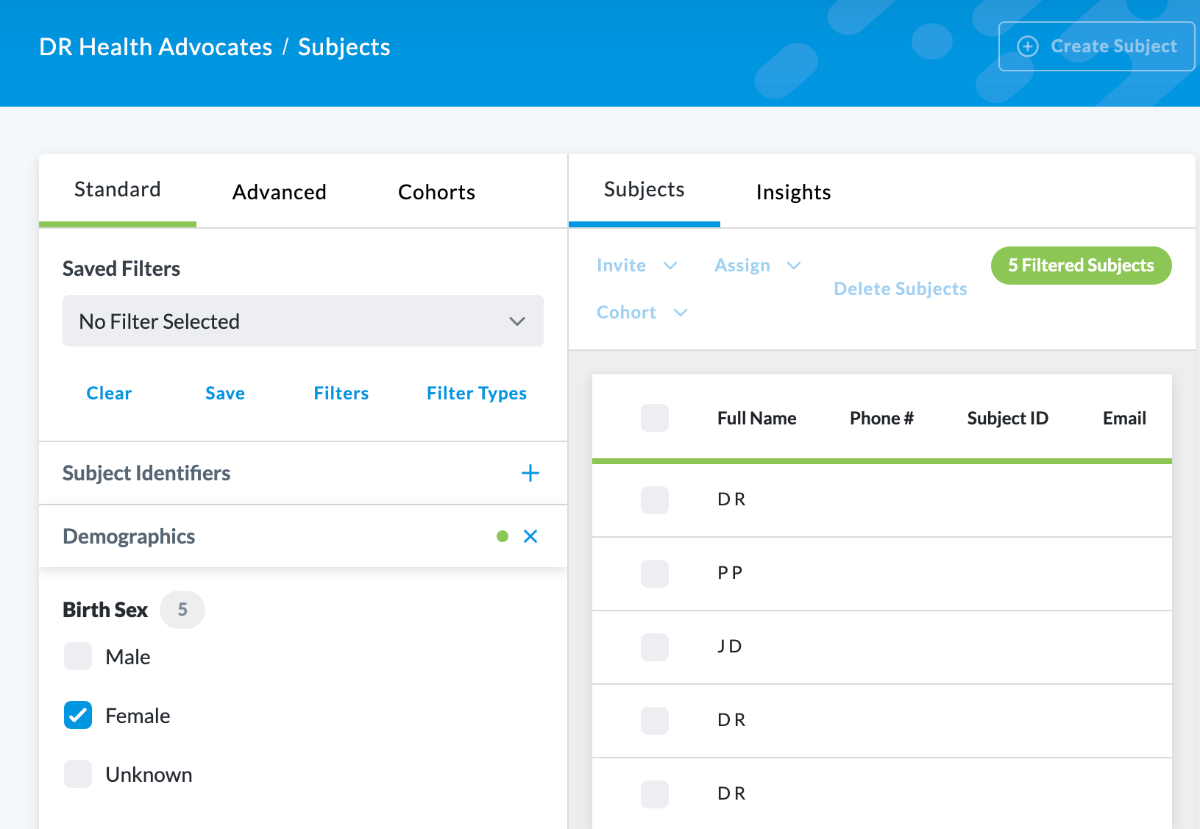
- Click on the Advanced tab to view the "filtering tree" on the left of the screen
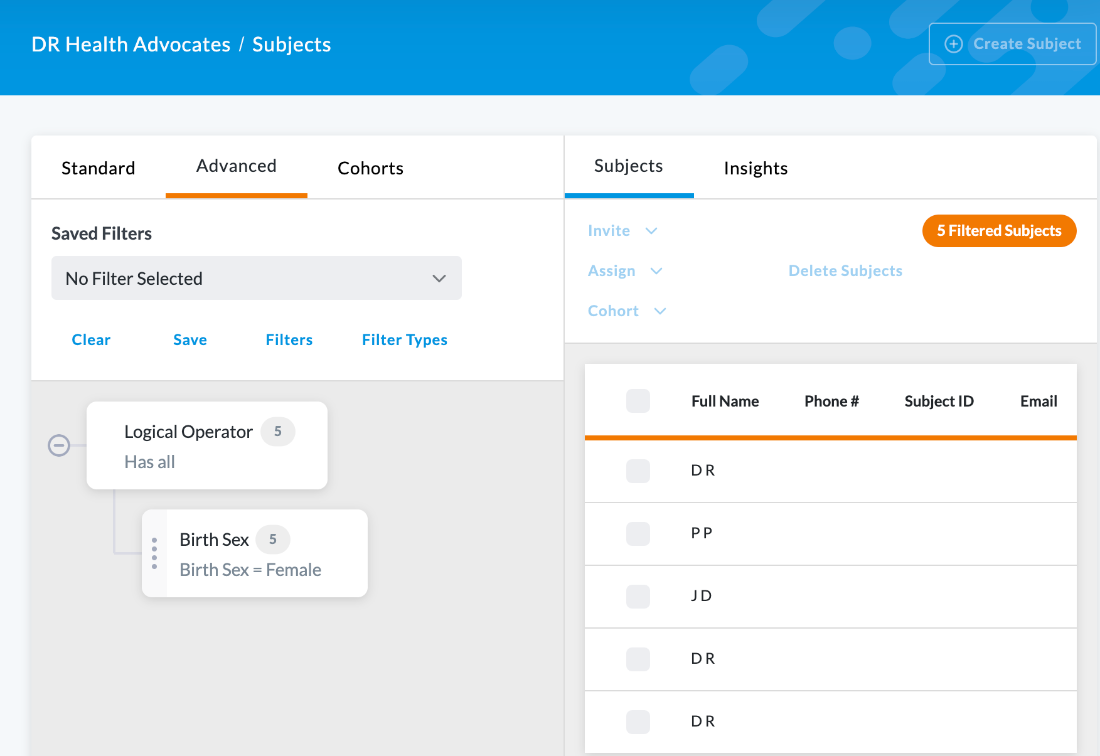
Note: It begins with the Operator or root, and shows our first branch, birth sex = female.
- Click on the Operator. This opens a window allowing you to add more filtering branches and options.
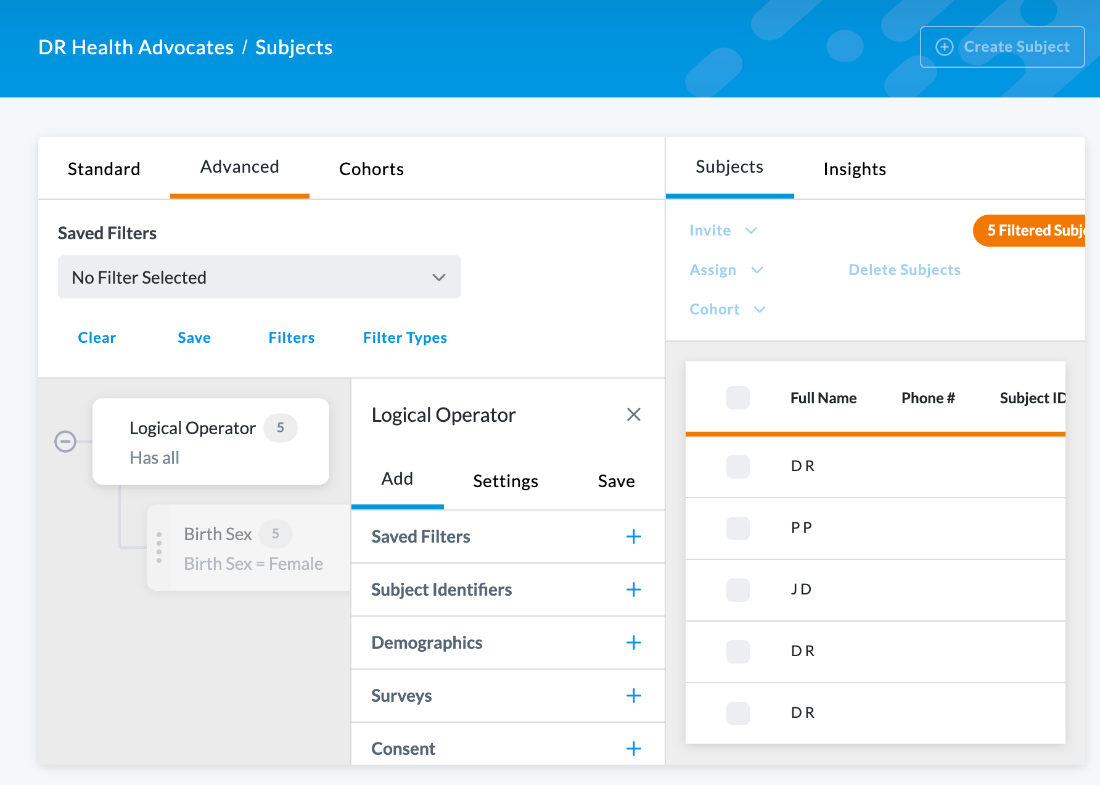
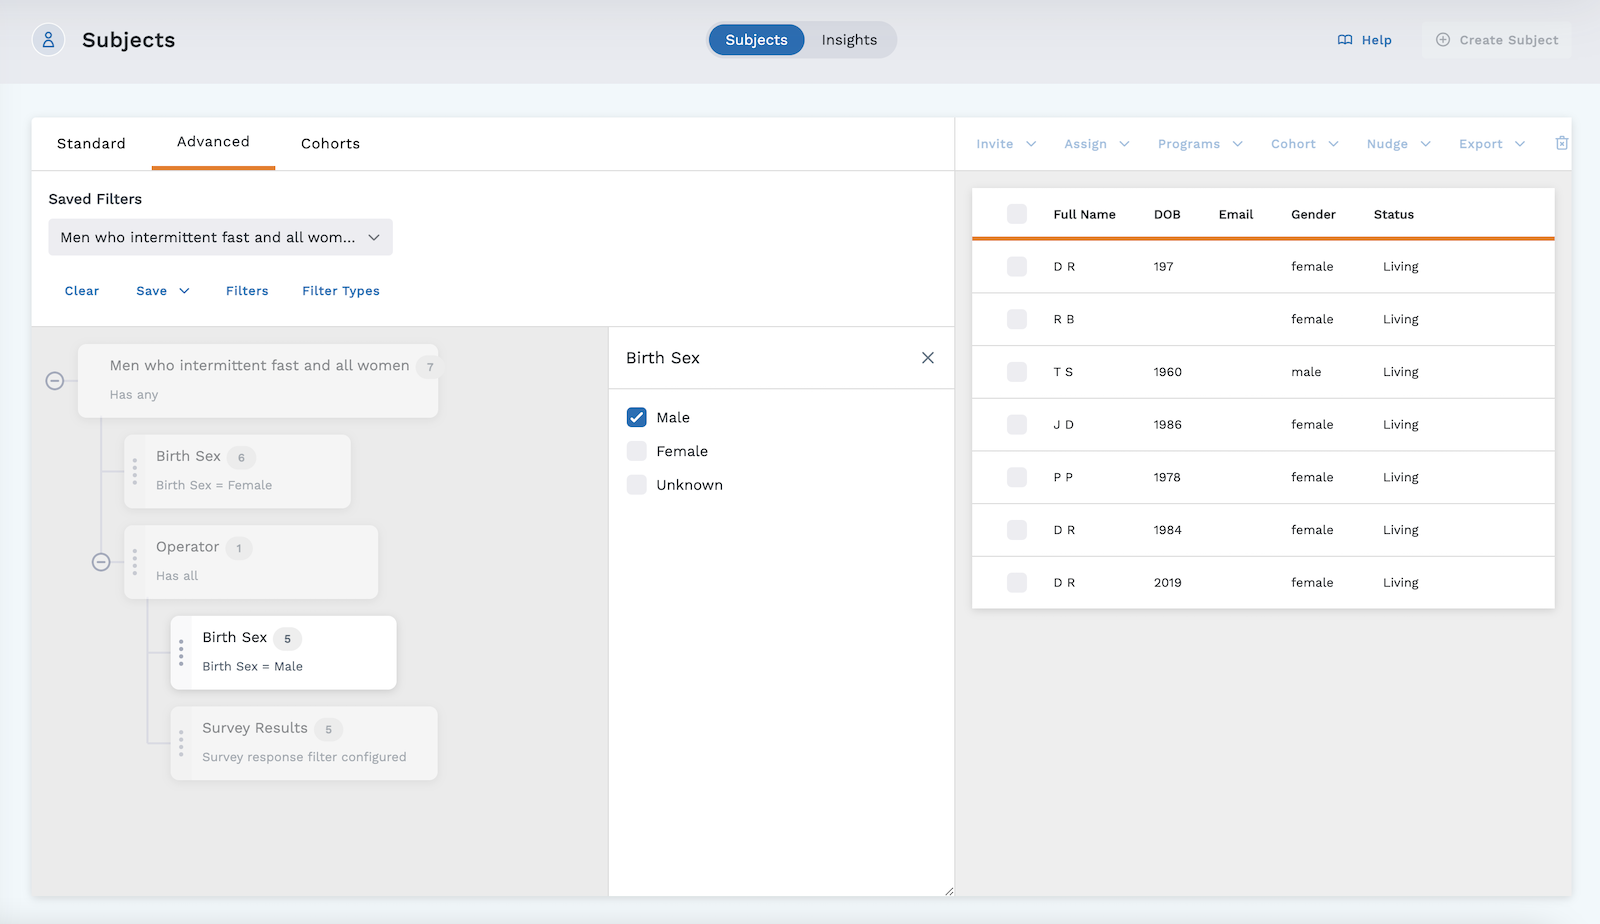
- Click on the "+" beside Demographics
- Select the "+" beside Birth Sex and select "unknown".
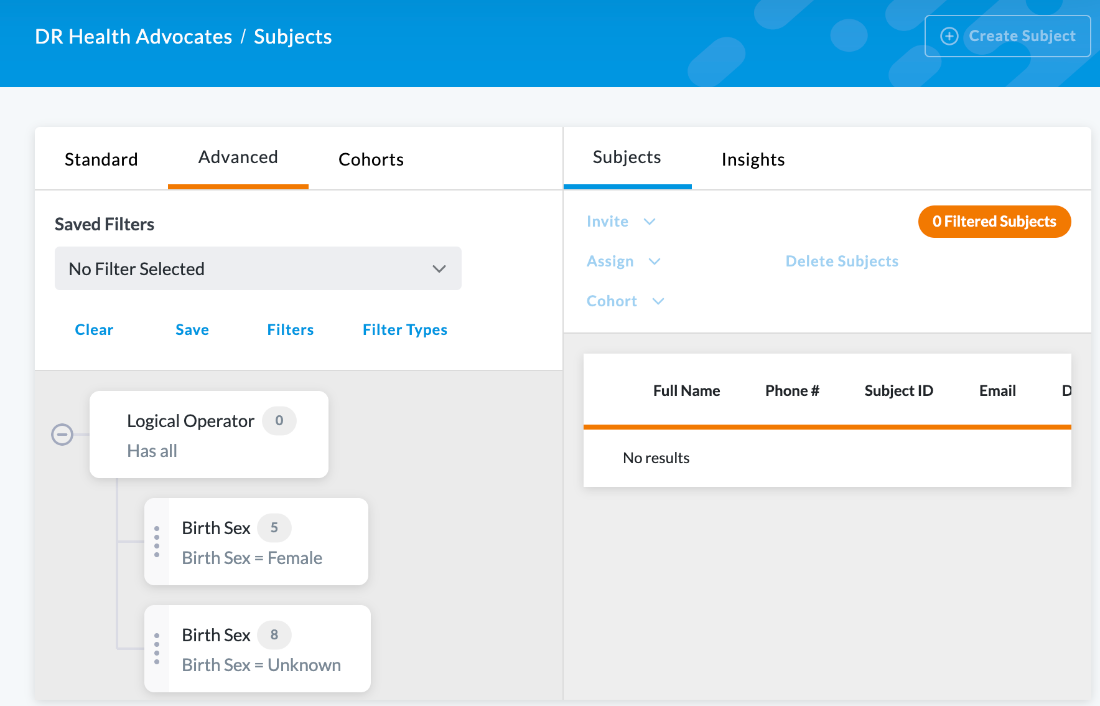
Note: Zero subjects match our filters. This is because the Operator is set to the default Standard setting of "Has all". This means any filtering branch coming off that Operator has to be met. And since someone cannot be born as both female and unknown, the filters are competing and we end up with zero subjects.
If you click back to the Standard tab, you’ll get the following message popup:
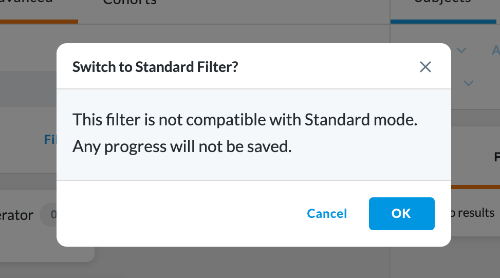
This is because Standard is for simple filters with non-competing criteria, and in our subject pool someone cannot have two different birth sex selections at the same time.
However, you can fix competing filters by:
- Removing one of the competing filters
- Adjusting the command of the Operator.
In this instance, we'll fix it using the Operator method:
- Click on the Advanced tab
- Click on the Operator node connected to the competing filters.
- In the window that opens, click on Settings
- Switch the command from "Subjects in EVERY sub-filter" to "Subjects in ANY sub-filter"
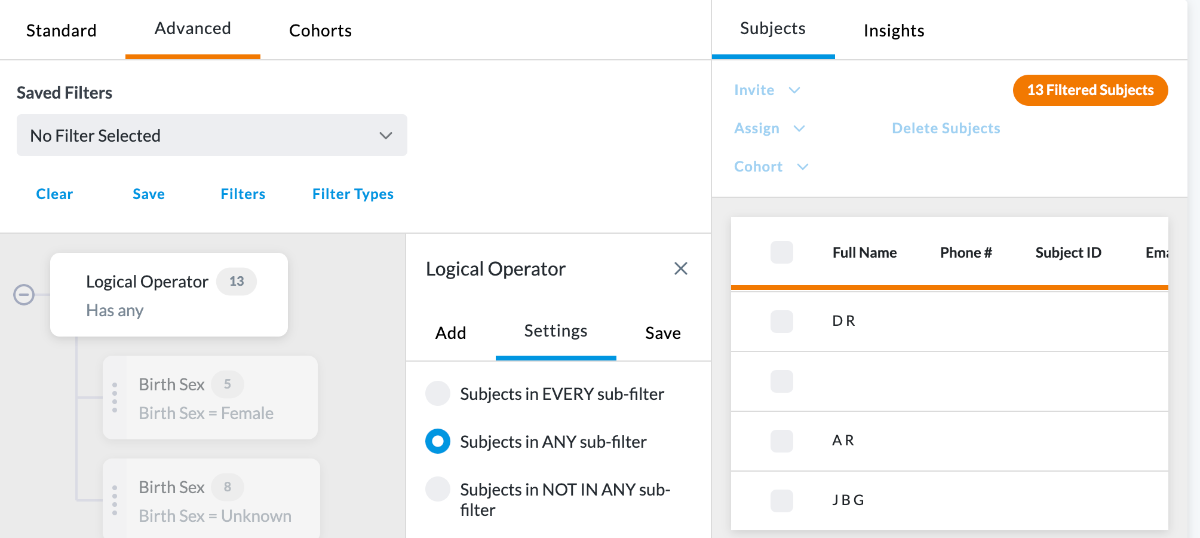
Note: The table on the right now shows all subjects (13) that match EITHER the female (5) or unknown birth sex (8) filter.
Example #2: Building a Complex Filter with Multiple Operators
Using multiple Operators allows you to have different settings (and/any/not) for each Operator and the filters branching from it, allowing you to fine tune your selection and craft a complex filter.
For this example, consider the following: An organization wants to send a follow-up survey to subjects who have consented to a project (and not revoked their consent), have received their lab results at least 30 days ago, and they have not received the "Participant Follow-up Survey".
Filter Tree setup:
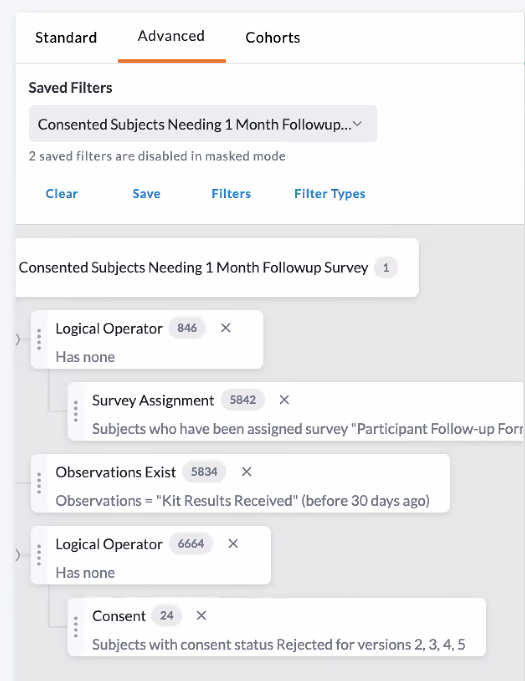
"Consent Subjects Needing 1 Month Followup Survey" Operator is set to "Has All" and will filter out subjects that meet the criteria of any attached filter. There are three branches coming off this Operator:
-
Operator "has none" - Setting "Subjects in NOT IN ANY sub-filter" because we want to see subjects who HAVE NOT received the follow-up survey
- Survey Assignment
- Subjects who have been assigned survey “Participant Follow-up Form”
- “All versions of survey?” checkbox is checked
-
Observations (filter settings for "HAVE received a kit results at least 30 days ago")
- Observations Exist – "Kit Results Received" – Toggle on “Filter by Date”
- “After Days Ago” - leave blank
- Check the “relative” checkbox
- “Before Days Ago” -input 30 in the box
- Check the “relative” checkbox
-
2nd Operator "has none" - Setting "Subjects in NOT IN ANY sub-filter"
- Consent (filter settings for "have NOT have had a consent with a 'rejected' status")
- In Consent settings, select 4 for “Consent Version” & select 4 for “Consent Minor Version"
- In "Consent Status," check the “Rejected” checkbox
- Consent (filter settings for "have NOT have had a consent with a 'rejected' status")