SFTP Data Transfer
You can add an SFTP user to the LifeOmic Platform. This allows the use of standard SFTP methods and tools to add files to a project.
Adding an SFTP user to the LifeOmic Platform is not the same as adding a LifeOmic Platform user. An SFTP user uses standard SFTP CLI commands or SFTP apps, such as Cyberduck or FileZilla, to upload files into the LifeOmic Platform. The SFTP user cannot access the LifeOmic Platform through the normal LifeOmic Platform app. The SFTP user receives the equivalent of an API key and write-only permissions.
SFTP access to the LifeOmic Platform is restricted to Write Access.
SFTP Data Transfer Roles
In many cases, the LifeOmic Platform admin may need to grant a third party access to upload SFTP files. If this is the case, the admin and the uploader each need to perform specific tasks to establish access. If the admin is creating SFTP access for themselves, the admin performs all the tasks.
Uploader Tasks
- Generate a Public/Private Key Pair
- Send the LifeOmic Platform admin your public key
- Transfer SFTP Files with the LifeOmic Platform username
LifeOmic Platform Admin Tasks
- Create an SFTP User in the LifeOmic Platform App
- Send the LifeOmic Platform username and server address to the uploader
Generate a Public/Private Key Pair
The SFTP service uses an SSH public key to authenticate an SFTP user. The uploader needs to generate the public/private key pair.
The following procedure gives the basic commands to generate these keys with OpenSSH. OpenSSH is installed on Windows, Mac, and Linux operating systems by default. If you need a more detailed procedure, search the web for OpenSSH and your particular operating system.
Note: The LifeOmic Platform requires that the keys are generated with RSA encryption.
- Open a terminal and enter the following:
$ ssh-keygen -t rsa
> Generating public/private rsa key pair.

> Enter file in which to save the key (/Users/dan/.ssh/id_rsa):
/Users/<username>/.ssh/<phc_key>
## Copy the default ssh file location from the displayed path and replace the default filename with a unique key name.

> Enter passphrase (empty for no passphrase):
## Press Enter for the no password option.

> Enter same passphrase again:
## Press Enter again to confirm the no password option.

>Your identification has been saved in /Users/dan/.ssh/phc_key
>Your public key has been saved in /Users/dan/.ssh/phc_key.pub
>....
## SSH also displays a key fingerprint and randomart image.

$ pbcopy < ~/.ssh/<phc_key>.pub
## This copies the public key to your clipboard.
-
If you are a third party, paste your public key in a message and send it to the LifeOmic Platform admin.
or
If you are the LifeOmic Platform admin, leave the public key in your clipboard to use in the next procedure.
If you are an uploader, wait until you receive your username from the admin before you complete the Transfer SFTP Files procedure.
Create an SFTP User in the LifeOmic Platform App
- On the left side menu, click Files and SFTP.
- Click the Add User button.
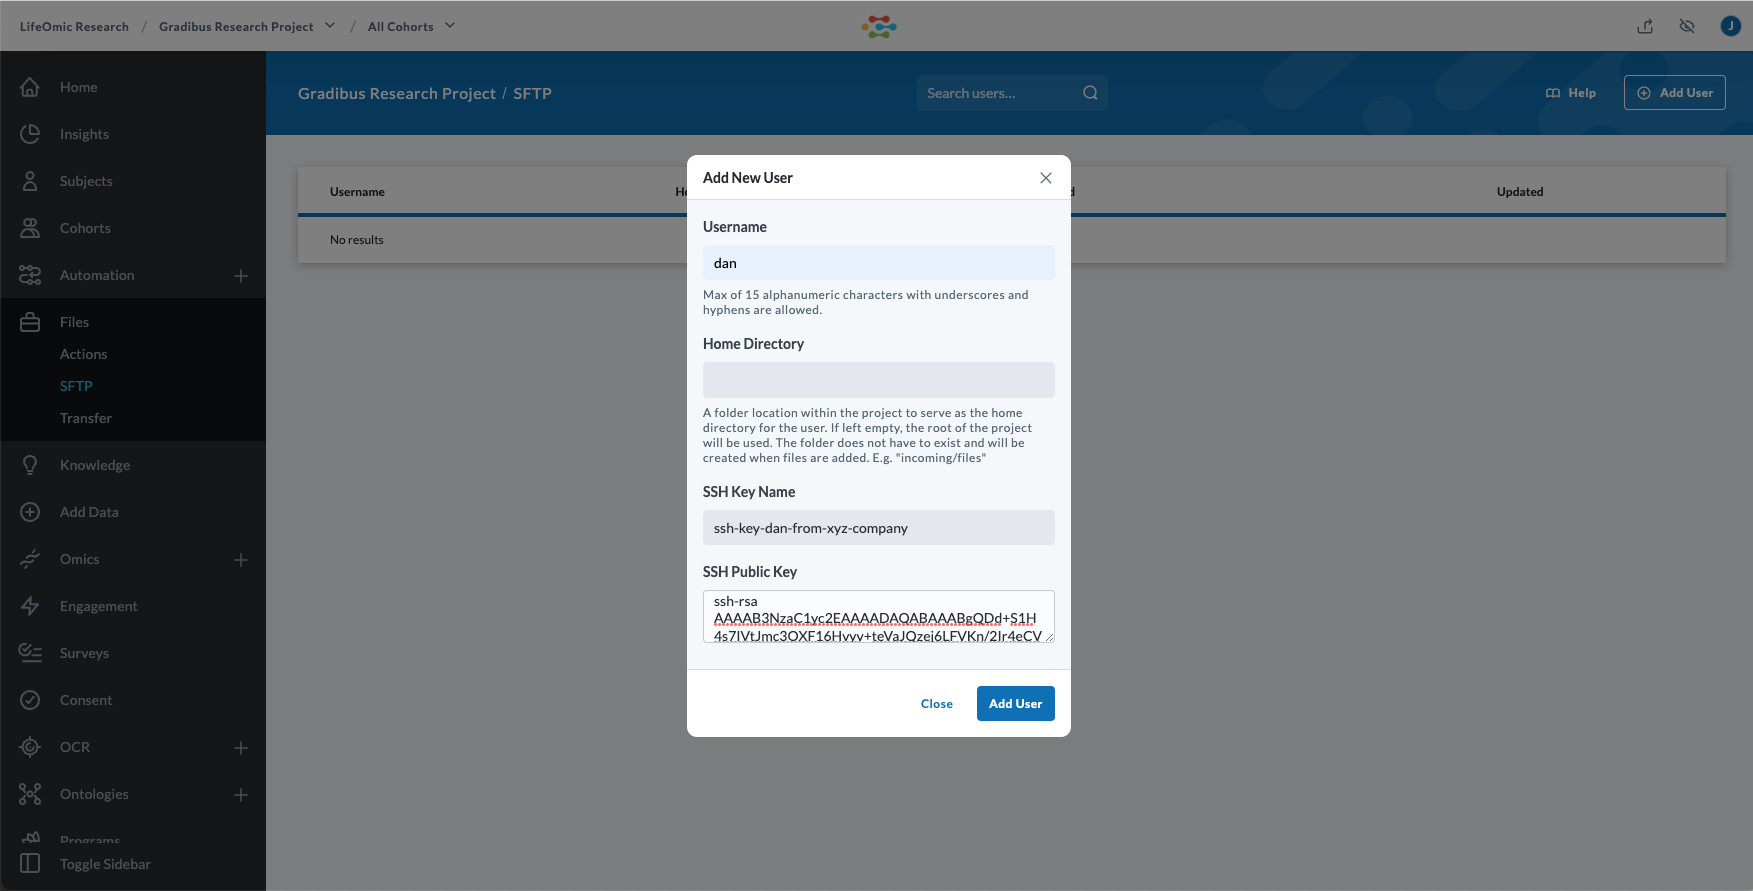 The Add New User dialog displays. Use the following information to fill in the fields:
| Field | Description |
|---|---|
| Username | This is the username that authenticates with the SFTP service. |
| Home Directory | (Optional) You may want to restrict where an SFTP user can add files within a project. You can do this by specifying a specific folder to use in the project as the user's home directory. The SFTP user will not be able to add files to any other location within the project. If left blank, the user can access the root level of project. |
| SSH Key Name | A user-friendly name to identify the key. |
| SSH Public Key | The public key portion of the public/private key pair. The LifeOmic Platform requires the RSA encryption option. RSA encrypted keys begin with ssh-rsa. |
- Click the Add User button on the dialog.
Transfer SFTP Files
The earlier procedures helped created the credentials needed to use SFTP. If you are working with a third-party uploader, you can send the credential table from Use SFTP Apps to Transfer the LifeOmic Platform Files. Copy and paste the table into the email or chat message you will send the uploader. Replace the generic username information with the <phc-account-id>_username you created in the LifeOmic Platform app.
The LifeOmic Platform account ID is automatically added as a prefix to the username value provided.
Use SFTP CLI commands to Transfer the LifeOmic Platform Files
After the user is added, click the added username on the SFTP page to display the SFTP Settings page. This includes the How to connect dialog dialog that gives the CLI command needed to connect and transmit files using the terminal. Once connected, you can transfer files into the project using standard SFTP commands.
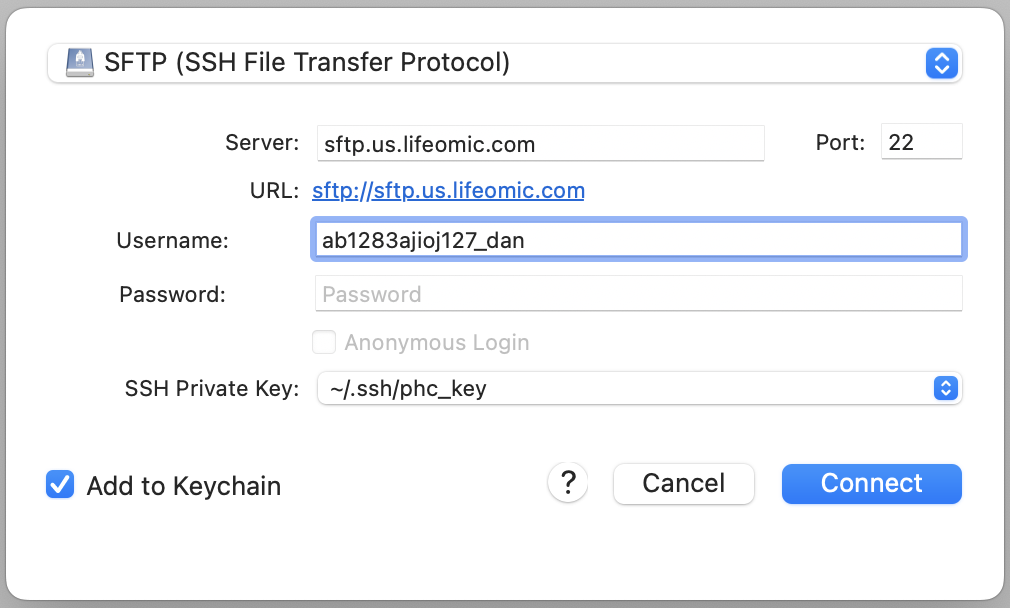
Use SFTP Apps to Transfer the LifeOmic Platform Files
The credentials needed to connect SFTP apps are described in the table below. You can also find these elements in the CLI command of the SFTP Settings page.
| Credential Type | Credential or Source |
|---|---|
| Protocol | SFTP |
| Server | sftp.us.lifeomic.com (If you are working in development, use sftp.dev.lifeomic.com. This is unusual.) |
| Username | <phc-account-id>_ plus the username entered in the Add User dialog. (Example, ab1283ajioj127_dan) |
| Password | Leave blank if you did not use a password to generate the SSH key pair. |
| SSH Private Key | Navigate to the private key file you created or enter the directory path and filename. (Example, ~/.ssh/phc_key) |
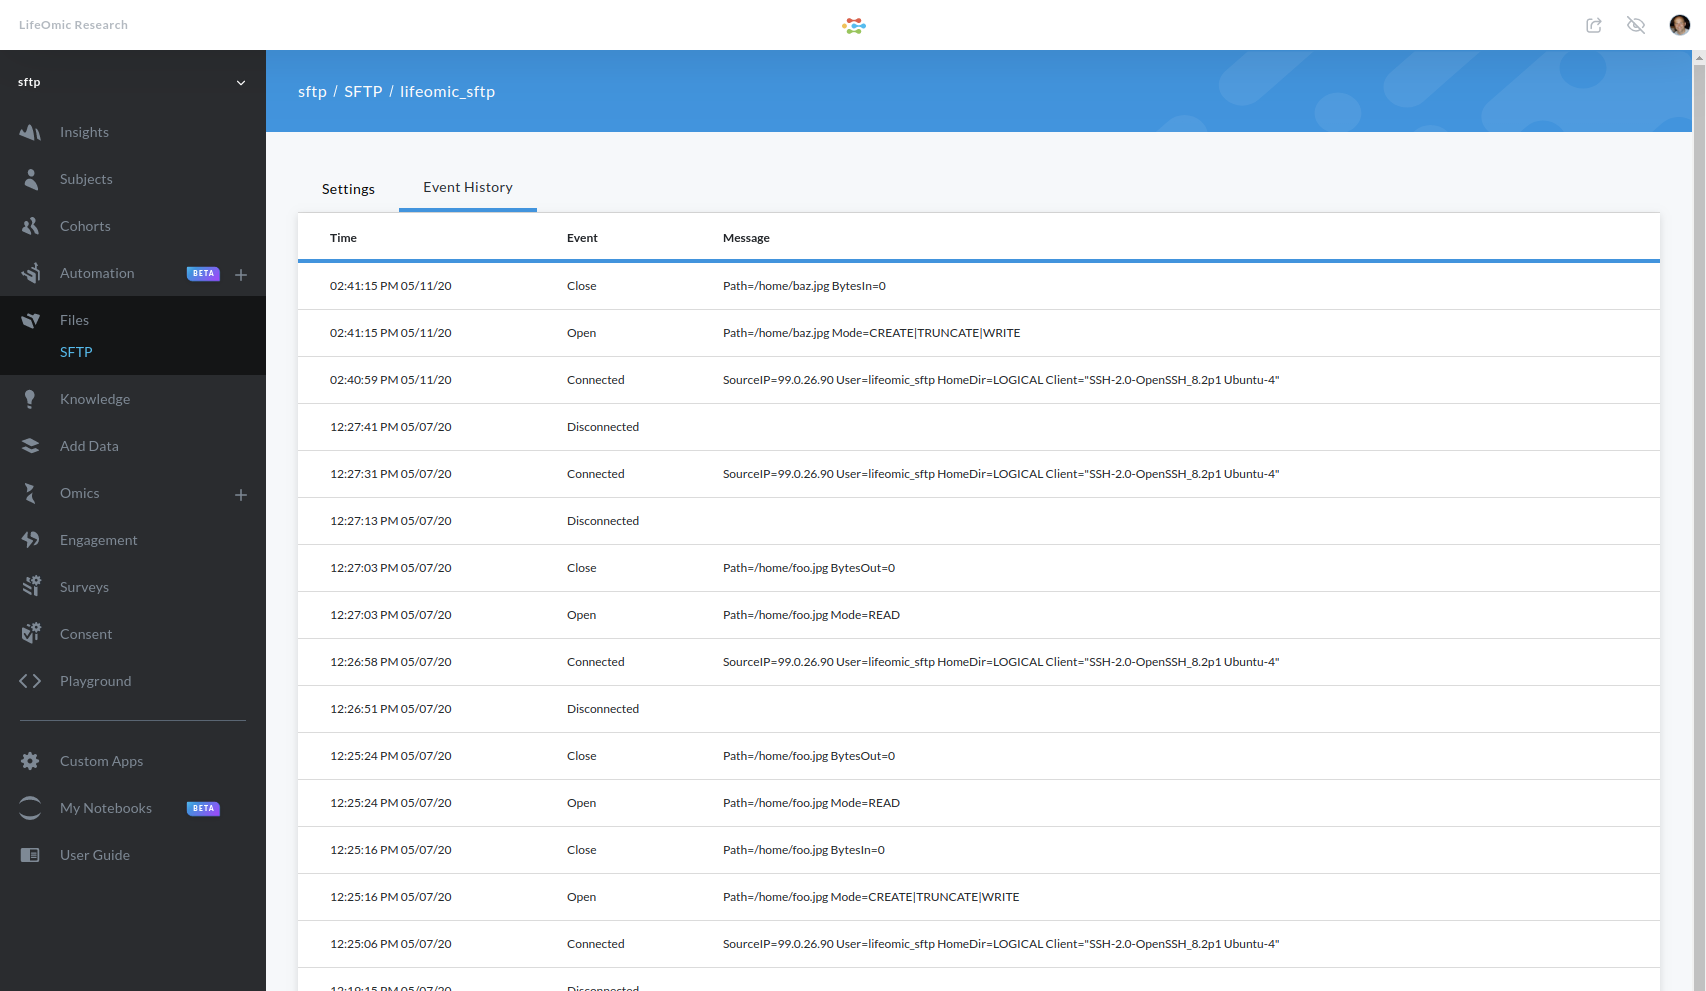
Audit Access and Event History
You can review SFTP access event history from the LifeOmic Platform app.
- On the left side menu, click Files and SFTP.
- Under Username, click on a user to display the SFTP User details view.
- From the SFTP User
details view, click on the Event History tab. This tab shows a listing of
events for the SFTP user. This includes events for when the user connected,
which files were added, and when they disconnected.
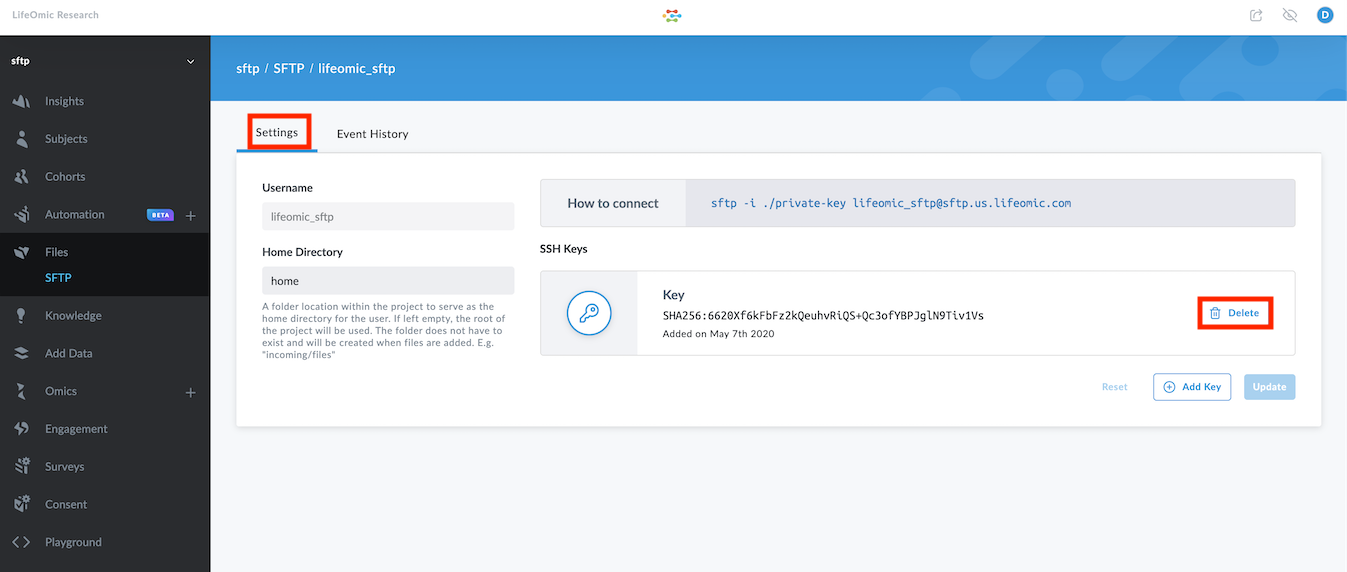
Delete SSH Keys
A single SFTP user can have up to five SSH keys registered at one time.
For security, we recommend that you rotate your SSH keys. A time interval of three months is a common rotation period.
If you think that a user's private key has been compromised, you can remove it from the list of keys on the SFTP User details view. Once removed, that private key can no longer be used to access the SFTP service.
- Under Username, click on a user to display the SFTP User details view.
- Click the Settings tab.
- Under SSH Keys, click Delete next to the specific key.